1/10 Scale Stuka 87-D, But not really. (1 Viewer)

Ad: This forum contains affiliate links to products on Amazon and eBay. More information in Terms and rules

Blacklist

Airman 1st Class
221
29
Apr 17, 2015
Florida
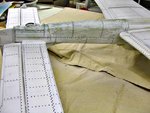
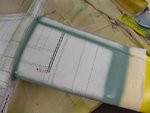
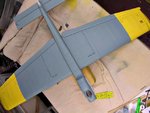
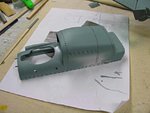
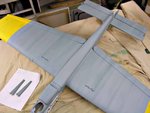
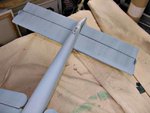
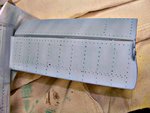
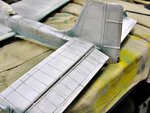
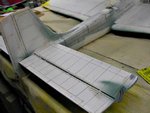
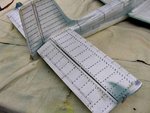
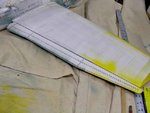
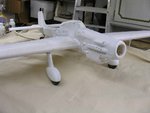
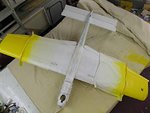
Well, I'm back with the 1/10 scale Stuka Tank Buster. I've already progressed with this scratch built balsa wood model.
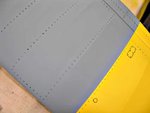
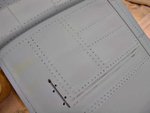
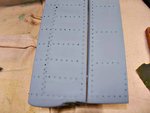
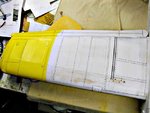
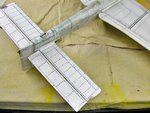
These photos will bring the build up to date. Or close.
More photos to follow!

Blacklist
 

Attachments

  • DSCN9236.jpg
    DSCN9236.jpg
    71.4 KB · Views: 314
  • DSCN9820.jpg
    DSCN9820.jpg
    44.5 KB · Views: 316
  • DSCN9824.jpg
    DSCN9824.jpg
    61 KB · Views: 311
  • DSCN9827.jpg
    DSCN9827.jpg
    55.5 KB · Views: 288
Gentlemen,

Thank you for the kind hello, it's good to be back.

Nothing exciting on the Tank Buster. The fuselage outline is really close to scale, but the wing is designed with les tip taper for an increase in area. I'll get better performance.

More photos of the underside.

Blacklist
 

Attachments

  • DSCN9828.jpg
    DSCN9828.jpg
    56.5 KB · Views: 256
  • DSCN9862.jpg
    DSCN9862.jpg
    40.7 KB · Views: 274
  • DSCN9864.jpg
    DSCN9864.jpg
    41.5 KB · Views: 260
  • DSCN9865.jpg
    DSCN9865.jpg
    33.5 KB · Views: 277
  • DSCN9866.jpg
    DSCN9866.jpg
    40 KB · Views: 257
  • DSCN9868.jpg
    DSCN9868.jpg
    42 KB · Views: 256
Werger,

Thank you.

I think this Stuka may be the Ju 87 G-2, not sure about that?

But the scheme I'm using is the airctaft with this rudder number. 494193, flown by Hans Uldrich Rudel.

I could use a bit of help with the top colors.

These following colors would be what color part number for Tamiya brand acrylic paint?

RLM71 Dark Green and RLM 70 Black Green.

Thanks in advance.

Blacklist
 

Attachments

  • DSCN9869.jpg
    DSCN9869.jpg
    30.9 KB · Views: 263
  • DSCN9871.jpg
    DSCN9871.jpg
    32.4 KB · Views: 273
  • DSCN9872.jpg
    DSCN9872.jpg
    37.3 KB · Views: 256
  • DSCN9887.jpg
    DSCN9887.jpg
    45.3 KB · Views: 261
You may use :

For tops ...
RLM70 - FS34050 or FS34052 - Tamiya XF27 or XF27:4 + XF2:1
RLM71 - FS34079 or FS34083 - Tamiya XF61 or XF62:1 + XF49:1

For undersides ...
RLM65 - FS 35414 or FS35352 - Tamiya XF23:1 + XF2:1

RLM70/71/65 ...

RLM70_71_65.jpg
 
Wurger,

Thank you for the quick reply.

Bad news, bad news, and luke news.

The bad news is, I already painted the underside with the XF23.
The bad news is, I already painted the XF23 with a layer or two of matt varnish.

Man, I really don't want to paint that underside again?

Tomorrow, I will order the colors I need.

Then, I'll be good to go with the top side.

Well, after I apply a few thousand rivets.

Thanks again Wurger.

Blacklist
 

Attachments

  • DSCN9883.jpg
    DSCN9883.jpg
    28.5 KB · Views: 249
  • DSCN9884.jpg
    DSCN9884.jpg
    30.6 KB · Views: 264
  • DSCN9885.jpg
    DSCN9885.jpg
    36 KB · Views: 273
  • DSCN9886.jpg
    DSCN9886.jpg
    40.2 KB · Views: 253
I think the XF23 straight from the bottle can be as well. So you may stay with the colour on undersides.
 
I think the XF23 straight from the bottle can be as well. So you may stay with the colour on undersides.

Wurger,

Yes, but that FX23 reduced one to one, that 50%! It would be a much different color.

I do have to wait a few days to get the top side paint. I might consider doing it.

Wurger, if you noticed a mistake you made on one of your models with the incorrect color, would you take the time and effort to correct it?

Bkacklist
 
In my opinion the difference between the XF 23 straight from the bottle and the mixture of XF23:1 + XF2:1 is its lighter tinge. The XF2 is just the white colour that can do that. But a such light blue colour can become darker because of the weather, dirt etc... So no problemo methinks.

To answer your question .... I always try to find out as much as possible on colours for a particular plane and its camo scheme. It allows me to avoid a such mistake you asked about. Just the rush is needed for catching of cooties only. Of course if it is possible I can take the time and efford to correct a wrong colour. But it all depends on a model type and the stage of working on that . Removing paints from a plastic model is easier than form the kind of models you make. Especially you have to keep the control over the model weight. Therefore I would leave it as it is.
 
Wurger,

I fixed that incorrect color this morning. Didn't take 8 minutes. Took longer for the mix and the clean up.

Took advantage of the lighter color, now I have lights and darks. The semi-gloss will bring them out a bit more.

I did sand the tops of the rivets on the stab to bring bacl the darker color plus the color of the rivet.

Sanding the rest will take a good hour.

Wurger, thanks for your help.

I feel better with the change even though the model isn't true scale.

Blacklist
 

Attachments

  • DSCN9888.jpg
    DSCN9888.jpg
    44.3 KB · Views: 250
  • DSCN9889.jpg
    DSCN9889.jpg
    38.2 KB · Views: 250
  • DSCN9890.jpg
    DSCN9890.jpg
    41.1 KB · Views: 266
  • DSCN9891.jpg
    DSCN9891.jpg
    44.9 KB · Views: 245
Wurger,

Thank you.

I couldn't leave it with the darker color. Actually fixed it way before your Post.

Sanded the rivet tops with 360 to bring out the darker shade. I like it better this way. Started to lay out the top side rivet lines.

I'm getting a bit better at this. If I can find some time in the next day or so to work on the model, this will go quick.

Thanks for the reply.

Blacklist
 

Attachments

  • DSCN9892.jpg
    DSCN9892.jpg
    57.8 KB · Views: 245
  • DSCN9893.jpg
    DSCN9893.jpg
    56.1 KB · Views: 253
Gentlemen,

Thank you for the kind remarks.

I spent some time today laying out the rivit detail and applying rivets on the flaps and tail areas.

Probably won't get to the wing tops till Saturday.

Blacklist
 

Attachments

  • DSCN9893.jpg
    DSCN9893.jpg
    46.7 KB · Views: 255
  • DSCN9895.jpg
    DSCN9895.jpg
    55.5 KB · Views: 254
  • DSCN9896.jpg
    DSCN9896.jpg
    42.7 KB · Views: 238

Users who are viewing this thread

Back