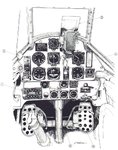
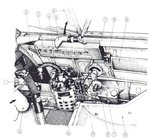
With the group build happening and Wojtek bird going on I was getting alittle ancy to start something.I have had this Bandai kit for quite awhile now and thought I would give it a go.The area I am having problems with is the finding enough pics of the sidewall esp. the left side so any pics would be a help.As I mentioned in another thread the seat is ALL WRONG so it's fix this one or build another.The front glass had two frames on the sides I had to cut out,sand and polish.The frames were way out of scale for what really looks like a wire with a mount at top and bottom.I really like Wojteks work on the wheel wells so might incorporate those ideas here.I will get some pics up later but any pics of the pit and wheel wheels would be apprecaited.Cheers
Navigation
Install the app
How to install the app on iOS
Follow along with the video below to see how to install our site as a web app on your home screen.
Note: This feature may not be available in some browsers.
More options
You are using an out of date browser. It may not display this or other websites correctly.
You should upgrade or use an alternative browser.
You should upgrade or use an alternative browser.
1/24 ME 109 E-4
- Thread starter javlin
- Start date
Ad: This forum contains affiliate links to products on Amazon and eBay. More information in Terms and rules
More options
Who Replied?Tony Hill
Tech Sergeant
Looking forward to watching your progress,
- Thread starter
- #4
That will work Wojek and much larger than what is in my squadron book for sure.I take it is a good rendition always kinda leary of drawings some but I know from pics I have of the R/side it matched the drawing pretty well.In using that pic some of the levers that Bandai had are really fictitious and out of scale.The fuse and wings look pretty good but the tailwheel  and I started the seat not to bad.I will have to start another one for the angle not quite right but the idea is working thus far.Thanks there Wojtek
 ")
lesofprimus
Brigadier General
Hey Kev, u doin this with all of us for the BoB Build???
Lookin forward to it... If it comes out anything like ur 1/24 Zero did, look out...
Lookin forward to it... If it comes out anything like ur 1/24 Zero did, look out...
- Thread starter
- #6
I don't Dan it's going to take awhile. I have a really small motor I was playing with tonight that will fit in the engine.What's nice is the radio compartent is open by Bandai and thinking of using it for the potentiometer setup.I could do like Wayne and NEVER finish a GB( the master at work )If it's okay can I answer next week?I start my vacation this Sunday and hopefully it will last two weeks.Cheers
finish a GB( the master at work )If it's okay can I answer next week?I start my vacation this Sunday and hopefully it will last two weeks.CheersAirframes
Benevolens Magister
Sounds interesting Kevin. I've heard of, but never seen, the old Bandai kit, so I'll be watching this one.
BTW, the drawings Wojtek posted are spot on. I've got some rather good photos of the E4 cockpit, but I've been asked not to publish them anywhere, but the drawings match perfectly.
BTW, the drawings Wojtek posted are spot on. I've got some rather good photos of the E4 cockpit, but I've been asked not to publish them anywhere, but the drawings match perfectly.
vikingBerserker
Lieutenant General
Great info!
hawkeye2an
Staff Sergeant
I wanna see some plastic !!!!!
- Thread starter
- #11

- Thread starter
- #13
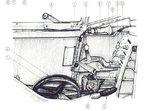
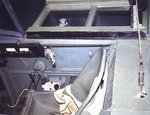
I was thinking the same thing about those buldges myself Wojtek and just getting rid of them all together.Does it look the same moulds as the Airfix?See how square that seat is jeezz! it's stuff liike that is going to extend the build outside of the BOB build's time frame I think.
Oh yes..my first thought was sprues are similar to the Airfix ones. However there are differences. The pilot's seat of Airfix isn't square.Comparing to drawings and pics of the part it looks nice.But it seems that the chair is a little bit too narrow...
Also underwing radiators are made separately. Of course I can see more differences here but these are positive in meaning for your kit
Also underwing radiators are made separately. Of course I can see more differences here but these are positive in meaning for your kit
- Thread starter
- #15
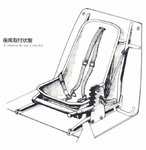
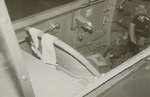
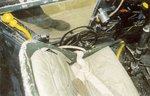
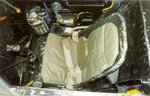
Alright Wojtek or others with info I have made might a seat for the most part higher then the boxed one with a taper.The seat pokes out above the fuse though by maybe 6" scale like on Lt. Hubert Kroeck #1 Top Hat Bird (Squadron in action #44) but upon looking for others I really do not notice them protruding out the fuse.The thing is that the picture of the seat shows it longer w/taper(artist pic) not the short box seat like the G models.Help
Airframes
Benevolens Magister
Thanks for the pic Kevin. Overall, it looks quite interesting, but as Wojtek pointed out, you're going to have some work to do on those cannon blisters. Also, the top wing access panel is the wrong size and shape, as are the wing panel lines, and the radiators look too long and narrow.Nothing which can't be corrected though.
I'm wondering if they've based the cockpit on the 'G' model ? You'd need to check the other parts, particularly the instrument panel, to find out. I guess you'll have to build a basic seat, then contour it with Milliput or similar. I have to do the same on the 1/32nd scale Hasegawa kit, as there's no way I'm paying for a full cockpit set just to get the seat ! I can scratch the rest, so I'll make a seat too !
I'm wondering if they've based the cockpit on the 'G' model ? You'd need to check the other parts, particularly the instrument panel, to find out. I guess you'll have to build a basic seat, then contour it with Milliput or similar. I have to do the same on the 1/32nd scale Hasegawa kit, as there's no way I'm paying for a full cockpit set just to get the seat ! I can scratch the rest, so I'll make a seat too !
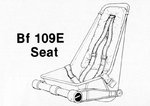
Concerning the pilot seat.... here you are a few shots I have found in a few book about Bf109E series. I'm sure you have seen a few of them as well.Also I include two sketches of the chair. As you can notice the seat is quite oval at its all edges. In the B&W pic of the Swiss Bf109E the seat is protruding a little above the rear edge of the fuselage "shelf" right?. In the pic of the Bf109E of Deutsches Museum it is not protruding at all. Am I right?.....But I would like to pay your attention to the fact that the chair was adjustable. It means that it could be adjust to any pilot's height. Because of that the seat could be moved up or down as it was slided going along two "channels". It can be seen in the pic titled "Bf109E3 seat deutsches Museum2" ( the third pic )
Because fighter pilots weren't too tall guys mostly the chair was set at the middle position with the top edge being at the level of the cockpit edges or slightly down.
I agree with Terry the seat has to be scratch-built. But I would suggest making the wooden ( balza for quicker making) former. Then warm up a sheet of styrene and stretch it onto the former and cut out the part you need when the styrend is stiff. The edge of the part you can finish with brassy wire to get the nice finish of the chair.
Attachments
-
 Bf109E3 seat drawings1.jpg86.5 KB · Views: 227
 -
 Bf109E3 seat Swiss.jpg66.5 KB · Views: 217
 -
 Bf109E3 seat deutsches Museum2.jpg85.3 KB · Views: 203
 -
 Bf109E3 seat deutsches Museum1.jpg91.7 KB · Views: 211
 -
 Bf109E3 seat Deutsches Museum .jpg89.5 KB · Views: 219
 -
 Bf109E3 seat drawings2.jpg52.4 KB · Views: 208
T Bolt
Colonel
Best thing to do with the cannon bulge might be to eliminate it all together and make a 109E-1
lesofprimus
Brigadier General
Nice idea, but then he's gonna have to re-srcibe alot of panel lines to convert....
Those bulges are way outta scale, jeez.... Kind of a huge f'up for such an $$$ kit, even back in the day...
Those bulges are way outta scale, jeez.... Kind of a huge f'up for such an $$$ kit, even back in the day...
T Bolt
Colonel
Nice idea, but then he's gonna have to re-srcibe alot of panel lines to convert....
Those bulges are way outta scale, jeez.... Kind of a huge f'up for such an $$$ kit, even back in the day...
Not too bad Dan. I just did it for my E-1 in the group build. A new access panel on the bottom of each wing and some lined filled in on the top. Of course it all depends on the scheme to be used in the end if an E-1 will work.
Users who are viewing this thread
Total: 1 (members: 0, guests: 1)