1/48 Airfix Hawker Hurricane Mk1

Ad: This forum contains affiliate links to products on Amazon and eBay. More information in Terms and rules

tigerdriver

Staff Sergeant
791
1
Sep 20, 2010
Norwich UK
www.seloc.org
Ok chaps be kind, this is my 2nd build in about 25 years and my first go at one of these threads.

The objective of the build is just to get the thing together looking vaguely like a WW2 era piston engine fighter and to start to work on getting a few build skills .

As a result it will obviously be OOB and I am more worried about learning and solving problems than the finished result. To use the dreadful reality tv saying du jour, its all about the journey.

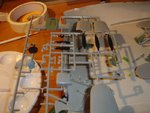
I am using mostly tamiya acyrlics for the colouring in bits. I have just bought a cheap beginners airbrush for ebay so i will see how i get on painting some bits of card with that then decide whether to spray or hairy stick this one .

Other concerns are the decals which look a bit rubbish , and rather "vague" quality of the detail on some of the mouldings. I have to say the "build quality" of the tamiya kit i just threw together a couple of weeks ago looks better.


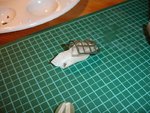
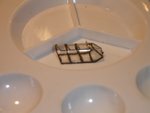
First drama was the canopy. I had a go at masking with fine strips but to be honest i was all over the place, so i got very frustrated and had a go at hand painting it . Its not a great moulding and the frame lines dont have much definition which didnt help my cause with either masking or hand painting given my lack of skills


It will need another coat then I will tidy up with a cocktail stick dipped in thinners ...
 

Attachments

  • DSC01065.JPG
    DSC01065.JPG
    22.1 KB · Views: 282
next job was to do some basic colour on some the the interior and or some fiddly bits ...

They can have a second coat and or some detail work next time
 

Attachments

  • DSC01062.JPG
    DSC01062.JPG
    66.9 KB · Views: 275
I've hand-painted some canopies myself because I find the whole masking process tedious and boring. What I do is use a small flat-edged brush, dip it in thinner, wipe it off, then rub it on the windows close to the frames to clean up the excess paint. Once the paint is thinned I dab it up with a paper towel.
 
Not too bad so far. This is an old kit, dating back to the late 1970s, so some of the surface detail has possibly suffered a bit. That said, my example was not bad, and the new decal sheet is fine.
For masking the canopy, you'll find that ordinary masking tape, or 'Sellotape' is not up to the job. Get yourself some Tamiya Masking Tape, available in various widths (I use 10mm), either in a dispenser, or as a refill at about half the price (around £1.99 for a 10mm refill). This will allow a good, clean edge, and can be re-positioned if needed. On a Hurricane canopy, I would mask each vertical 'pane' first, then the horizontal frame, and cut the tape when in position, using a new blade in the scalpel.
Maybe next time around.
Have a look at my Hurricane thread in the BoB GB, - it's the same kit, so might give yoiu some guidance.
 
This was my first 1/48 kit. It's generally ok - on the one I built the fit between fuselage and wings was very tight and needed quite a bit of sanding. Otherwise it comes out very well, and is a good little kit for the price.
 
Forgot that - the wing/fuselage joint is tight, and will need a bit of sanding. Also, the cockpit bulkhead needs setting at the correct angle, to mate with the rear cockpit fuselage at the top. test fit until you know it's right !
 
thanks guys

Terry i picked up some 6mm tamiya tape in town at the weekend, and did try that.

I just couldnt seem to get a good "edge" to get the scalpel blade to follow ...

one to practice :cry:
 
Yep, just a bit of practice, and a sharp blade! I normally try to align one edge as close as possible, then carefully trim along the raised or engraved detail. If you use a sharp-pointed pencil, and run it along the frame lines, this will help, but you must ensure that the tape is stuck down firmly, and burnished into place, especially along the edges. Run the back of a fingernail along it to do this, or the blunt end of a pair of tweezers, paint brush etc.
 
Yep, just a bit of practice, and a sharp blade! I normally try to align one edge as close as possible, then carefully trim along the raised or engraved detail. If you use a sharp-pointed pencil, and run it along the frame lines, this will help, but you must ensure that the tape is stuck down firmly, and burnished into place, especially along the edges. Run the back of a fingernail along it to do this, or the blunt end of a pair of tweezers, paint brush etc.

aha i didnt think of running a pencil round before i tried to cut, genius,
 
Looks good TD. Masking is a tough job and the Hurricane canopy is yet more of a challenge than some. The hand paint job you did looks retty darned good if you asked me.

One other way I like to get excess paint off glazed parts is to rub it off with an ordinary toothpick. No mess, no fuss and should work with acrylics, although they may be prone to chipping aay from areas you wanted to leave painted.
 
ok next thrilling episode


tidied up the canopy a bit and coloured in the mirror

doesnt look so bad for freehand


then had a bit of fun doing some detail on the little bit of cockpit there is

disaster no one, the column was broken before i even had a chance to break it off
 

Attachments

  • DSC01073.JPG
    DSC01073.JPG
    83.8 KB · Views: 273
  • DSC01075.JPG
    DSC01075.JPG
    57 KB · Views: 276
  • DSC01077.JPG
    DSC01077.JPG
    76.2 KB · Views: 245
A nice work so far. But the pilot's panel should have been black painted as memo serves.
 

Attachments

  • Hurri panel1.jpg
    Hurri panel1.jpg
    113.7 KB · Views: 261
Practice is practice. But following rules is a good way. Sometimes...:lol: Of course I don't say the indicator panel is made by you wrongly. It is like it is. But it is a process of gathering of the experience. I hope you will be remember that you have to check how a panel was painted in reality before you start painting of the part for the next model..
 
I see.

Also I would like to show you something about these seat belts. Of course there are different ways of making them including these PE parts.But you can make them yourself in an easy way. I don't say these you had made, aren't bad. You used one of ways for making them. However there are better materials for a such things. It is aluminium foil you can find almost everywhere, for example - tops of joghurt boxes and some brassy wire. The foil can be cut and shaped very easy. Of course the thickness of the foil should be correct for a model scale. Please look at these pics below. I'm sure you can grasp the idea with no problem.
 

Attachments

  • pasy2.jpg
    pasy2.jpg
    75.3 KB · Views: 254
  • pasy1c.jpg
    pasy1c.jpg
    95.5 KB · Views: 222
  • pasy1b.jpg
    pasy1b.jpg
    107.9 KB · Views: 215
  • pasy1a.jpg
    pasy1a.jpg
    111.9 KB · Views: 206
  • pasy1.jpg
    pasy1.jpg
    122.1 KB · Views: 225
  • pasy2a.jpg
    pasy2a.jpg
    88.2 KB · Views: 216
crikey thats awesome


get the idea with the foil for sure

i fear the buckles may be a bit beyond me for now though !! you must use a microscope!
 

Users who are viewing this thread

Back