1/48 Revell Lockheed Ventura

Ad: This forum contains affiliate links to products on Amazon and eBay. More information in Terms and rules

F-104nut

Staff Sergeant
885
985
Dec 14, 2011
Wichita,Kansas USA
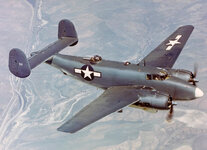
Decided to get back to my Ventura I stsarted on last year . I will be using a few aftermarket items on the kit bombshell decls , ultracast resin heels and Vector props . Not sure of markings yet , R-2800-31 painted up and weathered. Just needs sptayed with clear flat

52025381718_49b4f99ffc_b.jpg
6CC87AEE-161F-42AB-8FCF-21AA726F9086 by b007scott, on Flickr

52024928234_2fdf6aea98_b.jpg
B9C7792F-D715-4424-81B9-6771B6684E5A by b007scott, on Flickr

52024928179_f08d266b45_b.jpg
11240D1E-2B54-4C6C-B790-1AE07BF265D2 by b007scott, on Flickr

52023640477_d610450764_b.jpg
D24953FB-040C-440F-905F-EA501AD93927 by b007scott, on Flickr

52023640372_eaa9a351f9_b.jpg
5C10E15A-66E6-40FF-BBE0-69EB8A5A508F by b007scott, on Flickr

52024713663_953be1f24a_b.jpg
114D3AA7-CC04-42C6-AF08-8B5DE3159782 by b007scott, on Flickr

52024283647_4e3e40d038_b.jpg
5C74E725-1FFB-4A94-BE89-C175163CDE71 by b007scott, on Flickr


Brian
 

Attachments

  • 52023640297_13e6576bbb_b.jpg
    52023640297_13e6576bbb_b.jpg
    80.3 KB · Views: 41
Last edited:
Making some progress on the Ventura . I used the kit provided decals on the IP . The Ultra Cast resin wheels had the perfect depth on the tread for my wash . Wheels painted with Mr color and Tamiya LP -11 paints . Then weathers with oil wash on the hub and mig pacific dust on the tires . Struts painted with Tamiya LP-11 and weathered with oil wash .

52038252026_c035c15aba_3k.jpg
2616568E-4EA2-4BCC-A2DC-495584300A04 by b007scott, on Flickr

52037211012_a6c33661f4_3k.jpg
C740F0FF-BF52-400B-B16C-99F275B81867 by b007scott, on Flickr

52038251846_adaa4e2d8e_3k.jpg
58C7F242-CDC1-4CF1-B9B3-8A54CB743590 by b007scott, on Flickr

52038303973_a694cb4a6f_3k.jpg
D6F1C432-B52D-466E-B887-9DB1A1C42AAB by b007scott, on Flickr

Brian
 
Spent the morning working on the Vector resin props . Clean up was really easy. I used three different sized drill bits to drill the hole out for the prop shaft. The fit was a lille tight so i used a Tamiya snading spongs to sand the kit prop shaft and the fit was better. Now to was the prop and spray some primer
smile.png

52071443415_a799e24789_3k.jpg
B21D586D-02F2-49E7-A7D9-ABA1724DD4AC by b007scott, on Flickr
52071196414_4468a2c594_3k.jpg
D5B9EE07-5D8C-4276-AC00-87B2BD4D1C4F by b007scott, on Flickr
52070965186_df0fd34ee2_3k.jpg
18B97970-B0A5-4587-8BAF-C514F8149FC3 by b007scott, on Flickr
52070972048_3d8348fd88_3k.jpg
31D21764-7455-4DF1-AD4A-7CBD6A0E4D2F by b007scott, on Flickr

Brian
 
Last edited:

Users who are viewing this thread

Back