65th Anniversary of the Battle for the Santa Cruz Islands Pt1

Ad: This forum contains affiliate links to products on Amazon and eBay. More information in Terms and rules

syscom3

Pacific Historian
14,803
10,857
Jun 4, 2005
Orange County, CA
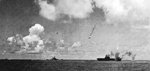
The increasing desperation of both sides of the battle for this stinking island was evident. Both the allies and the Japanese escalated the fight. While the USMC held the ground around the vital airfield, another carrier vs carrier slug fest occurred to the east. This was undoubtedly a Japanese tactical victory, but the loss of so many irreplaceable aircrews crippled Japanese carrier power for quite some time. Not untill The Battle for the Mariana Island in June 1944 were opposing carriers were to go to battle again.

Prelude

From October 20 to October 25, Japanese land forces on Guadalcanal attempted to capture Henderson Field with a large-scale attack against U.S. troops defending the airfield. However, the attack was decisively defeated with heavy casualties for the Japanese during the Battle for Henderson Field.

Incorrectly believing that the Japanese army troops had succeeded in capturing Henderson Field, a force of Japanese warships approached Guadalcanal on the morning of October 25 to provide further support for the army offensive. Aircraft from Henderson Field attacked the convoy throughout the day, sinking the light cruiser Yura and damaging the destroyer Akizuki.

Despite the failure of the Japanese ground offensive and the loss of Yura, the rest of the Combined Fleet continued to maneuver near the southern Solomon Islands on October 25 with the hope of encountering Allied naval forces in battle. The Japanese naval forces included four carriers, because Hiyō had suffered an accidental, damaging fire on October 22 that forced her to return to Truk for repairs. The Japanese naval forces were divided into three groups: The "Advanced" force contained Junyō, plus two battleships, four heavy cruisers, one light cruiser, and 10 destroyers, and was commanded by Vice Admiral Nobutake Kondo in heavy cruiser Atago; the "Main Body" consisted of Shōkaku, Zuikaku, and Zuihō plus one heavy cruiser and eight destroyers, and was commanded by Vice Admiral Chuichi Nagumo in Shōkaku; the "Vanguard" force contained two battleships, three heavy cruisers, one light cruiser, and seven destroyers, and was commanded by Rear Admiral Hiroaki Abe in battleship Hiei. In addition to commanding the Advanced force, Kondo acted as the overall commander of the three forces.

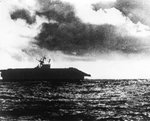
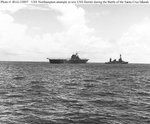
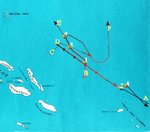
On the U.S. side, the Hornet and Enterprise task groups, under the overall command of Rear Admiral Thomas Kinkaid swept around to the north of the Santa Cruz Islands on October 25 searching for the Japanese naval forces. The U.S. warships were deployed as two separate carrier groups, each centered on either Hornet or Enterprise, and separated from each other by about 10 nm. A U.S. PBY Catalina based in the Santa Cruz Islands located the Japanese Main body carriers at 11:03. However, the Japanese carriers were about 355 nm from the U.S. force, just beyond carrier aircraft range. Kinkaid, hoping to close the range to be able to execute an attack that day, steamed towards the Japanese carriers at top speed and, at 14:25, launched a strike force of 23 aircraft. But the Japanese, knowing that they had been spotted by U.S. aircraft and not knowing where the U.S. carriers were, turned to the north to stay out of range of the U.S. carriers' aircraft. Thus, the U.S. strike force returned to their carriers without finding or attacking the Japanese warships.

Carrier action on October 26 - first strikes

At 02:50 on October 26, the Japanese naval forces reversed direction and the naval forces of the two adversaries closed the distance until they were only 200 nm away from each other by 05:00. Both sides launched search aircraft and prepared their remaining aircraft to attack as soon as the other side's ships were located. Although a radar-equipped PBY Catalina sighted the Japanese carriers at 03:10, the report did not reach Kinkaid until 05:12. Therefore, believing that the Japanese ships had probably changed position during the last two hours, he decided to withhold launching a strike force until he received more current information on the location of the Japanese ships.

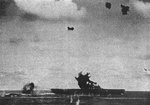
At 06:45, a U.S. scout aircraft sighted the carriers of Nagumo's Main body. At 06:58, a Japanese scout aircraft reported the location of Hornet's task force. Both sides raced to be the first to attack the other. The Japanese were first to get their strike force launched, with 64 aircraft, including 21 "Val" dive bombers, 20 "Kate" torpedo bombers, 21 Zero fighters, and two "Kate" command and control aircraft on the way towards Hornet by 07:40. Also at 07:40, two U.S. SBD Dauntless scout aircraft, responding to the earlier sighting of the Japanese carriers, arrived and dove on Zuihō. With the Japanese combat air patrol (CAP) busy chasing other U.S. scout aircraft away, the two U.S. aircraft were able to approach and drop both of their bombs on Zuihō, causing heavy damage and preventing the carrier's flight deck from being able to land aircraft.

Meanwhile, Kondo ordered Abe's Vanguard force to race ahead to try to intercept and engage the U.S. warships. Kondo also brought his own Advanced force forward at maximum speed so that Junyō's aircraft could join in the attacks on the U.S. ships. At 08:10, Shōkaku launched a second wave of strike aircraft, consisting of 19 Vals and eight Zeros, and Zuikaku launched 16 Kates at 08:40. Thus, by 09:10 the Japanese had 110 aircraft on the way to attack the U.S. carriers.

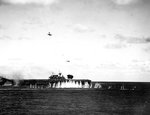
The U.S. strike aircraft were running about 20 minutes behind the Japanese. Believing that a speedy attack was more important than a massed attack, the U.S. aircraft proceeded in small groups towards the Japanese ships instead of forming into one large strike force. The first group, consisting of 15 SBD dive bombers, six TBF Avenger torpedo bombers, and eight F4F Wildcat fighters from Hornet, was on its way by about 08:00. A second group, consisting of three SBDs, seven TBFs, and eight Wildcats from Enterprise was off by 08:10. A third group, which included nine SBDs, eight TBFs, and seven Wildcats from Hornet, was on its way by 08:20.

At 08:30, the opposing aircraft strike formations began passing within sight of each other. Nine Zeros from Zuihō broke off from their formation and attacked the Enterprise group of aircraft. In the resulting engagement, four Zeros, three Wildcats, and two TBFs were shot down, with another two TBFs forced to return to Enterprise with heavy damage.
 
At 08:50, the lead U.S. attack formation from Hornet spotted four ships from Abe's Vanguard force. Pressing on, the U.S. aircraft sighted the Japanese carriers and prepared to attack. Three Zeros from Zuihō attacked the formation's Wildcats, drawing them away from the bombers they were assigned to protect. Thus, the dive bombers in the first group initiated their attacks without fighter escort. Twenty Zeros from the Japanese carrier CAP attacked the SBD formation and shot down four of them. The remaining 11 SBDs commenced their attack dives on Shōkaku at 09:27, hitting her with three to six bombs, ruining her flight deck and causing serious damage to the interior of the ship. The final SBD of the 11 lost track of the Shōkaku and instead dropped its bomb near the Japanese destroyer Teruzuki, causing minor damage. The six TBFs in the first strike force, having become separated from their strike group, missed finding the Japanese carriers and eventually turned-back towards Hornet. On the way back, they attacked the Japanese heavy cruiser Tone, missing with all of their torpedoes.

The TBFs of the second U.S. attack formation from Enterprise were unable to locate the Japanese carriers and instead attacked the Japanese heavy cruiser Suzuya from Abe's Vanguard force but caused no damage. At about the same time, the third U.S. attack formation, from Hornet, found Abe's ships and attacked the Japanese heavy cruiser Chikuma, hitting her with two 1,000 pound bombs and causing heavy damage. The three Enterprise SBDs then arrived and also attacked Chikuma, causing more damage with one bomb hit and two near-misses. Finally, the eight TBFs from the third strike group arrived and attacked the smoking Chikuma, scoring one more hit. Chikuma, escorted by two destroyers, withdrew from the battle and headed towards Truk for repairs.

The U.S. carrier forces received word from their outbound strike aircraft at 08:30 that Japanese attack aircraft were headed their way. At 08:52, the Japanese strike force commander sighted the Hornet task force (the Enterprise task force was hidden by a rain squall) and deployed his aircraft for attack. At 08:55, the U.S. carriers detected the approaching Japanese aircraft on radar, about 35 nm away, and began to vector the 37 Wildcat fighters of their CAP to engage the incoming Japanese aircraft. However, communication problems, mistakes by the U.S. fighter control directors, and primitive control procedures prevented all but a few of the U.S. fighters from engaging the Japanese aircraft before they began their attacks on Hornet. Although the U.S. CAP was able to shoot down several Vals, most of the Japanese aircraft commenced their attacks relatively unmolested by U.S. fighters.

At 09:09, the anti-aircraft guns of Hornet and her escorting warships opened fire as the 20 untouched Japanese Kates and remaining 16 Vals commenced their attacks on the carrier. At 09:12, a Val placed its 250-kilogram, semi-armor-piercing bomb dead center on Hornet's flight deck, across from the island, which penetrated three decks before exploding, killing 60 men. Moments later, a 242-kilogram "land" bomb struck the flight deck, detonating on impact and creating an 11-foot hole as well as killing 30 men. A minute or so later, a third bomb hit Hornet near where the first bomb hit, penetrating three decks before exploding, causing severe damage but no direct loss of life. At 09:14, a diving Val was hit and damaged by anti-aircraft fire directly over Hornet. The Val's pilot, in an apparently spontaneous, kamikaze-style attack, then purposely crashed his aircraft into Hornet's stack, spreading burning aviation fuel over the signal deck.

At the same time that the Vals were attacking, the Japanese Kate torpedo bombers were also attacking Hornet from two different directions. Despite suffering heavy losses from anti-aircraft fire, the Kates planted two torpedoes in Hornet between 09:13 and 09:17, knocking-out her engines. As Hornet glided to a stop, a damaged Val approached and purposely crashed into the carrier's side, starting a fire near the ship's main supply of aviation fuel. At 09:20, the surviving Japanese aircraft departed, leaving Hornet dead in the water and burning. Twenty-five Japanese and six U.S. aircraft were destroyed in this first attack on Hornet.

With the assistance of firehoses from three escorting destroyers, the fires on Hornet were under control by 10:00. Wounded personnel were evacuated from the carrier, and an attempt was made by the cruiser USS Northampton to tow Hornet away from the battle area. However, the effort to rig the towline took some time, and more attack waves of Japanese aircraft were inbound.

Carrier action on October 26 - post-first strike actions

Starting at 09:30, Enterprise landed many of the damaged and fuel-depleted CAP fighters and returning scout aircraft from both carriers. However, with her flight deck full, and the second wave of Japanese aircraft inbound, which was detected on radar at 09:30, Enterprise ceased landing operations at 10:00. Fuel-depleted aircraft then began ditching in the ocean as the carrier's escorting destroyers rescued the aircrews. One of the ditching aircraft, a damaged TBF from Enterprise's strike force that had been attacked earlier by Zuihō Zeros, crashed into the water near the destroyer USS Porter. As the destroyer rescued the TBF's crew, the torpedo from the TBF began running in a wild circle and struck Porter and exploded, causing heavy damage and killing 15 crewmen. After the task force commander ordered the destroyer scuttled, the crew was rescued by the destroyer USS Shaw which then sank Porter with gunfire.

As the first wave of Japanese strike aircraft began returning to their carriers from their attack on Hornet, one of them spotted the Enterprise task force and reported the carrier's position. Thus, the second Japanese aircraft strike wave, believing Hornet to be sinking, directed their attacks on the Enterprise task force, beginning at 10:08. Again, the U.S. CAP had trouble intercepting the Japanese aircraft before they attacked Enterprise, shooting down only two of the 19 Vals as they began their dives on the carrier. Attacking through the intense anti-aircraft fire put-up by Enterprise and her escorting warships, the Vals hit the carrier with two 250-kilogram bombs and near-missed with another, causing heavy damage to the carrier and jamming her forward elevator in the "up" position. Twelve of the 19 Vals were lost in this attack.

Twenty minutes later, the 16 Zuikaku Kates arrived and split up to attack Enterprise. One group of Kates was attacked by two CAP Wildcats which shot down three of them and damaged a fourth. On fire, the fourth damaged Kate purposely crashed into the destroyer USS Smith, setting the ship on fire and killing 57 of her crew. The destroyer steered into the spraying wake of the battleship USS South Dakota to help put out the fires and then resumed her station, firing her remaining anti-aircraft guns at the still attacking Kates.

The remaining Kates attacked Enterprise, South Dakota, and cruiser USS Portland, but all of their torpedoes missed or were duds, causing no damage. The engagement was over at 10:53 with nine of the 16 attacking Kates shot down. After suppressing most of the onboard fires, at 11:15 Enterprise reopened her flight deck to begin landing returning aircraft from the morning U.S. strikes on the Japanese warship forces. However, only a few aircraft landed before the next wave of Japanese strike aircraft arrived and began their attacks on Enterprise, forcing a suspension of landing operations.

Between 09:05 and 09:14, Junyō had arrived within 280 nm of the U.S. carriers and launched a strike of 17 Vals and 12 Zeros. As the Japanese Main body and Advanced force maneuvered to try to join formations, Junyō readied follow-up strikes. At 11:21, the Junyō Vals arrived and dove on the Enterprise task force. The Vals scored one near miss on Enterprise, causing more damage, and one hit each on South Dakota and cruiser USS San Juan, causing moderate damage to both ships. Eleven of the 17 Vals were destroyed in this attack.

At 11:35, Kinkaid decided to withdraw Enterprise and her screening ships from the battle, since Hornet was out of action, Enterprise was heavily damaged, and believing (correctly) that the Japanese had one to two undamaged carriers in the area. He directed Hornet's task force to follow as soon as they were able. Between 11:39 and 13:22, Enterprise recovered 57 of the 73 airborne U.S. aircraft as she headed away from the battle. The remaining U.S. aircraft ditched in the ocean, and their aircrews were rescued by escorting warships.

Between 11:40 and 14:00, Zuikaku and Junyō recovered the few aircraft that returned from the morning strikes on Hornet and Enterprise and prepared follow-up strikes. The air staff officer on Junyō described the return of the carrier's first strike groups:
" We searched the sky with apprehension. There were only a few planes in the air in comparison with the numbers launched several hours before... The planes lurched and staggered onto the deck, every single fighter and bomber bullet holed... As the pilots climbed wearily from their cramped cockpits, they told of unbelievable opposition, of skies choked wth antiaircraft shell bursts and tracers. "

The only Junyō carrier bomber leader to return from the first strike wave appeared, "so shaken that at times he could not speak coherently."

PICTURES ARE OF THE HORNET GETTING HAMMERED
 

Attachments

  • SantaCruzEVal.jpg
    SantaCruzEVal.jpg
    24.9 KB · Views: 130
  • SantaCruzHornetCrash.jpg
    SantaCruzHornetCrash.jpg
    43.7 KB · Views: 125
  • SantaCruzHornetSinking.jpg
    SantaCruzHornetSinking.jpg
    33.8 KB · Views: 253
  • USS_Hornet_(CV-8)_during_battle_of_the_Santa_Cruz_Islands.jpg
    USS_Hornet_(CV-8)_during_battle_of_the_Santa_Cruz_Islands.jpg
    57.2 KB · Views: 89
  • USS_South_Dakota_and_jap_torpedo_plane-Bat_Santa_Cruz.jpg
    USS_South_Dakota_and_jap_torpedo_plane-Bat_Santa_Cruz.jpg
    35.7 KB · Views: 79
  • SantaCruzNorthampton.jpg
    SantaCruzNorthampton.jpg
    100.2 KB · Views: 152
At 13:00, Kondo's Advanced force and Abe's Vanguard force warships together headed directly towards the last reported position of the U.S. carrier task forces and increased speed to try to intercept them for a warship gunfire battle. Zuihō and Shōkaku, with Nagumo still on board, retreated from the battle area, leaving Rear Admiral Kakuji Kakuta in charge of the Zuikaku and Junyō battle forces. At 13:06, Junyō launched her second strike of seven Kates and eight Zeros, and Zuikaku launched her third strike of seven Kates, two Vals, and five Zeros. At 15:35, Junyō launched the last Japanese strike force of the day, consisting of four Kates and six Zeros.

PICTURES ARE OF THE ENTERPRIZE

After several technical problems, Northampton finally began slowly towing Hornet out of the battle area at 14:45. Also, Hornet's crew was on the verge of restoring partial power to the ship. However, at 15:20, Junyō's second strike arrived and attacked the almost stationary carrier. At 15:23, one torpedo struck Hornet, destroying the repairs to the power system, causing heavy flooding and a 14-degree list. With no power to pump out the water, Hornet was given up for lost, and the crew abandoned ship. The third strike from Zuikaku attacked Hornet during this time, hitting the sinking ship with one more bomb. All of the Hornet's crewmen were off by 16:27. The last Japanese strike of the day dropped one more bomb on the sinking hulk at 17:20.

Destroyers USS Mustin and USS Anderson were ordered to scuttle Hornet with gunfire and torpedoes while the rest of the U.S. warships retired towards the southeast to get out of range of Kondo's and Abe's oncoming warships. With advancing Japanese destroyers only 20 minutes away, the two U.S. destroyers abandoned Hornet's burning hulk at 20:40. The rest of the warships of Kondo's and Abe's forces arrived at Hornet's location by 22:20, decided that she was too damaged to try to capture and finished the job of scuttling her with torpedoes by 01:35 on October 27. Several night attacks by radar-equipped Catalinas on Junyō and Teruzuki, knowledge of the head-start the U.S. warships had in their retreat from the area, plus a critical fuel situation apparently caused the Japanese to reconsider further pursuit of the U.S. warships. After refueling near the northern Solomon Islands, the ships returned to their main base at Truk on October 30. During the U.S. retreat from the battle area towards Espiritu Santo and New Caledonia, South Dakota collided with destroyer USS Mahan, heavily damaging the destroyer.

Aftermath

The loss of Hornet was a severe blow for Allied forces in the South Pacific, leaving just one operational, albeit damaged, Allied carrier in the entire Pacific theater. Enterprise, however, received temporary repairs at New Caledonia and, although still somewhat damaged, returned to the southern Solomons area just two weeks later to support Allied forces during the Naval Battle of Guadalcanal, playing an important role in what turned out to be the decisive naval engagement in the overall battle for Guadalcanal.

Although a tactical victory for the Japanese in terms of ships sunk, it came at a high cost for Japanese naval forces. Both damaged carriers were forced to return to Japan for extensive repairs and refitting. After repair, Zuihō returned to Truk in late January 1943. Shōkaku was under repair until March 1943 and did not return to the front until July 1943, when she was reunited with Zuikaku at Truk.

The most significant losses for the Japanese Navy, however, were in aircrew. The U.S. lost 26 aircrew members in the battle. The Japanese, on the other hand, lost 148 aircrew members including two dive bomber group leaders, three torpedo squadron leaders, and 18 other section or flight leaders. Forty-nine percent of the Japanese torpedo bomber aircrews involved in the battle were killed along with 39% of the dive bomber crews and 20% of the fighter pilots. The Japanese lost so many aircrew members that undamaged Zuikaku and Hiyō were also forced to return to Japan because of a scarcity of trained aircrew to man their air groups. Admiral Nagumo, upon being relieved of command shortly after the battle and reassigned to shore duty in Japan, stated,
"This battle was a tactical win, but a shattering strategic loss for Japan. Considering the great superiority of our enemy's industrial capacity, we must win every battle overwhelmingly. This last one, unfortunately, was not an overwhelming victory."

With its carrier aircrew ranks decimated, and with no quick way to replace them, Japan lost its strategic opportunity to defeat Allied naval forces in a single, decisive battle before the industrial might of the U.S. placed that goal out of reach. Although they returned to Truk by the summer of 1943, the Japanese carriers played no further offensive role in the decisive Solomon Islands campaign. Historian Eric Hammel sums up the significance of the Battle of the Santa Cruz Islands this way:
" Santa Cruz was a Japanese victory. That victory cost Japan her last best hope to win the war."
 

Attachments

  • USS_Enterprise-Bat_Santa_Cruz.jpg
    USS_Enterprise-Bat_Santa_Cruz.jpg
    94.8 KB · Views: 139
  • ouemo1.jpg
    ouemo1.jpg
    22.7 KB · Views: 123
  • ouemo.asp.jpg
    ouemo.asp.jpg
    45.1 KB · Views: 124
Summary

Chart of the Battle of the Santa Cruz Islands, October 26, 1942, showing approximate paths of participating forces.

Tracks:

* A- U.S. carrier task forces: Hornet and Enterprise (solid black line)
* B- Japanese "Main" body under Chuichi Nagumo with carriers Zuiho, Shokaku, and Zuikaku (solid red line)
* C- Japanese carrier Junyo under Rear Admiral Kakuji Kakuta (dotted red line)
* D- Japanese battleship and cruiser "Advanced" and "Vanguard" forces under Nobutake Kondo and Hiroaki Abe (arrowed red line)
* E- Zuiho and Shokaku withdraw from battle area
* F- Zuikaku and Junyo join to launch afternoon strikes on U.S. carrier forces

Numbered yellow dots:

* 1- 08:30-Zuiho hit
* 2- 10:15-Hornet hit and crippled
* 3- 10:20-Shokaku hit
* 4- 11:15-Enterprise hit
* 5- 12:30-Zuiho and Shokaku retire from the battle area.
 

Attachments

  • SantaCruzChart2.jpg
    SantaCruzChart2.jpg
    32.3 KB · Views: 132
  • USN-CN-SantaCruz-1a.jpg
    USN-CN-SantaCruz-1a.jpg
    152.5 KB · Views: 134

Users who are viewing this thread

Back