Aeronca K Floatplane

Ad: This forum contains affiliate links to products on Amazon and eBay. More information in Terms and rules

ccheese

Member In Perpetuity
12,408
130
Jul 10, 2007
Virginia Beach, Va.
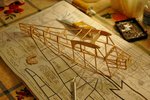
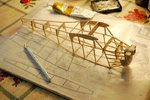
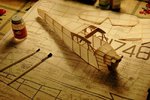
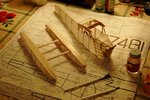
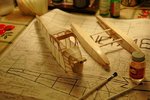
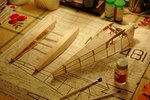
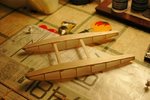
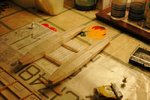
Going to start this thread completely over. The pic's are in the order
in which they occured. Hope it's not confusing.....

Charles
 

Attachments

  • fuselage1.jpg
    fuselage1.jpg
    87.9 KB · Views: 126
  • fuselage2.jpg
    fuselage2.jpg
    68.7 KB · Views: 126
  • Seaplane.jpg
    Seaplane.jpg
    68.6 KB · Views: 137
  • Seaplane1.jpg
    Seaplane1.jpg
    64.4 KB · Views: 135
  • Seaplane2.jpg
    Seaplane2.jpg
    70.2 KB · Views: 134
  • Seaplane5.jpg
    Seaplane5.jpg
    62.4 KB · Views: 133
  • Seaplane4.jpg
    Seaplane4.jpg
    67 KB · Views: 124
  • Seaplane3.jpg
    Seaplane3.jpg
    71.7 KB · Views: 132
Charles, I'm so glad we did this trade. Its more than I could've done! It looks awesome!!! Are you going to use the rubber band propeller or leave it static?
 
Chris: If I can find the rubber band I want (a ten incher) I will go with the
rubber power. There's no rush, I can keep looking.

Charles
 
Thanks, Joe and Heinz....

I'm a bit disappointed in the way the designer of the plans did the floats.
The "V" in the float is only 1/16" ! Had I drawn these plans I would have used
formers for the floats instead of a stick build up, as you can see in the one
pic where the float is not covered. However, no big deal.... this will be a
hanging model. I doubt if it will ever see flight.

Charles
 
Hi Charles, It's really looking good! The floats are outstanding!! I really think the tops look much better with the wood vice paper. Good Job!!
 
Worked on the wings, tonight. Except for the leading edge and the inboard
rib, the right wing is done. The last rib and the leading edge have to be
put on after the rest of it dries and comes off the pins The left wing was
finished, except for covering, last night.

Charles
 

Attachments

  • wings.jpg
    wings.jpg
    72.1 KB · Views: 116
The floats are complete, except for a couple of coats of banana oil, for
waterproofing. I've got the owner of the hobby shop trying to order some
for me. The noseblocks and the tops need a bit more sanding, too.

Charles
 

Attachments

  • Floats1.jpg
    Floats1.jpg
    54.2 KB · Views: 119
  • Floats2.jpg
    Floats2.jpg
    60.7 KB · Views: 113
Taking the scructure of the fuselage and wings into consideration it will be quite light.Could you tell me if the model is expected to fly? It looks for me like the model with the rubber propulsion?
 
You are correct, Wurger, the model is rubber powered and is expected to
fly. At this point I don't know if I want it to fly. I'd rather have it hanging
from the ceiling. I expect it to be quite light, just a matter of ounces.

Charles
 
With the hanging you are probably right.Flights with the kind of models need very good weather conditions.I've losted some of these due to the wind,etc...:( But it is always nice to see an effect of our work in action,isn't it.:)
 
Yes, it's good to be able to step back and admire your work. As a youngster
I set many a model on fire just to see it burn. How dumb it seems now.

Charles
 
Hi All: I got the rubber motor prop installed tonight. Also finished the
right wing, and covered the top of the left wing. Getting the rubber motor
installed was a bear.... I broke a couple of stringers and had to stop to
repair them. Wurger: I weighed the fuselage, pontoons and tail assembly,
tonight. Eight-tenths of an ounce ! I'm guessing the completed model,
with a couple coats of paint will go less than an ounce and a half. I'm
hoping, this weekend, I should be able to put some of these parts to-
gether.

Charles
 

Users who are viewing this thread

Back