Airfix 1/24 P-51d

Ad: This forum contains affiliate links to products on Amazon and eBay. More information in Terms and rules

ScanmanDan

Airman
60
2
Dec 25, 2010
After finding Geedees great post on P-51 cockpits while looking for references I thought I'd share how my Airfix cockpit is coming out.

The first little steps;

cockpit.jpg


cockpit2.jpg


cockpit4.jpg


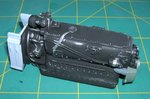
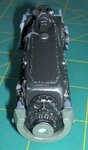
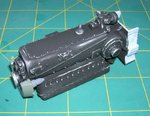
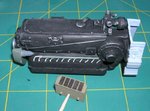
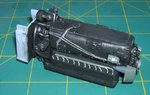
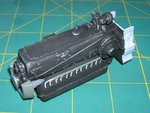
Reworked the seat a few times, still a bit too big and could use some more details. The seat awaits some Eduard pre-painted seat belts to finish it off. Radio rack and fuselage tank still in the paint shop. I've assembled the engine but I'm not sure if I'll use it or not.

Thanks for looking.

Dan
 
Wurger-- Thank you for your comments. I take your point about the green being too yellow. I do tend to be a bit heavy handed with the paintbrush. I should have base coated in a deeper color green. Must work on being more subtle as well.

Airframes--I built the seat from soldered copper wire and thin copper sheet with aluminium tape details. Went through three tries to get to this point. To my eyes the whole set is too big by about 10%. You are very correct in that the seat pan should be much deeper and have a slight reverse curve to the front edge. The seat back needs a couple of square holes in the edges next to where the side braces, which are too thick, attach and the wire loop on the top of the seat is too wide. I had to stop on the seat as I was getting target fixation... just one more try it will be better :) . If I ever get a chance to build another one of these I'd rebuild the whole seat/headrest assembly. I'm trying to keep the build going forward as I don't want to get to distracted. Thanks for your feedback it's much appreciated. I want to improve my skills and criticism beats back complacency.

A little progress tonight.

Fuselage tank.

fuselagetank1.jpg


Added some solder fuel lines, bolt detail and a little texture to the tank. Very little of this will be seen once the radio rack gets installed

Thanks again.

Dan
 
Very nice work, I particularly like the look of the tank.
Don't know if you've noticed it, or even if it's been corrected since the kit was first released in 1972 (UK retail price then, £2.75 !!), but there's a major error with the kit parts for the main landing gear legs. Not having built this kit, It took me over thirty years to realise what it was, after looking at a particular photo on a magazine cover from the time!
The oleos have been moulded fully extended, which means they need to be shortened to give the correct 'stance' to the model if built with the gear down.
Just a thought, but it might be easier to achieve the correct seat dimensions and shape if the back and pan are moulded from plastic sheet, but neat work on the attempt to date.
Looking forward to seeing some more progress shots, and welcome to the forum.
 
Wurger-- Thank you for your comments. I take your point about the green being too yellow. I do tend to be a bit heavy handed with the paintbrush. I should have base coated in a deeper color green. Must work on being more subtle as well.

Your welcome...please, try to use a small piece of sponge glued to a wooden thin stick instead of a brush for making weathering. Also you can use an eyeshadow blending brushes with sponge endings or these flat-shadow-sponge-brushes for make-up.
 

Attachments

  • flat-shadow-sponge-brush.jpg
    flat-shadow-sponge-brush.jpg
    8.1 KB · Views: 361
  • pędzel do powiek.jpg
    pędzel do powiek.jpg
    15.4 KB · Views: 519
Last edited:
I like the shading and the yellow, makes it sorta impressionistic and more like a painting.
Not sure if that's the effect you were after though :p
 
Airframes--Thanks again. Yes, the gear will be .... interesting, to say the least. I'm not too sure how far I'll go on getting them 100% right. But I will shorten the struts so she doesn't sit on tippy toes. Thanks for the heads up. I was going to go for a OOB build but too many little things bugged me to leave well enough alone. On examining the kit further I have found that the main gear bays are just blank spaces. Quite a challenge and just a touch intimidating to put all the details that go in there.

Wurger--Hmmm, interesting idea about the makeup sponges. I gotta try that! I hadn't even considered using make up as a modeling material. Pastels yes, but not make up. Thanks, you've put my little grey cells to work. Best kind of feedback!

Crimea_River--Thank you, glad you like it.

seiseki--Happy you like my progress. I'm not sure if I was going impressionist but I do tend towards the hyper-saturated look. I have more success with the high contrast color modulated painting style. I really wish I could get my head around the dead scale color technique because it looks awesome when it's done well. I just can't manage to get it to look anything other than drab, dull and boring. Gotta keep trying though. I'm going to muck about with those sponges Wurger was mentioning. Working on being a bit more subtle.

A little progress on the build.

Radio rack out of the paint shop;

radiorack1.jpg


radiorack.jpg


Drop tanks assembled and working on the pylons. Trying to get the fuselage to fit together and scatching up a new radiator. Basically having fun!

Thanks again for looking in.
Dan
 
Wurger--Hmmm, interesting idea about the makeup sponges. I gotta try that! I hadn't even considered using make up as a modeling material. Pastels yes, but not make up. Thanks, you've put my little grey cells to work. Best kind of feedback!

Dan

You'r welcome. These sponges don't have to be soaked with a paint fully. The technique is called the " dry brush " one. The soaked sponge ending should be cleaned with a paper towel initially. And then you can wipe gently on all edges and surfaces of parts.
 
Last edited:
Here is an example of using these sponge brushes. The engine was made for 1/24 scale Bf109E of Airfix. I applied the black matt colour overall on that. Then I used the " dry brush" technique for applying a silver paint. It was the first step.
 

Attachments

  • engin1.jpg
    engin1.jpg
    104 KB · Views: 535
  • engin1b.jpg
    engin1b.jpg
    174.9 KB · Views: 355
  • engin1a.jpg
    engin1a.jpg
    112.6 KB · Views: 526
The next step was to apply the thinned black paint with the sponge brush. I did it because I wanted to make these silver areas less "shining".
 

Attachments

  • engin2b.jpg
    engin2b.jpg
    115.4 KB · Views: 332
  • engin2a.jpg
    engin2a.jpg
    101.4 KB · Views: 425
  • engin2.jpg
    engin2.jpg
    110.6 KB · Views: 460
Thanks everybody for the comments.

Wurger-- Nice pic of how you use those sponges. Got to get some more bits finished and give em a try.

Airframes--Grey huh? Nows ya tell me....;) If I get the nerve up I'll have a crack at repainting the frame. It gets a might tight in between the battery and the radio.

I touch more headway today;

Plug wires and priming on the Merlin.

merlin.jpg


Man, that priming shows the rough spots :(.

Some rough details on the tanks and braces on the racks.

tank1.jpg


tank.jpg


I'm not too sure if I'll not redo the braces, add some adjustment bolts and make them a touch longer/thinner. I know that the rack isn't plumbed directly into tank but I need a firm way to mount the darn thing. I'm pretty sure there was a loop on the tank close to the front brace that hooked onto the rack like a 500lb bomb but I haven't seen a real good close up of the area.

Well plenty more plastic to bash.

Thanks for dropping in.

Dan
 
You'r welcome. :)
These details look great. How did you make these rack endings? Soldering with a tin?
Good job so far.
 
Yep, a loop of stout copper picture hanging wire 0.9mm and a touch of solder. I don't know how well I'd go drilling a 0.5mm hole trough the solder to get an adjustment bolt in there. I might have to bodge something up.

Dan
 

Users who are viewing this thread

Back