So, I recently started the Eduard BF-110G build, but I have the feeling that build is gonna be slow going for the time being. I wanted to do a more straigt forward build to go with it. Back in July I got this new Seafire XVII as a birthday present, and since I like the looks of this puppy I decided to have a crack at one of the latest offerings of the folks in red. I found it to be a surprisingly big box and I wondered why that might be, but once openend it was quite clear why the solid top opening box was so big. Airfix provided two sets of wings, in the shaps of parts used for to build it up with wings folded and another set of parts to build it up with wings down.
At first glance it seems like a very nice kit indeed, perhaps apart from the panel lines being a little heavy handed (this time around I intend to spray a few coats of primer on the model to hopefully make to panel lines appear a little less heavy handed)
Off wel go:
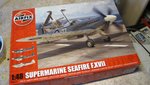
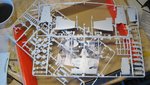
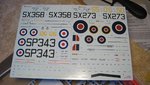
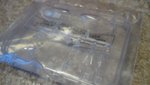
PICS 1-4: The boxart on the rather large and sturdy top opening box, and the contents of the box consisting of two large sprues, a sizeable decal sheet (with a good amount of stencils, and markings covering three different a/c) and a seperately bagged set of clear parts
PIC 5: Cutting and cleaning up some of the parts needed in the near future was the first thing I did.
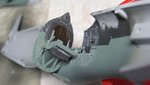
PIC 6: With the major parts of the airframe cut from their sprues and cleaned up it was on to a little fryfitting. It seems the overall fit will be very good. I did spot a few areas that might need a little filling and sanding (mostly the join of the fuselage halves) but other then that it should be pretty straight forward as far a filling and sanding is concerned.
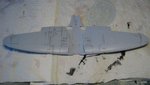
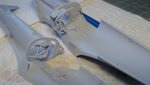
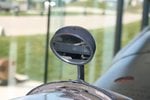
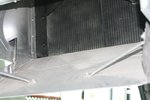
PIC 7: Here's where it gets interesting. Upon close inspection of the wing parts I've found that this particular shot suffers from some serious sink marks. I rubbed the wings down with some high grid sand paper to make sink marks better visible and ran a bead of Mr.Surfacer 1000 over the sink marks I've found and then gently sanded this down until the sink marks blend in with the rest of the surface. The upper surfaces suffers a tad from sink marks, but it's easy to fix.
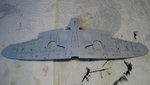
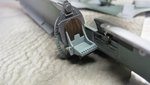
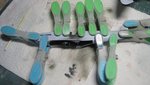
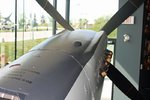
PIC 8: However the sink mark mania was only just beginning. The lower surfaces had A LOT of 'em. These parts were on the receiving end of the same treatment as the upper surfaces of the wings. Slightly rubbed the surface down with fine sand paper to reveal sink mark, apply a bead of Mr.Surfacer 1000 to them and then gently sand it down until the sink marks are gone. Again fairly easy to fix, but I do feel Airfix didn't quite pass mark as far as quality control goes. It's a brand new kit for G*ds sake. I don't mind an occasional sink mark, it happens in this line of business, but just look at the lower wing surface.... Either way...it's fixed now and checked with a brushed on coat of water soluble black paint (hence the black panel lines) Looks OK, and I'm pretty sure a few coats of primer will also help to cover up any remaining depressions in the plastic)
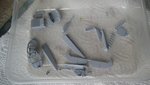
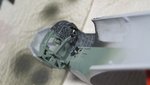
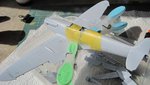
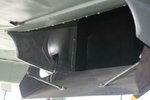
PIC 9: After the whole sink mark business was done I went on to glueing some parts into the interior. Not exactly a 3rd party resin cockpit set as far as details go, but still, reasonably well done. The appropriate colors and some dry brushing should go a long way in picking out what details are present.Interesting note is I glued these parts in place with Acetone. I saw the guy gluing entire models together with Acetone and was rather impressed by how his seams ended up looking much cleaner and how much less workin in cleaning them up he had. So I gave that a try as well, and indeed it works great. Kinda like Tamiya extra thin except even thinner and way cheaper, and on top way cleaner joins.
At first glance it seems like a very nice kit indeed, perhaps apart from the panel lines being a little heavy handed (this time around I intend to spray a few coats of primer on the model to hopefully make to panel lines appear a little less heavy handed)
Off wel go:
PICS 1-4: The boxart on the rather large and sturdy top opening box, and the contents of the box consisting of two large sprues, a sizeable decal sheet (with a good amount of stencils, and markings covering three different a/c) and a seperately bagged set of clear parts
PIC 5: Cutting and cleaning up some of the parts needed in the near future was the first thing I did.
PIC 6: With the major parts of the airframe cut from their sprues and cleaned up it was on to a little fryfitting. It seems the overall fit will be very good. I did spot a few areas that might need a little filling and sanding (mostly the join of the fuselage halves) but other then that it should be pretty straight forward as far a filling and sanding is concerned.
PIC 7: Here's where it gets interesting. Upon close inspection of the wing parts I've found that this particular shot suffers from some serious sink marks. I rubbed the wings down with some high grid sand paper to make sink marks better visible and ran a bead of Mr.Surfacer 1000 over the sink marks I've found and then gently sanded this down until the sink marks blend in with the rest of the surface. The upper surfaces suffers a tad from sink marks, but it's easy to fix.
PIC 8: However the sink mark mania was only just beginning. The lower surfaces had A LOT of 'em. These parts were on the receiving end of the same treatment as the upper surfaces of the wings. Slightly rubbed the surface down with fine sand paper to reveal sink mark, apply a bead of Mr.Surfacer 1000 to them and then gently sand it down until the sink marks are gone. Again fairly easy to fix, but I do feel Airfix didn't quite pass mark as far as quality control goes. It's a brand new kit for G*ds sake. I don't mind an occasional sink mark, it happens in this line of business, but just look at the lower wing surface.... Either way...it's fixed now and checked with a brushed on coat of water soluble black paint (hence the black panel lines) Looks OK, and I'm pretty sure a few coats of primer will also help to cover up any remaining depressions in the plastic)
PIC 9: After the whole sink mark business was done I went on to glueing some parts into the interior. Not exactly a 3rd party resin cockpit set as far as details go, but still, reasonably well done. The appropriate colors and some dry brushing should go a long way in picking out what details are present.Interesting note is I glued these parts in place with Acetone. I saw the guy gluing entire models together with Acetone and was rather impressed by how his seams ended up looking much cleaner and how much less workin in cleaning them up he had. So I gave that a try as well, and indeed it works great. Kinda like Tamiya extra thin except even thinner and way cheaper, and on top way cleaner joins.
Attachments
-
 00 - doos.JPG118.1 KB · Views: 201
 -
 00 - rekjes.JPG126 KB · Views: 214
 -
 00 - plakkerts.JPG108.8 KB · Views: 192
 -
 00 - glaasjes.JPG65.1 KB · Views: 217
 -
 02 - assorted small parts.JPG75.7 KB · Views: 195
 -
 01 - dryfit.JPG84.4 KB · Views: 186
 -
 03 - upper wings.JPG72.3 KB · Views: 294
 -
 04 - lower wings.JPG77.8 KB · Views: 198
 -
 05 - office.JPG64 KB · Views: 192
Last edited:


")