Amodel 1/72 scale I-16 (type 5/6)

Ad: This forum contains affiliate links to products on Amazon and eBay. More information in Terms and rules

rocker286

Airman
10
0
Dec 26, 2010
Rochester, NY
Hey everybody,

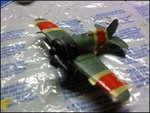
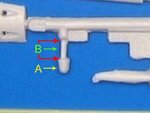
Has anyone ever built this type of kit before? I'm in the process of putting one together and I'm having a heck of a time with it, specifically the propeller shaft, or lack there of. It's a short piece of plastic that isn't long enough to go through the engine or the cowling to link up with the prop itself. I've contemplated elongating the prop shaft with a bit of a toothpick, but if anyone else out there has any ideas or tips, I'd greatly appreciate it! 8)

-Brian
 
Amodel kits are usually the short-run type with a lot of work ahead.It is quite common that there are overflows all around parts. So sanding is something obvious. Alsso fitting of all parts might be a trouble. However models of the firm are nice when finished but need more attention that other kind of kits.

Concerning the prop shaft. Just cut the B piece off and drill a hole in the piece A. The hole has to be of a proper diameter and can go deep to a half of the A piece. The B piece you can replace with a bit of a copper wire of the correct diameter and length of course. For gluing the wire to the plastic part you have to use a cyanoacrylate glue ( for example the Superglue ). The wire can be longer initially . Later you'll cut it to the correct one.

If you can't find a copper ( brassy) wire you can use a pivot made of stretched with warm a piece of the sprue frame.Then you can use the standard cement for styrene.
 

Attachments

  • Amodel I16.jpg
    Amodel I16.jpg
    30.1 KB · Views: 236
Last edited:
To be honest I'm not sure the shaft is really too short. I think the main problem is with fitting of the part to the rear ( the hole there) part of the maquette of the engine. In my opinion the hole there can't be enough deep or is of incorrect diameter that doesn't allow to push the prop shaft more forward into the engine casing.
 
Last edited:
Wurger you were right! I did some sanding and some carving and I got it to fit! I think it was a combination of the hole on the engine block not being big enough and also section "A" that you marked in your picture was a bit too big, so I sanded both pieces down and it fit perfectly. Thanks again!
 
I should have a "work in progress" picture up tonight. I'm still waiting on my laptop to get fixed :mad: , so I took a few photos with the camera on my phone.
 
here's a picture of what I have so far. My apologies for the picture quality not being so great, my computer is still in the shop, along with all the software for my digital camera! So I took this photo with the camera on my phone.
 

Attachments

  • 615093389_2195770796_0.jpg
    615093389_2195770796_0.jpg
    24.1 KB · Views: 159
Not too bad. However you have to pay more attention to fitting of the main sections of a model. Nothing offenced.. just for the future. :)
 
Last edited:
Well the plane is done! Still having some trouble with my computer but I should be getting it fixed within the next few days so I can post some pictures.
 

Users who are viewing this thread

Back