Airframes
Benevolens Magister
With not much else to do over Christmas Eve, I decided to make a start on the (to me) teeny weeny FW190, in 1/72nd scale, for the Group Build thingy.
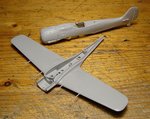
As I have an idea for something just a little bit different, I wanted a FW190A8, but didn't really want to rape a good, and relatively expensive, 1/48th scale kit in order to satisfy my slightly odd-ball desires. So, I got a 1/72nd scale Hobby Boss kit, the only one available at my model shop in this scale. Had to laugh when I saw the small number of parts, especially the one-piece fuselage and similar wing! I also gulped at the small size - I haven't touched this scale for over 25 years, and wondered whether my knackered hands would be able to cope! I have to say though, the detail is incredible, compared with the last 1/72nd scale kit I touched so many years ago.
However, having got the kit parts spread out, it soon became apparent that my plans would be a little more difficult to implement than I originally thought. Due to the 'solid' wing, and somewhat thick, one-piece fuselage, not to mention the abundance of connection points, locating pegs and formers, the required micro-surgery would be rather more demanding than anticipated. So, after a bit of thought, I dragged out the required tools whilst thinking that what was about to follow would at least provide an interesting and smile-provoking story for all of you to read after your Christmas dinner!
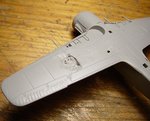
This 'Butcher Bird' didn't need micro-surgery, it needed butchering!
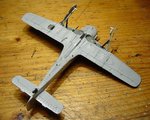
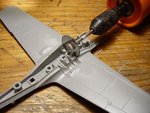
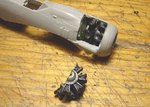
I needed to remove the upper engine cowling panel, one wing-root cannon cover, and one under-wing cannon ammo hatch cover, the reasons for which you will find out when the model is completed. (Sorry, you'll just have to wait!)
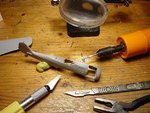
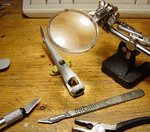
On a 'normal' kit, with separate wing and fuselage halves, this would be a simple, straightforward job. But, on this little bird, it needed more drastic measures. The removal of said pieces was achieved with the use of a mini circular saw, a chisel-bladed craft knife, a scalpel, various drill bits and small modelling pliers!
After sawing, gouging, drilling, reaming, scraping, cutting and bending, the parts were eventually removed, and the plastic around the openings thinned where possible. Any rough edges or 'overshoots' in the cutting will be made good later. By the time I'd finished, I'd snapped one knife blade, and managed to burn-out the circular saw blade and one small drill bit, as the palstic was over a quarter of an inch thick (8+mm) in places!
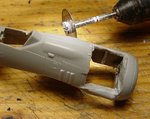
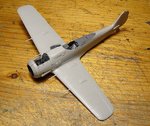
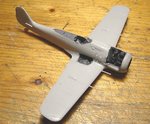
Once this was done, construction got underway, with the addition of part of an engine, from a C47 (!) sourced from the 'spares box', and hey presto! In no time this small model was almost ready for the first stages of painting!
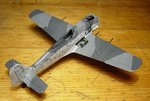
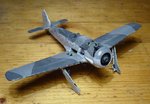
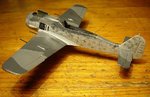
The attached pics show the various stages described, with the final shots showing the model assembled, with the cockpit painted and fitted, and the opened areas painted, ready for detailing etc. I've yet to make the hatch covers from plastic card, plus a few other little bits.
The model is going to be based on a particular aircraft shown in a well-known photograph from 1944 and, as mentioned, just a little bit different from the normally expected FW190. I'm not going to reveal what is different yet, you'll just have to wait and see. But, if anyone can guess, and give me the correct answer before the model is revealed, you'll win a prize - the scrap plastic removed from the darned thing!
I hope this has kept you entertained for a little while, enjoy the rest of your Christmas hols and all the best for '09.
Terry.
As I have an idea for something just a little bit different, I wanted a FW190A8, but didn't really want to rape a good, and relatively expensive, 1/48th scale kit in order to satisfy my slightly odd-ball desires. So, I got a 1/72nd scale Hobby Boss kit, the only one available at my model shop in this scale. Had to laugh when I saw the small number of parts, especially the one-piece fuselage and similar wing! I also gulped at the small size - I haven't touched this scale for over 25 years, and wondered whether my knackered hands would be able to cope! I have to say though, the detail is incredible, compared with the last 1/72nd scale kit I touched so many years ago.
However, having got the kit parts spread out, it soon became apparent that my plans would be a little more difficult to implement than I originally thought. Due to the 'solid' wing, and somewhat thick, one-piece fuselage, not to mention the abundance of connection points, locating pegs and formers, the required micro-surgery would be rather more demanding than anticipated. So, after a bit of thought, I dragged out the required tools whilst thinking that what was about to follow would at least provide an interesting and smile-provoking story for all of you to read after your Christmas dinner!
This 'Butcher Bird' didn't need micro-surgery, it needed butchering!
I needed to remove the upper engine cowling panel, one wing-root cannon cover, and one under-wing cannon ammo hatch cover, the reasons for which you will find out when the model is completed. (Sorry, you'll just have to wait!)
On a 'normal' kit, with separate wing and fuselage halves, this would be a simple, straightforward job. But, on this little bird, it needed more drastic measures. The removal of said pieces was achieved with the use of a mini circular saw, a chisel-bladed craft knife, a scalpel, various drill bits and small modelling pliers!
After sawing, gouging, drilling, reaming, scraping, cutting and bending, the parts were eventually removed, and the plastic around the openings thinned where possible. Any rough edges or 'overshoots' in the cutting will be made good later. By the time I'd finished, I'd snapped one knife blade, and managed to burn-out the circular saw blade and one small drill bit, as the palstic was over a quarter of an inch thick (8+mm) in places!
Once this was done, construction got underway, with the addition of part of an engine, from a C47 (!) sourced from the 'spares box', and hey presto! In no time this small model was almost ready for the first stages of painting!
The attached pics show the various stages described, with the final shots showing the model assembled, with the cockpit painted and fitted, and the opened areas painted, ready for detailing etc. I've yet to make the hatch covers from plastic card, plus a few other little bits.
The model is going to be based on a particular aircraft shown in a well-known photograph from 1944 and, as mentioned, just a little bit different from the normally expected FW190. I'm not going to reveal what is different yet, you'll just have to wait and see. But, if anyone can guess, and give me the correct answer before the model is revealed, you'll win a prize - the scrap plastic removed from the darned thing!
I hope this has kept you entertained for a little while, enjoy the rest of your Christmas hols and all the best for '09.
Terry.
Attachments
-
 Group build 002.jpg66.2 KB · Views: 89
 -
 Group build 007.jpg58 KB · Views: 73
 -
 Group build 008.jpg74.4 KB · Views: 89
 -
 Group build 010.jpg51.4 KB · Views: 71
 -
 Group build 016.jpg82 KB · Views: 92
 -
 Group build 029.jpg75.5 KB · Views: 81
 -
 Group build 026.jpg66.3 KB · Views: 94
 -
 Group build 022.jpg61.1 KB · Views: 84
 -
 Group build 020.jpg44.5 KB · Views: 77
")