Dirk's 1/72 MPC B-24 Liberator "Sunshine"

Ad: This forum contains affiliate links to products on Amazon and eBay. More information in Terms and rules

dirkpitt289

Master Sergeant
2,286
20
Jul 16, 2009
South Plainfield New Jersey
All these great builds going on involving much older kits such as the two Airfix Halifax's and I believe the soon to be started Short Sterling has me motivated. I went through my stash and believe I've found just the kit and subject. MPC's B-24 Liberator. Like the real Liberator this kit has no refinements and should prove to be a challenge for my skill level. :oops:

I'm not going to get into a history lesson about this aircraft because there is little that I could offer that isn't already known. However I do like this brief description I came across about the Liberator.
The B-24 was built like a Mack truck, except that it had an aluminium skin that could be cut with a knife. It could carry a heavy load far and fast but it had no refinements. Steering the four engine aircraft was difficult and exhausting as there was no power except the pilot's muscles. It didn't even have any windshield wipers.

The Kit

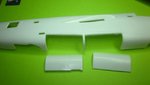
It's an oldie but I'm not sure it was ever a goodie. I have heard that these old MPC kits were once Airfix kits. I'm not sure if that's true or not but this kit has raised panel lines and virtually no interior detail.

IMG_1880.jpg


The parts are molded in white plastic with a fair share of flash.

IMG_1881.jpg


I purchased this kit used of EvilBay and it was opened. All the parts seem to be there at first glance but a hand full of the parts are off the trees. Also one of the props are broken. Two of the blades are broken off and one of those broken blades is missing. I'll have to address this at some point later in the build. The clear parts are very thick. I need to figure out a way to vac-u-form my own glass.

IMG_1883.jpg


IMG_1884.jpg


The decals look ok I guess but the colors seem off. Not that big an issue as I will be using aftermarket decals.

IMG_1885.jpg


The subject of my build will be "Sunshine" of 719th BS, 449th BG, 47th BW, 15th AF, USAAF

3_12_b1.jpg


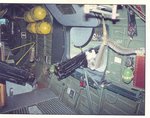
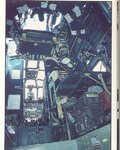
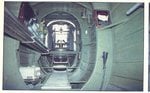
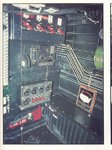
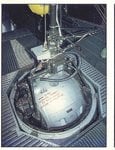
A few photos i found

B24-1x.jpg


SUNSHINE4.jpg
 
Last edited:
I can add a little history about this aircraft.

Sunshine was a B-24H with an offbeat story to tell. In April 1944 she landed at Venegono airport in Italy, and the Germans made a movie showing her "surrendering". The crewmen in American uniforms are Germans, but the undamaged aircraft made the whole stunt look convincing. These photos are from that movie

MovieShot01.jpg


MovieShot02.jpg
 
Last edited:
Nice one Dirk, and good background info.
Yes, this is the old Airfix kit, from the same era as the Halifax kit, and earlier than the Stirling. It's basic by today's standards, but fairly 'upmarket' for the time it was released, in the early 1960s. It's another one which can make a nice model, and fairly easy to add interior detailing, but again, not much can be seen of the inside.
 
I agree not much will be seen so i won't be going crazy. I'm trying to decide if I want to open the bomb bay doors or not. That decision will be determined if I can find some good drawings or not.
 
Shouldn't be too difficult Dirk. The doors were 'roller shutters', which 'rolled up' into the fuselage, so, once cut out, you would only have to add strips along the top line of the open bay, to represent the bottom of each roller shutter. The catwalk and bomb beams should be fairly straightforward to make, with a bulkhead at each end of the bay. Note that, on the ground, the bays were left open, or opened a few notches, to prevent build-up of fumes from the fuel.
 
Thanks Terry. My first thought was to make them open and it should be relativity straight forward. I just need to find some diagrams. I just went through all the B-24 books I have (5) and none of them have any diagrams. I'm searching the web as we speak.
 
I'll see what I have in the way of photos and diagrams. I know I have pics of the inside of the bomb bay, along with other interior shots if you need them.
 
Wooohooooo! Looks like we're having a bit nostalgia theme going here, in Start to Finish Builds! Awesome! Found another two old Airfix kits at Kingkit, that I'll snap up later, I also have to say that I'm more eagerly awaiting my old Airfix Short Stirling, than I was on the 1/32 F4U-4..

:lol:

Looking forward to this one pal! :thumbright:
 
Thanks Jan, I'm digging the current nostalgic builds we got going on here. Some good old fashion modeling where the outcome depends highly on the skill of the modeler, eh? No shake and bake here.
 
Here's some to be going on with - should have more somewhere, so I'll check and post when found.
 

Attachments

  • Can Jan 122.jpg
    Can Jan 122.jpg
    157.8 KB · Views: 228
  • Can Jan 123.jpg
    Can Jan 123.jpg
    94.6 KB · Views: 244
  • Can Jan 124.jpg
    Can Jan 124.jpg
    109.4 KB · Views: 286
  • Can Jan 125.jpg
    Can Jan 125.jpg
    90.1 KB · Views: 214
  • Can Jan 126.jpg
    Can Jan 126.jpg
    140.6 KB · Views: 256
  • Can Jan 127.jpg
    Can Jan 127.jpg
    71.8 KB · Views: 245
  • Can Jan 128.jpg
    Can Jan 128.jpg
    90.1 KB · Views: 308
It's time to start the build process. Started by cleaning and inspecting the fuselage parts. There are some rough edges and flash to be cleaned up.

IMG_1890.jpg


IMG_1891.jpg


It's hard to see with the white plastic and the lighting but just forward of the cockpit is two sink holes that will need to be addressed. Also the shape of the cockpit opening is incorrect.

IMG_1892.jpg


Panel lines are raised and so are the rivets. Over all I'm not terribly unhappy with it. I may take down the detail a little but I'm not going to go crazy with it.

IMG_1893.jpg


You can see it needs some TLC around the turret openings

IMG_1894.jpg


IMG_1895.jpg


IMG_1896.jpg


More to follow shortly
 
As part of the cleanup I cleaned the edges and thinned out the openings around the turrets. I think over all it looks better.

IMG_1916.jpg


IMG_1917.jpg


IMG_1918.jpg


Next I turned to the cockpit area.

IMG_1903.jpg


IMG_1901.jpg


IMG_1904.jpg


IMG_1905.jpg


IMG_1906.jpg


Next I turned to the bomb bay doors. Using a sharp blade and saw the doors came off rather easily

IMG_1908.jpg


IMG_1909.jpg


With all the doors removed, and the fuselage halves taped together, this shows the huge void which has to be covered by a scratch-built bomb bay.

IMG_1910.jpg


Thanks for looking
 
"... Is that a pee-pee tube on the right there in the third pic? "

AKA a "relief tube"

and this photo would be of what ... ? Dumpster doors ...?
 

Attachments

  • IMG_1909.jpg
    IMG_1909.jpg
    27.8 KB · Views: 247

Users who are viewing this thread

Back