**** DONE: 1/48 Republic P-47D - Mediterranean Theater of Operations

Ad: This forum contains affiliate links to products on Amazon and eBay. More information in Terms and rules

JKim

Senior Master Sergeant
3,601
544
Jul 1, 2014
Carlsbad, CA
Username: JKim
First name: John
Category: Advanced
Scale: 1/48
Manufacturer: Tamiya
Model Type: P-47D Razorback Thunderbolt
Aftermarket addons: Eduard PE Detail Set, Eduard Masks, Rising Decals, maybe a set of Eduard 500# bombs

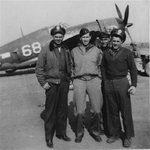
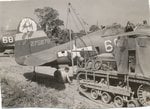
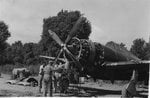
I've chosen to represent a P-47D-15-RE of 57th Fighter Group operating out of Corsica, Italy, 1944. This particular plane was christened The Wog and was piloted by Stanley Morrow.

133_copy_zps444a5c4d.jpg
 
Last edited by a moderator:
Nice selection the Tamiya is a box full of wonderment and it builds its self nearly Best Jug out there.
 
John that Tamy kit just falls together virtually no putty if any if you pay attention ;)
 
John, another good model for this GB, with good hands that you have another great entry models also have joy in this category.


another year or so ago I did the "44" in the same squadron here in the forum, the decals are great very, very good.

The pity is that mine have suffered from over 30 years (the kit was 1981) and the plastic was something like bad and it broke me transparent.
 
A half dozen or so more books to go, so far, just a profile, same side...

Geo
Thanks for the profile George... that definitely helps with the demarcation between the olive and grey. Also highlights some paint wear areas.

John that Tamy kit just falls together virtually no putty if any if you pay attention ;)
That's good to hear Javlin and I'll definitely be paying attention by doing lots of pre-fitting. Based on some recent modeling work I've seen on the big Pratt Whitney 2800 (mostly 1/32 Corsairs), I'll be looking at adding some details on the engine. Which is a key benefit of a well-fitting kit... more time to spend on details!

John, another good model for this GB, with good hands that you have another great entry models also have joy in this category.


another year or so ago I did the "44" in the same squadron here in the forum, the decals are great very, very good.

The pity is that mine have suffered from over 30 years (the kit was 1981) and the plastic was something like bad and it broke me transparent.
Thank you! When I did research on P-47's in the Mediterranean, Hare's Wicked Wabbit "44" was an obvious choice but I elected to go with "68" instead.
 
An Uncle Bud! Great choice John. These additional photos are in the Bob Hanning section of the 57th Web site. Fixing to do this one myself sometime...
 

Attachments

  • Image8 800.jpg
    Image8 800.jpg
    75.8 KB · Views: 271
  • Image6 800.jpg
    Image6 800.jpg
    89.9 KB · Views: 255
  • Image7 800.jpg
    Image7 800.jpg
    77.6 KB · Views: 261
Last edited:
Yeah, I will echo everyone on the Tamiya kit. Just a beautiful kit if you have not built one yet. I want to do one again, but with the cowls off. I need to track down a good engine aftermarket set.
 
Dang... I am itching to GO but I am awaiting arrival of the kit still! I have received the decals, canopy masks and PE detail set but no kit!
 
Obviously your JIT provisioning has developed a glitch. I'd be chatting to my supply manager!

b0227.gif

They must've heard my grumbling as I received a shipment from my supplier yesterday!:lol:

Finally... something to get my hands on! I received the kit in a box shipped from Japan. Also included in the order was a 1/48 Hasegawa Ki-84 for a future build. Both kits were unsealed but new. This will be my first experience with a newer Tamiya kit so I'm anxious to see how the company's esteemed reputation jibes with my practical experience. Along with the kit, I've picked up the Thunderbolts over Corsica decal set from Rising Decals, a canopy mask set from Eduard, and a PE detail set, also from Eduard.
IMG_6992_copy_zps5ea866ec.jpg


Packaging is pretty good. 1-3 sprues to a bag. Not as protective as Hobby Boss' or Eduard's "one bag per sprue" approach but better than Hasegawa's "all of the sprues in one bag" method.
IMG_6993_copy_zpsb61ff723.jpg


I won't show all of the sprues but will present a quick tour of the parts to get an overall impression of the kit. Molding on the kit looks as good as anything I've seen in styrene. The wheel wells are molded into the wings and are impressively deep and detailed. Note the stops for the Browning 50cal MG barrels, which is a nice touch since that implies that the barrels can be added after painting.
IMG_6994_copy_zps3d799b64.jpg


The landing gear doors have nice 3-D detail but also some ejector pins marks that may/may not have to be addressed depending on how much the wheels cover up.
IMG_6995_copy_zps5cdf407b.jpg


The ejector chutes are molded open but reveal the thickness of the plastic... may have to grind that down from the inside!
IMG_6996_copy_zps6c95bda0.jpg


The panel lines are very well done. Mostly recessed but there are some panels that are subtly raised or lowered. I'm not familiar enough with the Thunderbolt to ascertain the accuracy of such panels but it is impressive molding nonetheless.
IMG_6997_copy_zps270c6c1d.jpg


Cockpit side panels are nicely detailed. Should look really nice with the details from the PE set added.
IMG_6998_copy_zps32ff310f.jpg


The instrument panel features finely molded instrument bezels but no instrument details, which indicate an IP instrument panel. The Eduard PE detail kit includes a 2-part instrument panel so I definitely have at least two viable options here.
IMG_6999_copy_zpsced5e0b5.jpg


The clear pieces were bagged separately and look... clear! No problems here. I normally glue the canopy in the closed position but based on how the cockpit turns out, I may consider mounting it open or perhaps unglued if the fit is good.
IMG_7000_copy_zpsee4ccb14.jpg


Three types of gunsights? I don't know that that is about so I'll have do to a little research to see which one would be appropriate for my MTO Bolt.
IMG_7001_copy_zps36f39992.jpg


The two rows of the Pratt-Whitney 2800 radial engine are molded separately. Since US radial engined fighters lacked a spinner, the engine is more readily seen through the cowl than, say, fighter planes from Japan and Germany. So I'm thinking about adding wiring to this engine, which would be a new experience for me. Gotta do something to warrant my jump into the Advanced category right? ;)
IMG_7002_copy_zps76d67963.jpg


The tires are molded in a single piece and have separate hubs, which will make painting easier. The tires have a diamond tread and it will take some careful cleanup work to remove the mold line without destroying the tread pattern.
IMG_7007_copy_zps04f54bc8.jpg


Well well well... it looks like Tamiya has robbed me of my customary "first order of business". This is the first time I've seen an injection molded kit at 1/48 scale with gun barrels already hollowed out. Impressive! Too bad the sprue connections are on the hollow ends and not on the butt ends.
IMG_7005_copy_zps00d89834.jpg


The kit decals appear to be very thick. Tamiya has had a past reputation for thick decals and it looks like this has not changed, which is unfortunate given how good the rest of the kit looks. I'll be relying on the kit decals for the stencils so hopefully they'll behave with some Microset/Microsol.
IMG_7006_copy_zps5a7ac491.jpg


I won't be able to really dive into this kit for at least a few days. My parents flew in from Hawaii for a surprise 50th birthday celebration masterminded by the wifey. Next week should be back to normal and I'll be able start this build in earnest!
 

Users who are viewing this thread

Back