Airframes
Benevolens Magister
Username: Airframes.
Name: Fingers Foxtrot
Category: Judge - non-competing.
Kit: Airfix Tornado F3.
Scale: 1/48th.
Accessories: A shed load of scratch-building, spare and home made decals.
This will be an addition to my '56 Squadron History' line up, but there'll be a lot of work to get it looking right.
The Tornado F3, an improvement of the intermediate F2, is the Air Defence Variant of the original GR1 to GR4 strike aircraft, and was introduced to RAF Squadron service in the mid 1980s, and retired at the end of 2011.
Longer than the strike versions, and with a totally different avionics, radar and weapons fit, the F3 was, when introduced, a very advanced, variable geometry ('swing-wing') interceptor fighter, and replaced the Phantom and Lightning F6 in RAF service.
The kit used is the Airfix offering, as, at the time of purchase, the much better Italeri kit was no longer available. However, this was another cost saver, as I got it for £12, instead of the normal price of £25. Just as well really, as the higher price tag is, in my opinion, unjustified for such a basic, and in some areas, poor and inaccurate kit, which is basically a scaled-up version of the older 1/72nd scale kit.
Having been pre-warned by Vic, I am aware of the problem areas of the build, which, like the Airfix Buccaneer, are concerned mainly with the fuselage joint, as well as the rather poor cockpit fittings.
The cockpit will be virtually totally scratch-built, using the kit parts as a basis or, where needed, templates, and the photos below will give some idea of the amount of work required in order to achieve a reasonable result. Fortunately, I've already had experience of doing a similar thing on the old Revell 1/32nd scale F2, converted to the F3, and this will help considerably.
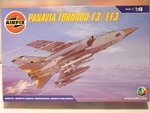
PIC 1. The kit box art - poor quality compared to 'traditional' Airfix, not that it matters that much.
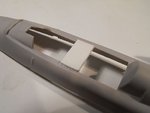
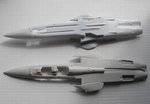
PIC 2. The horizontally-split fuselage halves, made from two distinctly different types of plastic. The bottom half will require 'spacers' in order to align the joints.
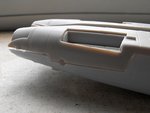
PICS 3 and 4. The problem areas - aligning the joints.
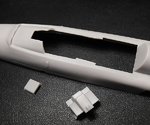
PIC 5. The shape of the moulded-in front and rear cockpit instrument consoles are incorrect, and more in line with the GR versions.
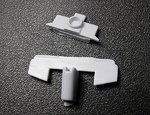
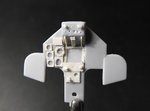
PIC 6. The instrument panel (at right) and Nav/WSO panel (left) are plain, flat, and inaccurate. Both rely on decals for the detail. These parts will be used as the basis, heavily modified, for scratch-built panels.
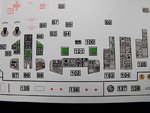
PIC 7. The instrument decals provided - headed for the spares files!
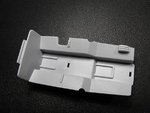
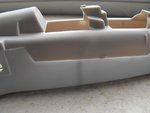
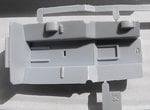
PIC 8. Cockpit tub. Again plain, and in need of major attention.
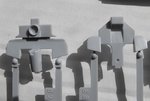
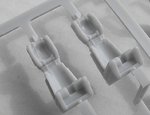
PIC 9. The kit ejector seats - er... yeah, right ... more scratch-building.
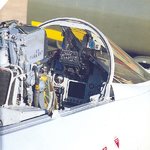
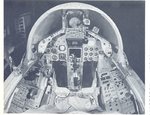
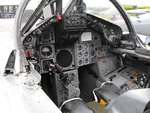
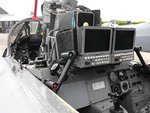
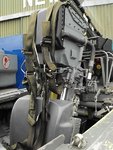
PICS 10 to 12. This partly restored Tornado F3 cockpit gives some idea of what this area should look like!
So, apologies for the rather long initial post, and I hope to make a start on the butchery ...er... scratch-building work, in the next couple of days.
Name: Fingers Foxtrot
Category: Judge - non-competing.
Kit: Airfix Tornado F3.
Scale: 1/48th.
Accessories: A shed load of scratch-building, spare and home made decals.
* Advance apologies - I might not complete this build *
This will be an addition to my '56 Squadron History' line up, but there'll be a lot of work to get it looking right.
The Tornado F3, an improvement of the intermediate F2, is the Air Defence Variant of the original GR1 to GR4 strike aircraft, and was introduced to RAF Squadron service in the mid 1980s, and retired at the end of 2011.
Longer than the strike versions, and with a totally different avionics, radar and weapons fit, the F3 was, when introduced, a very advanced, variable geometry ('swing-wing') interceptor fighter, and replaced the Phantom and Lightning F6 in RAF service.
The kit used is the Airfix offering, as, at the time of purchase, the much better Italeri kit was no longer available. However, this was another cost saver, as I got it for £12, instead of the normal price of £25. Just as well really, as the higher price tag is, in my opinion, unjustified for such a basic, and in some areas, poor and inaccurate kit, which is basically a scaled-up version of the older 1/72nd scale kit.
Having been pre-warned by Vic, I am aware of the problem areas of the build, which, like the Airfix Buccaneer, are concerned mainly with the fuselage joint, as well as the rather poor cockpit fittings.
The cockpit will be virtually totally scratch-built, using the kit parts as a basis or, where needed, templates, and the photos below will give some idea of the amount of work required in order to achieve a reasonable result. Fortunately, I've already had experience of doing a similar thing on the old Revell 1/32nd scale F2, converted to the F3, and this will help considerably.
PIC 1. The kit box art - poor quality compared to 'traditional' Airfix, not that it matters that much.
PIC 2. The horizontally-split fuselage halves, made from two distinctly different types of plastic. The bottom half will require 'spacers' in order to align the joints.
PICS 3 and 4. The problem areas - aligning the joints.
PIC 5. The shape of the moulded-in front and rear cockpit instrument consoles are incorrect, and more in line with the GR versions.
PIC 6. The instrument panel (at right) and Nav/WSO panel (left) are plain, flat, and inaccurate. Both rely on decals for the detail. These parts will be used as the basis, heavily modified, for scratch-built panels.
PIC 7. The instrument decals provided - headed for the spares files!
PIC 8. Cockpit tub. Again plain, and in need of major attention.
PIC 9. The kit ejector seats - er... yeah, right ... more scratch-building.
PICS 10 to 12. This partly restored Tornado F3 cockpit gives some idea of what this area should look like!
So, apologies for the rather long initial post, and I hope to make a start on the butchery ...er... scratch-building work, in the next couple of days.
Attachments
-
 Buys 048.jpg114.6 KB · Views: 435
 -
 Tornado GB 002.jpg61.4 KB · Views: 367
 -
 Tornado GB 009.jpg55 KB · Views: 292
 -
 Tornado GB 011.jpg74.8 KB · Views: 287
 -
 Tornado GB 003.jpg49.2 KB · Views: 299
 -
 Tornado GB 006.jpg50.6 KB · Views: 291
 -
 Tornado GB 013.jpg110 KB · Views: 292
 -
 Tornado GB 008.jpg89.3 KB · Views: 302
 -
 Tornado GB 005.jpg60 KB · Views: 325
 -
 C Fest 011.jpg122.7 KB · Views: 971
 -
 C Fest 009.jpg106.8 KB · Views: 464
 -
 C Fest 014.jpg77.2 KB · Views: 690
Last edited by a moderator: