**** DONE: 1/48 Typhoon Mk.1B RCAF 143 16 Wing Comm 1944 Commonwealth GB

Ad: This forum contains affiliate links to products on Amazon and eBay. More information in Terms and rules

N4521U

Colonel
13,434
5,661
Nov 1, 2009
Miranda, NSW
User name: N4521U
Name: Bill
Category: 2, Intermediate
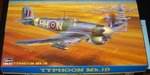
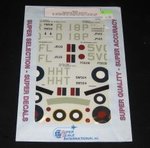
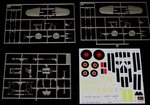
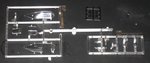
Kit: Hasegawa Typhoon Mk.1b
Scale: 1/48th.

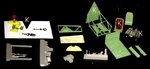
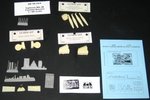
Accessories: Cast; Wheels, exhaust, cannon, cockpit, blades and spinner, decals for R*D and serial numbers.
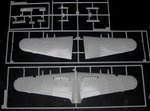
Scratch built, as much as I can.

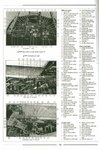
Inspiration: In my searches for sir name pilots of all services, I came across this one. Joined in the war in England after the BoB he rose to wing commander of both 143 and 16 groups. I do want to build as many aircraft Davidsons took part in as crew and pilots. Call me silly. I had this kit in the closet along with my other entry of the Spitfire over Darwin. So since I am going to be recovering from surgery for the next couple months I decided to try and attack both, forces me to get off my now skinnier bum. So here's Robert.

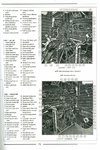
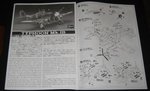
For this I have been searching in vain for real good cockpit pictures..... can anyone help with this???
 

Attachments

  • Bob Davidson.pdf
    195.8 KB · Views: 221
  • 1d.jpg
    1d.jpg
    36.5 KB · Views: 331
  • 1di.jpg
    1di.jpg
    27.6 KB · Views: 323
  • 1e.jpg
    1e.jpg
    29.1 KB · Views: 385
  • 1f.jpg
    1f.jpg
    33.9 KB · Views: 323
  • 1h.jpg
    1h.jpg
    20 KB · Views: 312
  • 1g.jpg
    1g.jpg
    34 KB · Views: 325
  • 1fj.jpg
    1fj.jpg
    30.4 KB · Views: 351
  • 1i access.JPG
    1i access.JPG
    23.9 KB · Views: 330
Last edited by a moderator:
Great to see another Tiffie in the GB Bill, looking forward to this one.

Here some cockpit detail taken from the official manual and published in AJ Press's book on the Typhoon.

72 different controls/instruments in the cockpit that had to be known by the pilot blindfolded :shock:

Cheers

Peter
 

Attachments

  • instrument panel 01.jpg
    instrument panel 01.jpg
    218.5 KB · Views: 326
  • instrument panel 02.jpg
    instrument panel 02.jpg
    228.6 KB · Views: 320
Interesting history this Davidson has.

Thanks for that Oz.... it's what I'm looking for.
Been fitting wings on both builds today so I can mold and cast control surfaces.
 
My first step is to make molds of all the control surfaces. Did this the day the forum went dark. Will have to get some casting resin as my supply has gone sour and will do this Wed. Did bot planes, Typhoon and Mk.Vb trop. Will have to post on both.
 

Attachments

  • IMG_2975.JPG
    IMG_2975.JPG
    38.6 KB · Views: 330
Last edited:
Good stuff Bill. I've got some more detail and cockpit pics, and scale plans too if you need them. I'll post some pics in the next day or two - trying to catch up with a lot of other things.
 
Did some casting from my molds today, after DR visit. Some parts worked, others did not. Crap left of the mold shown didn't go well, and have recast the tail feathers of the Spittie. will have to remold the aelarons of the Typhoon. Sometimes it doesn't go according to plan 100 per cent. But I'll gettum.
 

Attachments

  • 3 casts.jpg
    3 casts.jpg
    27.8 KB · Views: 285
I've been having issues with the cockpit. Kit parts and aftermarket parts, each just didn't seem to do what I wanted. Since this is one of my "Davidson" pilot series of planes I wanted to have the details right, ya know.

I was surfing the net for reviews, and found one builder who combined these parts.......... So is what I am gonna do with this build. I thin it's gonna be the beez neez!

In the photo I am just documenting the "K" kits parts and the resin parts before I start hacking into them.
 

Attachments

  • 4 cockpit parts.jpg
    4 cockpit parts.jpg
    28.3 KB · Views: 252
Bill, there were some detail differences between the 'car door' cockpit, and the later 'bubble hood' cockpit, and I think the kit was originally designed around the 'car door' version (hence the insert for the fuselage). The pics Peter posted are of the 'car door' version. Note that the upper half of the cockpit was black on later versions.
I'll try to get some pics posted either later tonight, or some time tomorrow.
 
I am building the car door version of the Typhoon. I have noticed the top portion of the inside of the cockpit is painted black as well.

The cockpit mods are going well!

(Wayne has been a champ and sent me some detail pics of the top surface of the "C" wing, I've got some work to do!) should have been in my Spitty post, duh!

I appreciate all the input guys.

Bill
 
Last edited:
Ok, but note on the 'car door' version, the cockpit was all Cockpit Green Grey, with the exception of some of the lower tubular structures, which were painted in 'Aluminium'.
Pics tomorrow night (Monday) UK time.
 
Ok, but note on the 'car door' version, the cockpit was all Cockpit Green Grey, with the exception of some of the lower tubular structures, which were painted in 'Aluminium'.
Pics tomorrow night (Monday) UK time.

Oh man! I gotta re-paint???????????? and it was all goin soooooo well............
I recall seeing bars as aluminium......... buggah
 
Bill, is your e-maill address still the same (what looks like an abbreviated name)? I've got some stuff together which might help you, bit a bit big to post here. I'll e-mail it if the address is correct.
 
Got it Vic.....
The bashing project is goin pretty good so far. Used the resin floor,trim wheel, throttle quadrant, control column and cut out the resin sidewall radio panel that will fit in the kit frame. Screwed up the etched peddles, dom, so have to use the dorkey kit plastic peddles. The resin seat fits the kit back wall, and the cushion is light canvas colour. I will have to get some aluminium colour to paint the tube frame. Dr. visit tomorrow, and will stop for paint then as I am not comfortable to drive as yet. But I am happy with the way it's goin.

My little painting station is an up-side down yogurt cup. good wide base that wont tip over.
 

Attachments

  • 5 cockpit.jpg
    5 cockpit.jpg
    29.5 KB · Views: 213

Users who are viewing this thread

Back