**** DONE: 1/72 LA-5FN VVS Group build (1 Viewer)

Ad: This forum contains affiliate links to products on Amazon and eBay. More information in Terms and rules

magnu

Staff Sergeant
889
1
Dec 11, 2007
Cornwall
Username Magnu
Name Lewis
Category 2 Intermediate
Kit Zeveda
Scale 1/72
Extras None
Refeernces Osprey aviation 3 Soviet aces of WWII


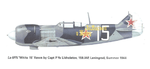
Iwill be doing this one as white 15 flown by Captain P. Likholetov of 159th
fighter regiment summer 1944.
006-1.jpg

007.jpg

008.jpg
 
Last edited by a moderator:
Another build of the La-5FN fighter. Great....:thumbright:

According to a profile of the plane I found, the spinner should be white painted.
 
Typical Zvezda's assembling instructions - all steps shown on one drawing. :)
Nice choice though. I've build their MiG-3 in 1/72nd scale and it needed a lot of filling on wing-fuselage joints. Hope their La-5 fits better. Looking forward to your build.
 
Snap.............Great on Lewis, we must be reading the same reviews but I did note that one has to be careful with the detail as to what can and what cannot be seen and I note no star on the upper wing surface.
 
Quick work.........
Question
I'm gonna do an La-7, the white 27 job. I've been looking for the color for the cockpit, where did you get the color number from, and what color is it??????
 
Quick work.........
Question
I'm gonna do an La-7, the white 27 job. I've been looking for the color for the cockpit, where did you get the color number from, and what color is it??????
The pit colour was a mix of RAF azure blue and Tamyia XF19 sky grey with a wash of Rail match weathered black cribbed from a build review of a 1/48 Zeveda LA5 FN on the net. So done slightly lighter for scale effect.

Bit more progress test fit of fuselage halves and wings the large gap in the fuselage/wing joint mostly disappears when the dihedral is set.
001-2.jpg
 
Fuselage,wings and empenage together ready for filling the gaps the worst of which is along the port wing root
0012-1.jpg

0022-1.jpg
 
Cheers all
Bit more progress, gave it a quick blast of colour to show up any gaps that still needed attention and sorted them also added the two pins in the wings which I assume are gear indicators, should have put them in when the wings went together Doh! didn't spot it in the one diag. instructions so put them in upside down and sawed off the base when dry
will now have to wait to get the colours sorted before I can start spraying.
001-3.jpg

002-4.jpg
 
I'm not sure if there were these gear indicatotrs located. I have to check that.
 

Users who are viewing this thread

Back