DONE: Avenger I 832 Sqd FAA, HMS Begum Group Build

Ad: This forum contains affiliate links to products on Amazon and eBay. More information in Terms and rules

Well guys, I went out and bought myself an Italeri Avenger as you probably all already know and I've managed to spread everything across 3 threads, now 4! :oops:

I will be doing another Fleet Air Arm bird, this time it will either be "4F", or it may end up being a made up plane, but from the same squadron, it depends on what I can find for decals or scratch on letters. It's also from SEAC, and not in the Pacific Fleet. This is a 1/48th scale, and I'll be entering as a Catagory 2...

I've begun the cockpit of what, from what little I've done of it, seems like an excellent kit. I will post pictures later!

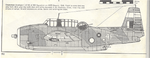
This a profile of the plane:
 

Attachments

  • Picture 20.png
    Picture 20.png
    55.1 KB · Views: 204
Last edited by a moderator:
Here are the pics. Sorry about the quality, I just don't have a camera that can do this close up! It's frustrating.
 

Attachments

  • Photo 89.jpg
    Photo 89.jpg
    66.7 KB · Views: 201
  • Photo 90.jpg
    Photo 90.jpg
    63.2 KB · Views: 190
  • Photo 91.jpg
    Photo 91.jpg
    61 KB · Views: 188
  • Photo 92.jpg
    Photo 92.jpg
    50.8 KB · Views: 200
That was quick mate! Great work Cory, see you got the floor modified OK. I hope you don't have any warping like mine. Check the main floor/spar section. I didn't notice until the bomb bay and floor were assembled and glued.
 
OK, keep checking by dry-fitting. There isn't much in the way of locating ribs, as everthing is to scale. If you think it's going to be a problem, start gluing the fuselage in sections, from the rear, making sure that when you get to the nose, you get the best possible joint. Then, start on the bottom of the nose. There's only about 1/4 inch here, so you might have to use superglue on the sides, where they meet the edge of the forward floor, where it slopes down under the engine bearers. But keep checking, and only use the CA a bit at a time; you'll probably only need it on one side, which in my case was the port side. If all of this is neccessary, ensure you keep the fuselage halves tightly taped or clamped, and don't be surprised if there is still a small gap top and bottom. Note that where the bottom central joint is, is a panel joint on the real thing, so you can get away with a bit more - you don't need to totally eliminate the joint line, as there should be a visible panel joint.
One other thing. With the ventral machine gun, once you've bent the ammo belt into place, it's easier to cut-off the gun at the joint of the belt and gun feed, and leave it out for now. This can be positioned and glued through the rear opening later, after painting the model, and then fit the transparency over it. Same with the tail wheel assembly, it can be assembled, then fitted later. If not, both items can easily be damaged or broken off, and would be a real pain to mask.
 

Users who are viewing this thread

Back