Hasegawa 1/32 Fiesler Fi -1B Storch Gran Sasso

Ad: This forum contains affiliate links to products on Amazon and eBay. More information in Terms and rules

Vaughan

Senior Airman
629
12
Oct 1, 2012
Norwich
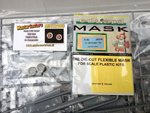
Well here's my next victim, I bought this one earlier this year and added a few extras, Master Caster resin wheels and a mask set from Eduard.
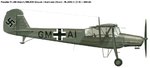
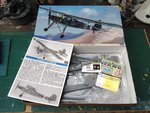
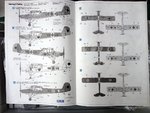
The kit comes with a wide choice of paint schemes including the one that rescued Mussolini from the Sasso Mountains during the second world war. There is a white metal tail wheel and skid depending which version you build. The canopy is hugh talk about a green house you could grow tomatoes in there!
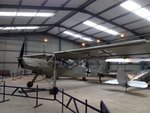
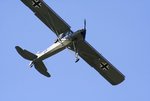
There's plenty of reference material to be had, I have visited The Shuttleworth Collection where they have an airworthy version. I was lucky to see it flying at the Seething air Show last summer it's quite a sight to be seen with a stall speed of 29mph!! so it looks like it's just hanging in the air.
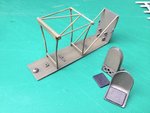
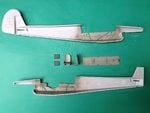
I made a start this afternoon with the sidewalls, seats and floor pan have been sprayed RLM02 with some shading.
 

Attachments

  • _MG_0165.jpg
    _MG_0165.jpg
    82.6 KB · Views: 256
  • 130811_0352.jpg
    130811_0352.jpg
    206.2 KB · Views: 242
  • 130811_0353.jpg
    130811_0353.jpg
    185 KB · Views: 257
  • 130811_0354.jpg
    130811_0354.jpg
    224.8 KB · Views: 256
  • 130811_0355.jpg
    130811_0355.jpg
    185.4 KB · Views: 276
  • 130811_0356.jpg
    130811_0356.jpg
    142.5 KB · Views: 262
  • 130911_0365.jpg
    130911_0365.jpg
    123.4 KB · Views: 279
Last edited:
Alright! Looking forward to see your magic on this one Vaughan. What scheme are you doing?
At this stage I'm not quite sure which one to do the Trop one looks interesting also the winter camo could be an option or even the Storch at The Shuttleworth collection.
 

Attachments

  • IMG_1834.jpg
    IMG_1834.jpg
    143.1 KB · Views: 248
  • FS GMAI.jpg
    FS GMAI.jpg
    38 KB · Views: 236
Last edited:
Progress from yesterday and this morning. Yesterday I sprayed the cockpit framework RLM 2 here's a dry fit with the floor pan. I thought the ejector pin marks on the seats wouldn't be visible once the seat pads were on, but they are, so will have sort that one out. The 8 cylinder inverted engine is well detailed with individual cylinders and pushrods. A coat of aluminium and a wash has been added I will add some ignition leads to the rails using some lead wire as I hope to leave the engine cowlings off.
 

Attachments

  • 131111_0371.jpg
    131111_0371.jpg
    171.8 KB · Views: 235
  • 131111_0383.jpg
    131111_0383.jpg
    144.6 KB · Views: 228
  • 131111_0385.jpg
    131111_0385.jpg
    142.1 KB · Views: 241
New 'technical terms' are being invented on this forum everyday old boy, as you know, I'm pretty sure that you've 'fathered' a few yourself....
 
It has been known !
I'm just visualising the guys in the paint shop at Fiesler - "Hans, macht schnell mit der farben, itz Friday und fier hour already!"
"But Fritz, ich habt der techniche squiggle markerung to finish yet!"
 
Last edited:
Thanks guys
Andy however you look at those squiggles it would be an interesting camo to do and very challenging to boot.
 
Last edited:
Cheers Martin
A small update the cylinder heads are on and were pre drilled to take the ignition wires. Wires are now in situ and attached to their respective rails. Next up will be to fit the engine mountings and fire wall.
 

Attachments

  • 131311_0391.jpg
    131311_0391.jpg
    108.3 KB · Views: 211
  • 131311_0394.jpg
    131311_0394.jpg
    108.5 KB · Views: 200
  • 131311_0396.jpg
    131311_0396.jpg
    108.1 KB · Views: 184
Good stuff Vaughan, and I have a confession to make. I was at Cosford today, but so busy photographing the FW 190, I totally forgot to get some detail shots of the Storch, which I'd passed to reach the '190!
And I'd written it on my list of 'useful shots for forum modellers' too!!
 

Users who are viewing this thread

Back