Hasegawa 1/32 P47D Republic Thunderbolt

Ad: This forum contains affiliate links to products on Amazon and eBay. More information in Terms and rules

Vaughan

Senior Airman
629
12
Oct 1, 2012
Norwich
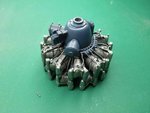
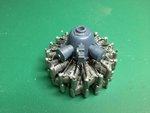
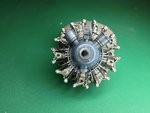
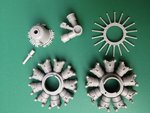
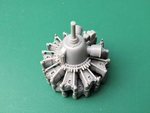
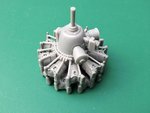
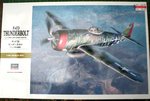
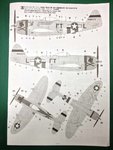
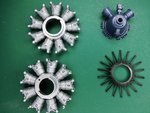
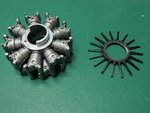
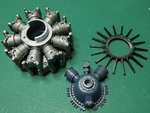
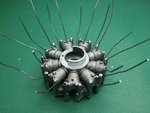
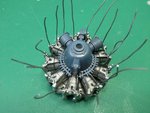
Well I couldn't hold back any longer so I've made a start on the Thunderbolt, it's a big kit and will look impressive on the shelf when finished. I won't be building the 'Gabby' version as most people do, so I've opted for Maj. Glenn T. Eagleston's Thunderbolt with the skull and cross bones nose art. This one's going to be a challenge as it's a NMF but I should be ok as the Wildcat turned out successfully. First up is the Pratt Whitney Double Wasp radial engine. There are very few parts compared to the Trumpeter kits but it's still well detailed. As with most of these planes very little will be seen of the engine but it's nice to put the effort in, so I might even go as far as adding some plug wires. It's a dry fit at the moment but will start spraying it this evening if I get the time.
Vaughan
 

Attachments

  • 20121114_0973.jpg
    20121114_0973.jpg
    157.5 KB · Views: 352
  • 20121114_0975.jpg
    20121114_0975.jpg
    108.3 KB · Views: 360
  • 20121114_0976.jpg
    20121114_0976.jpg
    108.9 KB · Views: 363
  • P47D Tunderbolt.jpg
    P47D Tunderbolt.jpg
    163.4 KB · Views: 368
  • 20121122_0994.jpg
    20121122_0994.jpg
    80.5 KB · Views: 355
  • Screen shot 2012-11-21 at 10.15.35.jpg
    Screen shot 2012-11-21 at 10.15.35.jpg
    52.7 KB · Views: 346
Last edited:
Looking forward to the progress. I have a few detail shots taken at Duxford if you need them.
 
Hi All
I managed to spray the engine components yesterday and have given the cylinders a wash to enhance them. The plug holes have been drilled, lead wires have been inserted and glued with CA. Push rods and distributer ring I will hopefully fit tomorrow .
Vaughan
 

Attachments

  • 20121123_0996.jpg
    20121123_0996.jpg
    173.3 KB · Views: 329
  • 20121123_0998.jpg
    20121123_0998.jpg
    139.2 KB · Views: 335
  • 20121123_0999.jpg
    20121123_0999.jpg
    161.4 KB · Views: 330
  • 20121123_1001.jpg
    20121123_1001.jpg
    120.5 KB · Views: 321
Great start Vaughan. Is that solder you are using for wire?
Andy, I've always used this make of lead wire which is very flexible but can break quite easily.
The pushrods/distributor ring is now fitted, next step will be to attach the plug wires.
Vaughan
 

Attachments

  • 20121125_1003.jpg
    20121125_1003.jpg
    164.2 KB · Views: 320
  • 20121125_1004.jpg
    20121125_1004.jpg
    130.1 KB · Views: 311
Hi All
I managed to spray the engine components yesterday and have given the cylinders a wash to enhance them. The plug holes have been drilled, lead wires have been inserted and glued with CA. Push rods and distributer ring I will hopefully fit tomorrow .
Vaughan

Off to a great start Vaughan!
 
How does this compare to the Revell mess?
Not quite sure what you mean.
Anyway here's the wires trimmed and attached.
Vaughan
 

Attachments

  • 20121125_1006.jpg
    20121125_1006.jpg
    126 KB · Views: 233
  • 20121125_1013.jpg
    20121125_1013.jpg
    116.1 KB · Views: 219
  • 20121125_1015.jpg
    20121125_1015.jpg
    118.3 KB · Views: 227

Users who are viewing this thread

Back