Navigation
Install the app
How to install the app on iOS
Follow along with the video below to see how to install our site as a web app on your home screen.
Note: This feature may not be available in some browsers.
More options
You are using an out of date browser. It may not display this or other websites correctly.
You should upgrade or use an alternative browser.
You should upgrade or use an alternative browser.
Matilda Churchill, British Infantry tanks in action.
- Thread starter CharlesBronson
- Start date
Ad: This forum contains affiliate links to products on Amazon and eBay. More information in Terms and rules
More options
Who Replied?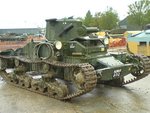
Vassili Zaitzev
Master Sergeant
Cool. I read somewhere, that during the Battle of France, a group of Matilda tanks counterattacked against German Panzers. They did pretty well until Rommel brought up flak 88's against them.
ah, here it is
Battle of Arras (1940 - Wikipedia, the free encyclopedia)
ah, here it is
Battle of Arras (1940 - Wikipedia, the free encyclopedia)
- Thread starter
- #3
CharlesBronson
Senior Master Sergeant
Vassili Zaitzev
Master Sergeant
Yeah, heavy armor, but small gun (2-pounder), limited speed and manuverablity proved it's downfall. The Cromwell proved to better suited though.
- Thread starter
- #5
CharlesBronson
Senior Master Sergeant
Well, yeah, but the Cromwell was a cruiser so it was designed from the begining to be more mobile and fast, the british infantry tank doctrine favoured a slow moving but heavily armored tank, with armamend to destroy enemy armor in order to protect the advancing infantry, however the lack of a suitable HE capable gun was very anoyying in some teathers of operations, like in Africa.
Matilda I knocked out in Arras.
Matilda I knocked out in Arras.
Attachments
- Thread starter
- #6
CharlesBronson
Senior Master Sergeant
Vassili Zaitzev
Master Sergeant
Okay, sorry, what do you mean by HE capable gun. Do you mean High Explosive. Sorry, my tank knowledge is a bit rusty.
- Thread starter
- #8
CharlesBronson
Senior Master Sergeant
Yes, the 2 pounder didnt use HE ammunition until 1943, wich was a bit late. In fact I must correct myself , the gun was capable of shooting explosive rounds but simple there was no provition for that, all the ammo carried was steel core AP.
There was a variant with a 76 mm howitzer, but it used smoke bombs mostly.
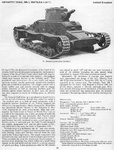
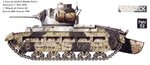
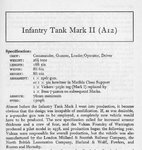
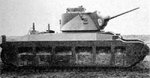
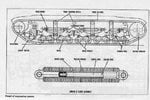
Profile of the "Gamecok", a Matilda II mark I captured in France, note the tailskid designed for avoid falling in a wide trench. also it had the increased clearance wich improved cross country capabilities but increased stress on suspension parts.
There was a variant with a 76 mm howitzer, but it used smoke bombs mostly.
Profile of the "Gamecok", a Matilda II mark I captured in France, note the tailskid designed for avoid falling in a wide trench. also it had the increased clearance wich improved cross country capabilities but increased stress on suspension parts.
Attachments
Vassili Zaitzev
Master Sergeant
Okay, I think I get it now. Lack of HE rounds in North Africa would have been a pain in the as@. AP rounds could be used against APCs and panzers, but would be completey useless against AT guns, bunkers, or soft skinned vehicles.
- Thread starter
- #10
CharlesBronson
Senior Master Sergeant
- Thread starter
- #11
CharlesBronson
Senior Master Sergeant
Vassili Zaitzev
Master Sergeant
Cool, thanks for the info.
Vassili Zaitzev
Master Sergeant
Here's some pics on the Churchill, sorry there just links, I have no clue on how to blow them up.
http://www.warbirdphotographs.com/ATC/ATC-BritishChurchill-1.jpg
http://www.dkimages.com/discover/previews/784/563758.JPG
http://www.warbirdphotographs.com/ATC/ATC-BritishChurchill-1.jpg
http://www.dkimages.com/discover/previews/784/563758.JPG
- Thread starter
- #14
CharlesBronson
Senior Master Sergeant
You have a button in the toolbar for posting pictures, is the fifth counting from the left, also you can upload it from you PC hard disk.
The top one seems a Mark IV or VI. The other is the Churchill flamethrower known as Crocodrile.
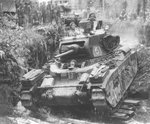
The Matilda in action agaist the italian, the WavelL counterofensive in late 1940 almost knocked out Italy from teh African continent causing apalling losses in the process. The attack was spearheaded by the Matildas.

Overrun italian artillery in Sidi barrani.

Matilda with fascine for trench crossing.

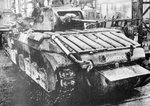
Matilda II Mark II with special ramp for crossing the Bardia fortress wide antitank ditch.

The top one seems a Mark IV or VI. The other is the Churchill flamethrower known as Crocodrile.
The Matilda in action agaist the italian, the WavelL counterofensive in late 1940 almost knocked out Italy from teh African continent causing apalling losses in the process. The attack was spearheaded by the Matildas.
In the meantime, Western Desert Force had also been reinforced, when on 24th September 1940, three new Armoured Regiments, plus other forces, arrived at Port Said. These were, 2nd RTR with Cruiser tanks (mainly A13, but with some A9 and A10s) and 7th RTR with 48 Matilda tanks and the 3rd Hussars which still had MKVI light tanks only. The Matilda's of 7th RTR were the first to arrive in the Middle East. In October 2nd RTR joined 4th Armoured Brigade, while 3rd Hussars joined 7th Armoured Brigade. The Divisional Commander, Major-General O'Moore-Creagh, decided to transfer 'B' Squadron of 2nd RTR to 3rd Hussars and visa versa, which meant that each tank Regiment was able to have at least one Cruiser tank Squadron on its strength. Click here to view the Divisional Order Of Battle at this time. In the meantime 7th RTR started training with various infantry brigades, in their infantry support roll. The 11th Hussars were also strengthened by the addition of No.2 Armoured Car Company RAF with ten Fordson Armoured cars, who became 'D' Squadron (RAF) within the regiment.
General O'Connor was ordered, by General Wavell, to attack in the area of Sidi Barrani, Sofafi and the saltpans of Buq-Buq, making use of the heavily armoured Matildas. However, the Italians had been idle for the last three month, with a string of fortified camps now protecting Sidi Barrani. Three of these, Nibeiwa, Tummar East and Tummar West, lay to the south of the main position at Sidi Barrani and were manned by infantry, heavy artillery and tanks. An estimated 75,000 men were in or around Sidi Barrani, with about 120 tanks and 200 guns, with O'Connor having the 7th Armoured and 4th Indian Divisions. The British force consisted of 25,000 men and a total of 275 light, Cruiser and Matilda tanks.
The plan was for the 7th Armoured lead 4th Indian Division and 16th British Infantry Brigade through the 20 mile wide Enba gap between Sofafi (to the south) and Nibeiwa Camp to sweep west and mask Sidi Barrani and the three camps, from the main Italian army, while the 4th Indian with 7th RTR in Matildas went north to overrun the camps and the town. The attacked was carefully rehearsed during November and on the evening of 8th December the advance (Operation Compass) began.
The 4th Armoured Brigade was across the coast road on 9th December, west of Sidi Barrani, with 4th Indian Division attacking the Tummar camps and isolating Sidi Barrani.
The Italian collapse was dramatic, with the Indians swiftly overrunning Nibeiwa and the Tummar camps, while 7th Armoured cut the coast road. The Italians around Sidi Barrani were soon in full retreat. Aided by the guns of 4th RHA and the advance of the Matildas of 7th RTR, two battalions of 11th Indian Brigade - the 2nd Battalion Cameron Highlanders and 1st/6th Rajputana Rifles soon cracked the defences at Nibeiwa.
The assault started at dawn, when the Matilda tanks of 7 RTR led the attack on the western side of Nibeiwa, their armour proving invulnerable to Italian artillery fire. Together with the infantry, they completely destroyed the Gruppo Maletti (a divisional sized formation of light tanks and Libyan infantry) based in the camp, but the commander; General Maletti engaged the tanks with a light machine gun before he was killed. The Cameron Highlanders from 4th Indian Division, swept through the camp with bayonet, killing several hundred Italians and taking over 4,000 prisoners.
7th RTR then advanced north to assist 5th Indian Brigade in its assault on a large encampment at Tummar West. The advantage of surprise had been lost, and the attack was hampered by a midday sandstorm. The first attack by the Royal Fusiliers was pinned down by enemy fire, but the 3rd/1st Punjabis managed to break through the defences and the camp was taken with a further 2,000 prisoners. Meanwhile, 4th/6th Rajputana Rifles drove off an Italian relief column of tanks and lorried infantry, inflicting 400 casualties without suffering a single injury themselves. The attack on Tummar was reinforced by the New Zealand drivers on the No 4 Motor Company, who having borrowed rifles, charged at the head of the British infantry with cries of "Come on you Pommie bastards".
The following morning, 10th December, saw the surrender of the now dispirited and isolated Italian garrisons of Tummar East and Point 90, while 16th Infantry Brigade advanced north through fog towards the coastal town of Sidi Barrani. Unfortunately, the fog lifted just as the Argyll Sutherland Highlanders began their assault, and they suffered relatively heavy casualties from Italian artillery. However, 10 Matildas of 7th RTR arrived to support 2nd Battalion, The Queen's Regiment in a successful attack on the western end of the defences, aided by fire from Royal Navy monitor, HMS Ladybird, which culminated in the surrender of the Black Shirt Legion garrison.
By the evening of 10th December, over 5,000 prisoners had been taken and with 7th Hussars cutting of their retreat route at Buq-Buq, so many Italians surrendered that they became to numerous to count. In the end some 20,000 prisoners were captured, with the British suffering about 700 losses.
This left 7th Armoured to continue the battle around Sidi Barrani and they soon took the Rabia and Sofafi camps, which the Italians had abandoned. At this time the 11th Hussars had discovered the Italian 64th Catanazaro Division, under General Armico, well dug into the dunes west of Buq-Buq, behind the salt flats, with thirty-five guns of all types covering the east and another twenty-five guns of all types covering the south. A hastily assembled force of 3rd Hussars, a squadron of 2nd RTR, cruisers from the 8th Hussars, along with 'B' 'C' Squadrons of the 11th Hussars, plus a battery of 4 RHA, all under the command of Lt-Colonel John Combe (11th Hussars) attacked the Italian force. They met strong opposition from the Italian artillery, which stopped the advance of 'C' Squadron, 3rd Hussars, and knocked out many of the tanks of 'A' Squadron. The Italians were finally overwhelmed by a flank attack by 8th Hussars, in Cruiser tanks, along the western seaward side.
Shocked by the violent assaults and the number of defeats, the Italian army was now in full retreat, while being harried by 7th Armoured's Support Group and of course roving patrols of 11th Hussars. These forces were of Birkforce (consisting of 7th Hussars, half of 11th Hussars, with two Batteries [1 field, 1 Anti-Tank] of RHA) and Combeforce (2nd RTR, half of 11th Hussars, with two Batteries [1 field, 1 Anti-Tank] of RHA). On many occasion the Italian air force (Regia Aeronautica) attacked these two forces, delaying their progress. 7th Armoured Brigade was ordered to capture Sollum and get between Fort Capuzzo and the coast, in order to prevent any Italian forces trying to retreat into Sollum, but the Brigade failed to do so, as they preferred to undertake tank maintenance, refueling and eat their evening meal rather than carry out night marches, much to General O'Connor's annoyance! However, the Italians were still chased back across the Italian wire south of Sollum and into Cyrenaica, but they left 38,000 prisoners and a vast quantity of equipment, including 237 guns and over 70 tanks.
By 15th December the Italian army was out of Egypt and the British paused to count their gains, with both sides holding their positions. The Division, less 4th Armoured Brigade, surrounded Bardia waiting for the 6th Australian Division to be brought up to prepare for an assault on Bardia and for supplies to be brought up. The enemy positions around Bardia, which was garrisoned by 45,000 men and over 400 guns (off all types), 12 M-13 Tanks and a Hundred L-3 Tankettes. consisted of a 18 mile long perimeter, with double barbed wire, a four foot anti-tank ditch, many natural wadis and scores of artillery and MG positions, plus six well dispersed minefields. Having captured plans of these defences back in June, the defences were probed for weakness for a while. There was also a need to re-equip as the strength of 7th Armoured had dropped to 108 light tanks and 59 Cruiser tanks, of which many had outrun the designed track mileage.
While the rest of the Division and the Australians prepared to attack Bardia, 4th Armoured Brigade, attacked the by-passed Italian camp as Sidi Omar on 16th December 1940. 2nd RTR lead the attack from the west, with good artillery support by 4 RHA, and soon broke through the perimeter, in tactics not dissimilar to a Napoleonic cavalry charge. 7th Hussars and 'B' Squadron, 3rd Hussars soon joined in, with the battle lasting just 10 minutes. The Italian Fascist gunners, with their guns sited on the east of the position (to face where any assault was most likely) fired to little avail, while under bombardment from two batteries of 4 RHA the main attack had come in from the west and south. 900 Italian prisoners were taken with 50 being killed
Overrun italian artillery in Sidi barrani.
Matilda with fascine for trench crossing.
Matilda II Mark II with special ramp for crossing the Bardia fortress wide antitank ditch.
Vassili Zaitzev
Master Sergeant
CB, thanks for the tip and info, great stuff.
25,000 to 75,000 huh? Usually the attacker needs a three to one advantage, not the other way around.
25,000 to 75,000 huh? Usually the attacker needs a three to one advantage, not the other way around.
- Thread starter
- #16
CharlesBronson
Senior Master Sergeant
You re welcome.
I guess that the Matilda II heavy armor compensated the british numerical inferiority. Not in vane the tank was nicknamed "Queen of the desert"
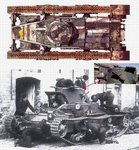
Matilda in the very shooted up Fortress of Bardia.

Cleaning up, the 2 pounder (40mm) main gun armor penetration was 52 mm at 500 meters and 44 mm at 1000 meters, more than enough against any italian afv.

I guess that the Matilda II heavy armor compensated the british numerical inferiority. Not in vane the tank was nicknamed "Queen of the desert"
Matilda in the very shooted up Fortress of Bardia.
Cleaning up, the 2 pounder (40mm) main gun armor penetration was 52 mm at 500 meters and 44 mm at 1000 meters, more than enough against any italian afv.
Vassili Zaitzev
Master Sergeant
- Thread starter
- #18
CharlesBronson
Senior Master Sergeant
Excellent find.
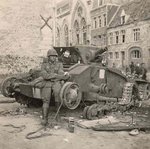
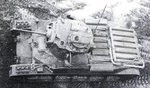
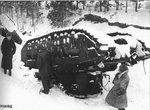
I suppose this view was quite a "shock"") the matilda relative narrow track does not seems very useful in icy conditions.
the matilda relative narrow track does not seems very useful in icy conditions.
Command staff of the 3rd Shock Army observing turned over "Matildas" from the 170th Separate Tank Battalion. February, 1942
I suppose this view was quite a "shock"
the matilda relative narrow track does not seems very useful in icy conditions.Attachments
Wildcat
Major
Here's some info on Matilda II used by the Australian Army in the SWP. See from chapter 4 onwards.
The World at War
The World at War
Attachments
Vassili Zaitzev
Master Sergeant
Cool Wildcat, how useful were tanks in the jungle.
Users who are viewing this thread
Total: 1 (members: 0, guests: 1)