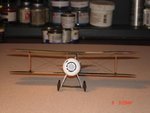
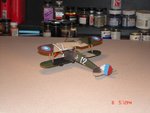
Now it's not quite a start to finish and I am only posting pics because this guy juussst about found the trash can.It has been three nights of attempting to get that upper wing on and thoughts were going thru my mind but patience prevailed.The National emblems were painted on while close on keeping everything centered it's not perfect 90-95%.I also had to paint the tail also the decals were just to thick and brittle.I actually had a brainstorm on the fuselage struts at the very end that may of worked maybe on the next build.The thought is that the wing cabanes seemed pretty easy to line up but if the fuse struts just sit on a platform with the top poking a hole in the wing it might be easier to do last??So pics are in order.......
Navigation
Install the app
How to install the app on iOS
Follow along with the video below to see how to install our site as a web app on your home screen.
Note: This feature may not be available in some browsers.
More options
You are using an out of date browser. It may not display this or other websites correctly.
You should upgrade or use an alternative browser.
You should upgrade or use an alternative browser.
NI-28C Roden 1/48
- Thread starter javlin
- Start date
Ad: This forum contains affiliate links to products on Amazon and eBay. More information in Terms and rules
More options
Who Replied?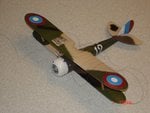
meatloaf109
1st Lieutenant
Yeah, that is how its done. Outer to inner on the struts.
Love the paintjob; Are those posters on the wings?
Love the paintjob; Are those posters on the wings?
- Thread starter
- #3
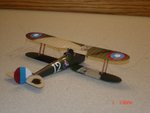
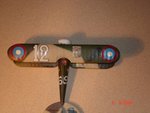
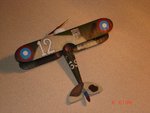
Posters they are.Thanks for the confirmation on the wing assembly must of been lucky in the past.actually five colors in that paint job the two green are real close to each other.I went and bought all Humbrol paints(numbers provided)since it wasthe only real numbers provided.
Crimea_River
Marshal
Looks good Kevin.
meatloaf109
1st Lieutenant
Can you do a couple of close-ups on the posters?
I can dig it on the lucky part, I built a good many bi-planes before it twigged with me.
Worst fitting one for me was a Clasic Airframes F4B-4, constructed in 2001, oddly enough, I am building another now.
I can dig it on the lucky part, I built a good many bi-planes before it twigged with me.
Worst fitting one for me was a Clasic Airframes F4B-4, constructed in 2001, oddly enough, I am building another now.
That's a nice bit of work Kevin!
- Thread starter
- #8
Airframes
Benevolens Magister
Nice one Kevin.
Aaron Brooks Wolters
Brigadier General
I can understand your frustration Kevin. That looks VERY sharp sir!

Vic Balshaw
Major General
Looks good Kevin.
- Thread starter
- #12
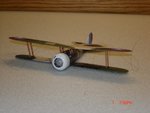
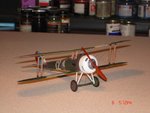
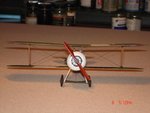
I was beginning to think I was going to have to repaint the struts for the gear since most NI-28s had the chocolate on the outside and light green to the inside but appears that Eddie's plane may of been white as represented on the boxart.The tail still need some rigging and still some more touchups to the upper wing I guess a little more super glue and sanding.The last thing I have to do is the prop with some simulated wood grain on the the next kit the prop will be one of the first efforts since so long to cure.Paul tried to get a photo of the poster for ya with more time I could photo edit in the next couple of days.
Attachments
meatloaf109
1st Lieutenant
Sweet!
A4K
Brigadier General
That's a fine job Kevin, good on ya!
Matt308
Glock Perfection
beauty!
Crimea_River
Marshal
With all.
Tony Hill
Tech Sergeant
Lovely work on such a small scale!!
- Thread starter
- #18
Thanks fellas I like the lines and colors over the last build for sure.I have a 1/32 Hobbycraft Camel I like to give a crack at or the Classic Airframes 1/48 He-51 in silver dope with medium blue nose and tail band.Tha only thing on the the Camel is I might try more of the wood grain effect and making some of my own buckles  I actually like doing the rigging and so many of these WWI birds have such nice colors rivals the ETO 8th AF.Cheers
I actually like doing the rigging and so many of these WWI birds have such nice colors rivals the ETO 8th AF.Cheers- Thread starter
- #19
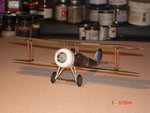
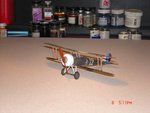
Well she is done!!I think the propellar came out looking pretty good for 1/48.I started with wood from Testors as a base,Future,red brown oil well thinned and then two darker brown oils dried out some brushed on.Then once this is dry you use Tamiya Clear Orange as your lacquer kinda blends it all.Hope it looks OK.Cheers
Attachments
Last edited:
vikingBerserker
Lieutenant General
BEAUTIFUL!
Users who are viewing this thread
Total: 1 (members: 0, guests: 1)