Airframes
Benevolens Magister
Due to a couple of deep penetration injections to my shoulder, I'm unable to continue with the Fennec build at the moment, as I need to avoid things such as sanding, filing and sawing. This also prevents me continuing with the commission builds still (slowly!) in progress.
So, in order to pass the time of day, and retain my enthusiasm for modelling, I decided to do a simple, Out of the Box build (yeah, right!), using the old Monogram 1/48th scale 'Razorback' kit.
As it seems every man and his dog, nephew, and the nephew's dog, only builds ETO P-47's from either the 56th or 78th Fighter Groups of the 8th Air Force, and there's nothing wrong with that, it's long been my intention to portray an aircraft from one of the biggest users of the type, and also possibly the most overlooked users.
The 9th USAAF had a total of 15 P-47 Groups based in England during World War 2, operating mainly from ALGs (Advanced Landing Grounds) spread along the length of the South coast area, from Hampshire to Kent, before moving to the Continent in late July 1944. Operating at first as escort for the Medium bombers of 9th AF, and for the 'Heavies' of 8th AF, these Fighter Groups were then assigned a tactical role, under the command of IX TAC, operating as fighter-bombers attacking targets such as bridges, airfields, railways and other lines of communication in Northern France and beyond, a task which was greatly intensified on the run-up to D-Day, and continued, in support of ground units, alongside the RAF's 2 TAF, to war's end.
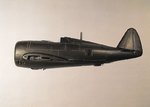
This small 'cameo' diorama will depict a P-47D-16 or 20, just about to start up, ready for another sortie against bridges in Normandy, soon after D-Day.
Subject to the results of currently ongoing research, the aircraft depicted will be from either the 50th, 362nd or 404th Fighter Group, and will be shown standing on a dispersal of Sommerfeld Matting, loaded with two, 1,000lb bombs and a 'belly tank', with the pilot strapped into the cockpit, the Crew Chief in front of the port wing, and the Assistant Crew Chief, fire extinguisher at the ready, near the starboard-side engine cowling. Various service items will be spread around the 'scene' as 'set dressing', and these will be shown and described as the build progresses.
The kit, originally dating from around 1967, was donated by Karl (Rochie), and is devoid of packaging, instructions or decals, none of which are a problem, and, judging by the plastic and the mouldings, is probably one of the releases from the 1980s. I've built two or three of these over the years and, bearing in mind its age, it still provides a good representation of the 'razorback' variant, with only a very small number of minor inaccuracies, the result of economy in production, which are hardly noticeable and easily corrected if required.
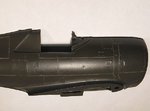
I had intended to ignore the raised panel-line detail which, once painted, is quite acceptable, but, after fiddling about with a couple of the panels, decided to re-scribe the whole lot, a task which was a lot easier and quicker than anticipated.
PIC 1. Shows the re-scribing underway, with the port fuselage half done, but not yet polished.
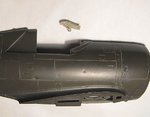
PICS 2 and 3. The kit has the moulded gun sight and instrument panel glare shield as part of the fuselage, with a slot for the armoured glass panel. As I wanted a better representation of the sight and its mount, and also wanted to show the rear of the instrument panel, this area was removed, and a K-14 gun sight mount, from the Academy kit, had the sight head removed and was adapted for use with a scratch-built sight.
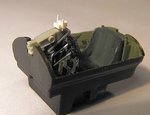
PICS 4 and 5. The adapted sight mounting bracket in place, with the basis of a scratch-built MkVIII reflector sight head in place. The sight's reflector 'glass' will be added before fitting the armoured glass and windshield. Also shown is some of the wiring and 'plumbing' added to the moulded instruments on the reverse of the panel, added from two gauges of lead wire.
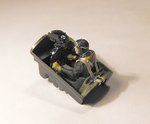
PIC 6. As the pilot is a central figure (literally) of the diorama, a suitable figure was sourced form the ICM USAAF figures set, this being a pilot from the PTO. The figure was therefore modified, by shaving off the 'rolled up' sleeves and carving folds to represent the A-1 leather jacket. The helmet was also slightly modified, the goggles lenses drilled out (later filled with PVA to represent the 'glass' lenses), and the head removed, and re-set at a different angle. The torso was also fitted at a different angle, leaning slightly forward and to the left, with the left hand on the throttle lever, and the right hand reaching for the switches. In order to allow the legs to fit into the cockpit around the rudder pedals, the feet were removed, below the ankles, and the 'leg ends' fit neatly into the pedal's vertical supports.
PIC 7. The pilot figure after clean-up and basic painting. Further tonal additions were made once the figure was 'seated' and the oxygen mask fitted.
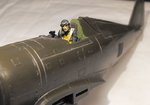
PICS 8 and 9. The pilot in the cockpit, with seat harness added from strips of painted foil, and an oxygen mask from the Academy F-86 Sabre kit. Some areas need re-touching, due to marks and abrasion from handling, and this will be done once the masks are removed from the model itself, after painting.
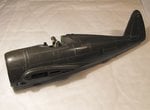
PICS 10 and 11. The fuselage has now been joined, and work has commenced on eliminating all traces of the joints. Various vents, jacking holes and breather holes have also been drilled out.
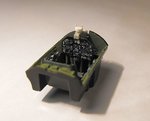
The final shot gives some idea of how the pilot's pose will fit into the overall 'scene' of the diorama.
So, in order to pass the time of day, and retain my enthusiasm for modelling, I decided to do a simple, Out of the Box build (yeah, right!), using the old Monogram 1/48th scale 'Razorback' kit.
As it seems every man and his dog, nephew, and the nephew's dog, only builds ETO P-47's from either the 56th or 78th Fighter Groups of the 8th Air Force, and there's nothing wrong with that, it's long been my intention to portray an aircraft from one of the biggest users of the type, and also possibly the most overlooked users.
The 9th USAAF had a total of 15 P-47 Groups based in England during World War 2, operating mainly from ALGs (Advanced Landing Grounds) spread along the length of the South coast area, from Hampshire to Kent, before moving to the Continent in late July 1944. Operating at first as escort for the Medium bombers of 9th AF, and for the 'Heavies' of 8th AF, these Fighter Groups were then assigned a tactical role, under the command of IX TAC, operating as fighter-bombers attacking targets such as bridges, airfields, railways and other lines of communication in Northern France and beyond, a task which was greatly intensified on the run-up to D-Day, and continued, in support of ground units, alongside the RAF's 2 TAF, to war's end.
This small 'cameo' diorama will depict a P-47D-16 or 20, just about to start up, ready for another sortie against bridges in Normandy, soon after D-Day.
Subject to the results of currently ongoing research, the aircraft depicted will be from either the 50th, 362nd or 404th Fighter Group, and will be shown standing on a dispersal of Sommerfeld Matting, loaded with two, 1,000lb bombs and a 'belly tank', with the pilot strapped into the cockpit, the Crew Chief in front of the port wing, and the Assistant Crew Chief, fire extinguisher at the ready, near the starboard-side engine cowling. Various service items will be spread around the 'scene' as 'set dressing', and these will be shown and described as the build progresses.
The kit, originally dating from around 1967, was donated by Karl (Rochie), and is devoid of packaging, instructions or decals, none of which are a problem, and, judging by the plastic and the mouldings, is probably one of the releases from the 1980s. I've built two or three of these over the years and, bearing in mind its age, it still provides a good representation of the 'razorback' variant, with only a very small number of minor inaccuracies, the result of economy in production, which are hardly noticeable and easily corrected if required.
I had intended to ignore the raised panel-line detail which, once painted, is quite acceptable, but, after fiddling about with a couple of the panels, decided to re-scribe the whole lot, a task which was a lot easier and quicker than anticipated.
PIC 1. Shows the re-scribing underway, with the port fuselage half done, but not yet polished.
PICS 2 and 3. The kit has the moulded gun sight and instrument panel glare shield as part of the fuselage, with a slot for the armoured glass panel. As I wanted a better representation of the sight and its mount, and also wanted to show the rear of the instrument panel, this area was removed, and a K-14 gun sight mount, from the Academy kit, had the sight head removed and was adapted for use with a scratch-built sight.
PICS 4 and 5. The adapted sight mounting bracket in place, with the basis of a scratch-built MkVIII reflector sight head in place. The sight's reflector 'glass' will be added before fitting the armoured glass and windshield. Also shown is some of the wiring and 'plumbing' added to the moulded instruments on the reverse of the panel, added from two gauges of lead wire.
PIC 6. As the pilot is a central figure (literally) of the diorama, a suitable figure was sourced form the ICM USAAF figures set, this being a pilot from the PTO. The figure was therefore modified, by shaving off the 'rolled up' sleeves and carving folds to represent the A-1 leather jacket. The helmet was also slightly modified, the goggles lenses drilled out (later filled with PVA to represent the 'glass' lenses), and the head removed, and re-set at a different angle. The torso was also fitted at a different angle, leaning slightly forward and to the left, with the left hand on the throttle lever, and the right hand reaching for the switches. In order to allow the legs to fit into the cockpit around the rudder pedals, the feet were removed, below the ankles, and the 'leg ends' fit neatly into the pedal's vertical supports.
PIC 7. The pilot figure after clean-up and basic painting. Further tonal additions were made once the figure was 'seated' and the oxygen mask fitted.
PICS 8 and 9. The pilot in the cockpit, with seat harness added from strips of painted foil, and an oxygen mask from the Academy F-86 Sabre kit. Some areas need re-touching, due to marks and abrasion from handling, and this will be done once the masks are removed from the model itself, after painting.
PICS 10 and 11. The fuselage has now been joined, and work has commenced on eliminating all traces of the joints. Various vents, jacking holes and breather holes have also been drilled out.
The final shot gives some idea of how the pilot's pose will fit into the overall 'scene' of the diorama.
Attachments
-
 P-47 Build 009.jpg63.1 KB · Views: 609
 -
 P-47 Build 019.jpg44.8 KB · Views: 576
 -
 P-47 Build 024.jpg46.6 KB · Views: 583
 -
 P-47 Build 032.jpg50.3 KB · Views: 581
 -
 P-47 Build 036.jpg39.4 KB · Views: 593
 -
 P-47 Build 005.jpg42.9 KB · Views: 594
 -
 P-47 Build 011.jpg34.6 KB · Views: 598
 -
 P-47 Build 042.jpg41.4 KB · Views: 599
 -
 P-47 Build 047.jpg39.7 KB · Views: 595
 -
 P-47 Build 056.jpg57.2 KB · Views: 597
 -
 P-47 Build 068.jpg47.2 KB · Views: 595