Well still going on my 1/32 P-51D Big Beautiful Doll thanks to lovely but time consuming twin girls but hit the limit of my resources. At this scale it would be wrong I feel to not scratch build some of the external plumbing for the drop tanks. I'm asking for detailed photos of just this for teardrop shaped 75 gallon tanks. I have a detail and scale book which is great but not quite clear enough and shows different versions. Also the alignment of these tanks to the wing cause with the play I have on the rack they could go anywhere i.e. is the seam parallel to the longitudinal axis or level in flight?
Navigation
Install the app
How to install the app on iOS
Follow along with the video below to see how to install our site as a web app on your home screen.
Note: This feature may not be available in some browsers.
More options
You are using an out of date browser. It may not display this or other websites correctly.
You should upgrade or use an alternative browser.
You should upgrade or use an alternative browser.
P-51D drop tank detail
- Thread starter chook
- Start date
Ad: This forum contains affiliate links to products on Amazon and eBay. More information in Terms and rules
More options
Who Replied?Airframes
Benevolens Magister
Chook, if you aint in a rush, I can dig out some scale drawings showing the fuel and pressure line fittings, and possibly some pics that will help. I had to do the same thing on my 1/32nd scale P51D.
But note, as far as I know, the 78th Fighter Group used the 108 US Gal paper drop tanks, the cigar-shaped ones. I'll double check on this for you though, as, by the time the Group got Mustangs, (Jan'45) a lot of their missions didn't require tanks. I know I have some colour shots of their Mustangs, including, I think BBD, at Duxford in Feb '45, or thereabouts.
Again I'd have to double check, but I believe the tank(s) were parrallel to the axis of the wing, but it is hardly noticeable anyway.
BTW, which kit is it?
- Thread starter
- #3
Thanks Terry. I had a funny feeling I would here from you. It is the Hasegawa kit and come to think of it I have not seen any photos of the BBD with drop tanks in my research and think I will leave them off. As with you, I suspect, accuracy is vital. I don't know quite as much as people on this forum so am happy to listen and want it to be era correct. To achieve this do you think no pylons, empty pylons or bombs on pylons(in kit too) would be accurate? It's Australia day long weekend here so it is filled, sanded and ready to paint and I might just get up to it on the weekend. The kit is originally a Butch Baby kit with decals for BBD thrown in so I'm not sure what would be correct for that era. Appreciate your input and help.
Sean
Sean
Airframes
Benevolens Magister
Hi Sean. I've done the (old) 1/32nd Hasegawa kit too, and still have it. For its age, it's still very good, putting aside some things that need attention, such as the seat, and the area for the radios etc.
The pylons and sway braces were fitted as standard, and should be included.
I'll have a look at my references, and try to post something tonight, or tomorrow (Saturday), so hopefully you'll have something to work with. The plumbing for both styles of tank is fairly simple to do, from stretched sprue or wire, but attaching to the wing is a bit of a PITA, as there is no way to avoid a little damage to the paintwork, unless you drill small holes first.
Watch this space for pics!
Terry.
Lucky13
Forum Mascot
Awesome pics! 8)
Airframes
Benevolens Magister
Brilliant stuff Gary! Thanks for that, it's saved me a job!
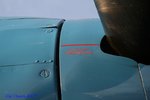
Chook, work off the pics Gary posted, but note the following.
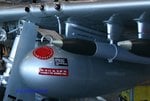
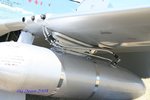
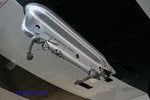
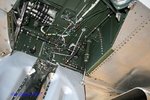
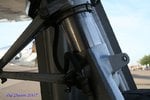
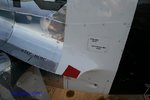
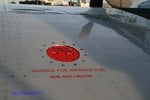
On the first pic of the steel, 'tear drop' tank, the pressure line is shown curved forward and down; on WW2 aircraft, this went into the wing.
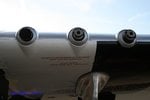
The position for the entry point of this line is shown as in the second pic of the 'paper' tank. However, on WW2 Mustangs, on the 'tear drop' tank, the actual pipes were rubber hose, with a metal pipe and union ('Jubillee Clip') at the bottom, on the tank, and a shorter pipe with the same clip on the top, wing joint. This was to allow easy separation when the tanks were jettisoned. The joints were similar for the 'paper' tanks, from the point where the main plumbing bends up towards the wing, with the remaining, longer plumbing in metal, as per Gary's pics.
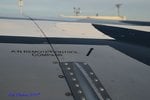
Note that the pic showing the empty pylon, shows the sway braces without the stabiliser pins - the metal rods that protrude through the end of each 'fork', with a small circular pad on the end which contacts the tank. These are included in the Hasegawa kit and, even if the tanks are not fitted, should be in place.
I'll still post the pics taken in '45 at Duxford, but Gary's pic are far better than any of the drawings I could provide.
Note also the angle of the pylon in Gary's last pic - it is mounted to the vertical datum, which means the tank would hang square to the pylon, not parrallel to the line of the wing, another thing I don't have to check - thanks again Gary!
Terry.
Chook, work off the pics Gary posted, but note the following.
On the first pic of the steel, 'tear drop' tank, the pressure line is shown curved forward and down; on WW2 aircraft, this went into the wing.
The position for the entry point of this line is shown as in the second pic of the 'paper' tank. However, on WW2 Mustangs, on the 'tear drop' tank, the actual pipes were rubber hose, with a metal pipe and union ('Jubillee Clip') at the bottom, on the tank, and a shorter pipe with the same clip on the top, wing joint. This was to allow easy separation when the tanks were jettisoned. The joints were similar for the 'paper' tanks, from the point where the main plumbing bends up towards the wing, with the remaining, longer plumbing in metal, as per Gary's pics.
Note that the pic showing the empty pylon, shows the sway braces without the stabiliser pins - the metal rods that protrude through the end of each 'fork', with a small circular pad on the end which contacts the tank. These are included in the Hasegawa kit and, even if the tanks are not fitted, should be in place.
I'll still post the pics taken in '45 at Duxford, but Gary's pic are far better than any of the drawings I could provide.
Note also the angle of the pylon in Gary's last pic - it is mounted to the vertical datum, which means the tank would hang square to the pylon, not parrallel to the line of the wing, another thing I don't have to check - thanks again Gary!
Terry.
- Thread starter
- #8
Thanks Gary. Sensational pics. Terry I scratch built the forks cause the ones supplied in the kit looked nothing like anything I have seen but they did have those vertical pins you speak of although way out of scale. I'm leaning towards leaving the drop tanks off to be true to the era and may just tidy up the forks a bit. You're right about the radio area and the seat. I'm including the pilot to cover up the seat! Gary my next obstacle is making the gun barrels right cause the kit has them protruding all at the same length so your photos will be great for that too.
Sean
Sean
Airframes
Benevolens Magister
You're right about the overscale sway braces, I scratch built the ones on my Hasegawa kit, though those on the Dragon kit aren't bad. I moulded a new seat, in two parts, from plastic sheet, which looked OK with the scratch-built harness in place. The guns I replaced with brass tubing.
Post some pics when you get it done.
Post some pics when you get it done.
- Thread starter
- #10
brass tubing hey? I'm still on the hunt for something like that. Don't hold your breath for finished pics. A good week for me is 2 hours in my shed on my model on saturday morning if I'm not working and the missus is at yoga during the girls morning nap! As well as twins we run our own business and currently have 5 guys working for us so bit busy. We run a mobile welding service so for the exhausts I used some 1.2 mm flux cored welding wire. Drilled out the flux and now it has a real steel look to it. While I'm here some colour pics of landing gear bay would be super too. Also what colour do you recommend I choose for the inside of the canopy cause I'll have to do that before painting the outside?
Sean
Sean
Airframes
Benevolens Magister
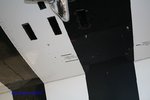
Sounds good Chook. There are some pics here somewhere in the modelling threads showing the main gear bays. However, they were NOT painted as shown. The wheel bays were laquered bare metal; only the front of the main spar, forming the rear wall of the wheel bay, was painted in Zinc Chromate Yellow. The inside frame of the canopy can be Interior Green, or semi-matt black. I painted both mine in the latter, as it seems to be the most common in all the period pics I've seen. Those pics of restored/flying P51's that you might see, will normally show the wheel bays painted - I've seen grey, white Interior Green and Interior Bronze Green - which is more than likely due to a mix of the owner (quite rightly) wishing to give some protection to his valuable aircraft, and looking for authenticity. However, the wheel bays were as decribed, but, there were sometimes mods performed at unit or BAD level. For instance, on the main gear doors, which close when the wheels are down, but can sag or drop fully open, due to hydraulic pressure bleed-off, you may sometimes see a reinforcing plate, covering about the centre third of the door, over the rectangular pressed 'slots' - this was sometimes painted in yellow zinc chromate, probably because it started out as a piece cut from raw metal sheet.
I'll get the colour pics posted later - they're not brilliant quality, but, remember when they were taken, and by an amateur, not a Press Corps or Army photographer.
Cheers,
Terry.
I'll get the colour pics posted later - they're not brilliant quality, but, remember when they were taken, and by an amateur, not a Press Corps or Army photographer.
Cheers,
Terry.
Airframes
Benevolens Magister
Here you go mate, a little later than anticipated, but hopefully in time to help.
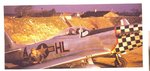
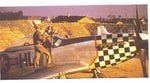
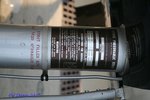
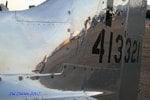
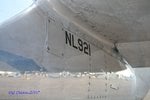
I was wrong! The 78th FG used the 75 US Gal steel 'tear drop' tanks!
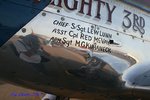
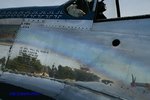
The three colour pics, taken at Duxford around March 1945, are courtesy of Mason Barnard Jr., and are from Roger Freeman's excellent 'The Mighty Eighth in Colour'. They show Col.Landers in 'Anne Nihilator', previously used by Lt. Col. Gilbert. Although these aircraft have the tanks in place, they wouldn't normally be uploaded, and then filled, until immediately prior to the mission. This was even more true of the 'paper' tanks, as the latter would start to leak within about four or five hours, as the fuel attacked the resins and adhesives. Personally, unless, as in one of my dioramas, the scene is depicting an aircraft ready 'to go', I prefer models of the P51 without the tanks.
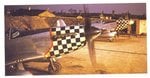
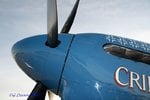
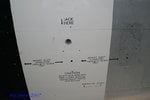
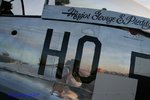
The profile of 'Big Beautiful Doll', P51D-20NA, 44-72218, is from 'Mustang Aces of the Eighth Air Force', by Jerry Scutts. The name was used on at least 11 aircraft, and this one was used from December 1944 (January '45?) until the end of the war in Europe. Ignore the writing at the top of the pic - it's part of the caption from the illustration above this one on the same page, I forgot to airbrush it out, as I couldn't crop without cutting off the top of the fin/rudder!
I hope these are useful, but if you need anything else, give me a shout.
Cheers.
Terry.
I was wrong! The 78th FG used the 75 US Gal steel 'tear drop' tanks!
The three colour pics, taken at Duxford around March 1945, are courtesy of Mason Barnard Jr., and are from Roger Freeman's excellent 'The Mighty Eighth in Colour'. They show Col.Landers in 'Anne Nihilator', previously used by Lt. Col. Gilbert. Although these aircraft have the tanks in place, they wouldn't normally be uploaded, and then filled, until immediately prior to the mission. This was even more true of the 'paper' tanks, as the latter would start to leak within about four or five hours, as the fuel attacked the resins and adhesives. Personally, unless, as in one of my dioramas, the scene is depicting an aircraft ready 'to go', I prefer models of the P51 without the tanks.
The profile of 'Big Beautiful Doll', P51D-20NA, 44-72218, is from 'Mustang Aces of the Eighth Air Force', by Jerry Scutts. The name was used on at least 11 aircraft, and this one was used from December 1944 (January '45?) until the end of the war in Europe. Ignore the writing at the top of the pic - it's part of the caption from the illustration above this one on the same page, I forgot to airbrush it out, as I couldn't crop without cutting off the top of the fin/rudder!
I hope these are useful, but if you need anything else, give me a shout.
Cheers.
Terry.
Attachments
- Thread starter
- #13
Airframes
Benevolens Magister
You're welcome mate, glad to be of service!
Hi Sean, as you look like you are 'going to town' on this model, thought you might find the attached useful. If you need, I can send you the full size shots......and errr, ignore the last pic with dodgy dude in it (ME ! )
)
Attachments
-
 m1.jpg43.1 KB · Views: 330
 -
 m2.jpg60.2 KB · Views: 370
 -
 m3.jpg78.9 KB · Views: 336
 -
 m4.jpg86 KB · Views: 337
 -
 m5.jpg61 KB · Views: 499
 -
 m10.jpg90.2 KB · Views: 324
 -
 m9.jpg56.3 KB · Views: 356
 -
 m8.jpg67.1 KB · Views: 363
 -
 m7.jpg106.5 KB · Views: 686
 -
 m6.jpg74 KB · Views: 341
 -
 m11.jpg65.6 KB · Views: 338
 -
 m12.jpg43.7 KB · Views: 338
 -
 m13.jpg46.5 KB · Views: 325
 -
 m14.jpg76.3 KB · Views: 378
 -
 m15.jpg73.6 KB · Views: 336
 -
 m20.jpg68.6 KB · Views: 367
 -
 m19.jpg53.1 KB · Views: 327
 -
 m18.jpg68.5 KB · Views: 357
 -
 m17.jpg79.2 KB · Views: 457
 -
 m16.jpg58.1 KB · Views: 324
 -
 m21.jpg61.8 KB · Views: 341
 -
 m22.jpg54.4 KB · Views: 321
 -
 m23.jpg45.3 KB · Views: 343
 -
 m24.jpg55.4 KB · Views: 388
 -
 m25.jpg43.3 KB · Views: 352
 -
 m26.jpg102.7 KB · Views: 324
- Thread starter
- #16
Thanks Gary. I'm not sure if I'll make it all the way to town but at least I have a good start and don't worry even you look good in front of the BBD!!! Anyway gotta go now. Girls are napping and so is the mrs so shed time now! Once again you guys are worth more money. Thanks. And Gary I have enough photos to proceed now, cheers.
Sean
Sean
Airframes
Benevolens Magister
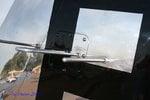
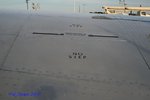
Terrific shots Gary! I'd always wondered exactly where the gunsight indexing line went! You must have put some time, and thought, into getting all those detail shots, great work mate!
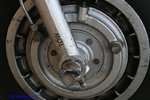
Sean, notice the wheel bays are painted here - on WW2 aircraft, as mentioned, they were laquered aluminium; only the main spar, forming the rear wall of the wheel bay, and not the leg bay, was treated in yellow zinc chromate. Note also the pristine surface of the two aircraft here - they were not that shiny in '44 to '45, although the Crew Chiefs did keep them polished. Remember, these birds spent their entire lives outside, in the British weather! (Britain doesn't have a climate - only weather!)
Sean, notice the wheel bays are painted here - on WW2 aircraft, as mentioned, they were laquered aluminium; only the main spar, forming the rear wall of the wheel bay, and not the leg bay, was treated in yellow zinc chromate. Note also the pristine surface of the two aircraft here - they were not that shiny in '44 to '45, although the Crew Chiefs did keep them polished. Remember, these birds spent their entire lives outside, in the British weather! (Britain doesn't have a climate - only weather!)
Lucky13
Forum Mascot
Awesome shots Gary! 8) Inspiring me to do a P-51 at some point. Have a few 353rd, 78th, 55th 356th FG's lying around....soon enough I'll have to flip a coin to pick a project..
- Thread starter
- #19
Thanks Terry. Priceless once again. Well I got around to scratch building the stabilising rods now got to make some fork pads to put on the forks and plumb them up. Not a lot of shed time this weekend but completed research so good result. I'll go with as you suggested the rear wall only in yellow although I'll loose the contrast between the hoses and green or yellow which would look good. Thanks for the weathering tip also. I never make 'off the showroom floor' models anyhow.
Sean
Sean
Airframes
Benevolens Magister
Glad I could help mate. If you paint the wheel bays in 'silver', with a coat of semi-matt clear, then pick-out the hoses in darker metallics, maybe add just a touch of gold to some, to give that 'certain look', plus black unions etc, I think you'll find they will still contrast quite well. With a diluted dark wash around them, or thin pencil line if possible,they'll 'jump out'.
Look forward to some pics when you can.
Cheers.
Terry.
Look forward to some pics when you can.
Cheers.
Terry.
Users who are viewing this thread
Total: 1 (members: 0, guests: 1)