Painting, Future, Decals, and other finishing challenges.

Ad: This forum contains affiliate links to products on Amazon and eBay. More information in Terms and rules

dneid

Staff Sergeant
1,378
293
Oct 31, 2012
Austin, TX
Hey, All,
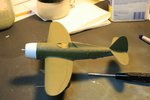
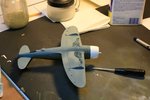
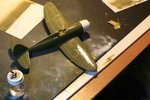
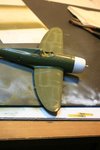
I have the 1st set of painting done on the Revell P-47. I will try to post a few pics this weekend. I am now digging through the forum on weathering ideas and techniques. I have the base coat of OD, medium Grey, and the white cowl done. I think the next step will be to try some "bleaching" weathering of the OD on one wing. The goal of this build is NOT to make a great model, it is more to learn, to experiment, to dig into weathering ideas. I did pick up a nice little set of pastel "chalks" at the local Hobby Lobby. I used pastels extensively many, many years ago (like Shep Paine many years ago). I actually got rather good at using them THEN as witnessed by my 9 best in show winners way back in the mid to late 70s and early 80s. So, be patient with me and let me get a few pics posted. Please feel free to provide any and all feedback. And, of course, hints, tips, and tricks are much appreciated.
Dale
 
Hey, Wayne,
Thanks! I pulled those several weeks ago and have them printed and on the work bench. Damned nice tutorials you put together.
Dale
 
ok, guys, here are a couple of pics....
1st the '47 after initial paint, but prior to weathering or Future
View attachment 218453
The next 2 are after some weathering attempts and application of future. I mixed up some OD with flat white and then cut the mix with thinner. Ratios are: 30 drops OD, 3 drops flat white, 15 drops thinner. I applied this mix with NEW iwata HP-C gravity fed air brush (more questions on that in a separate post). The left wing is obviously far more heavy handed than the right wing. I was trying to give you a sense of amount of Future applied with the 1st pic. 2nd pic was to show the differences between the two wings.
View attachment 218419View attachment 218420

It appears that I need to learn far more touch and finesse with the idea of weathering the top side paint. I know, I know.... less is more. All feedback and hints and tips are VERY much appreciated.
Dale
 

Attachments

  • IMG_2755_small.jpg
    IMG_2755_small.jpg
    236 KB · Views: 173
  • IMG_2756_small.jpg
    IMG_2756_small.jpg
    236.6 KB · Views: 162
  • IMG_2757_small.jpg
    IMG_2757_small.jpg
    240.8 KB · Views: 157
  • IMG_2758_small.jpg
    IMG_2758_small.jpg
    231 KB · Views: 156
Last edited:
Not a bad job but it looks like you're applying the lighter stuff over the Future? I tend to do that before the Future is applied so I can see a true colour differential, then apply the gloss when it's done.

BTW, the pics are quite large at 3Mb each and take a bit long to load. Try saving at a lower quality ( I get mine down to less than 100kB without sacrificing clarity).
 
Hey, Andy,
Nope, the weathering was done before the Future. I am still not sure about my application of Future. I think I may have gone a little too heavy. However, it is looking better after curing for about 18 hrs.
I need to work on my picture library and resize everything down. Those pics are as they came straight of my camera (an EOS 30D).
Dale
 
Just re-size as needed, from your files, saving a separate images if required. I use 'Irfanview' - quick, easy, no loss of resolution or quality - and it's free. Can't comment on the painting, as the pics are still loading!
 
Hey, Terry,
I am on macintosh since the days of Blista, errr, Vista that is. I used iPhoto to resize to under 300kb. I am trying to figure out how to remove the original pics and reload them with the smaller ones.
Dale
 
Last edited:
ok, just how do I REMOVE my original pictures? I thought I had that figured out. Turns out I now have the large and smaller sets uploaded. Can anyone tell me how scrub out the original, bigger than hell pics?
Dale
 
Last edited:
Go to the post, hit Edit Post, then Go Advanced. Scroll down to the Manage Attachments button and hit that. You should see your pictures in a window at the bottom of the box that opens up. When you hover over each, you should see an X in the top right corner. Press the X for each picture you want to delete, then press Done. They should be gone when you Submit Reply.
 
My sequence is to paint the entire plane, I use acrylics and an airbrush. When paint is 100% dry then apply 100% future over the entire plane. Apply decals when the Future is completely dry using Micro-sol or -set. When the decals are set and dry I use an airbrush to apply a 50-50 mix of flat clear and Future. Avoid glass parts which I coat with Future as well. Wayne's method of using a pencil to do panel lines is great and is done after painting
 
Dale, you are welcome. After 40 years of building models I learned more in one year from the great guys on this site than all the other years put together.
 
Hey, Mike,
Oh, I can understand you there 100%!!! These guys are awesome! Terry, Andy, you, stona, wurger, and many more I do not recall at the moment have been a huge aid and a source of some serious chuckles as well. I think I will be picking Terry's brains on a few BoB ideas and builds I have planned.
Dale
 
Dale, I will as I do Game Review first give a light hand on the base color, let it dry, with a darker color to give the lines, leaving the interior dry the lighter colored panels give, let it dry again, finally give 2 or 3 very light hands (diluted between 50 and 60%) covering slightly but revealing the colored bottom, this gives both volume and contrast paneling not have to later.
A while ago I did a course oriented modeling airbrushing and the techniques was to use the maximum amount of posivilidades to model no more to paint.

According to your model I would do is OD mix into 6 parts to 1 part black and give very fine lines in the panels if you want to paint them but you have it as well I would use the oils or pastels for paneling
 
Hey, destrozas,
I will give your ideas a try. They make sense to me and they all sound like solid ideas. Thanks for the time to provide feedback.
Dale
 
Hey, All,
Work and real life have been keeping me busy. But, I have made some progress on the test P-47. Below are 2 shots of where I am at with it. One question for you all; any tips are putting those DAMNED SMALL decals on? I have lost more of them sticking to my fingers, toothpicks, brushes, etc.

IMG_5838_smaller.jpg
IMG_5839_smaller.jpg


BTW, this is my 1st almost complete kit in about 15 yrs. Man, I had to learn or relearn so many things. Overall, I am ok with where it is at this point. I am trying to decide how extensive to get with weathering the plane. Any pics you all may have of heavily weathered aircraft AND/OR models would be really appreciated.
Dale
 
Last edited:
Dale, you are welcome. After 40 years of building models I learned more in one year from the great guys on this site than all the other years put together.

Before I came on this site, I was content with painting the exterior, and then painting the inside of the canopy white so I didn't have to do the cockpits!!!!! I've learned a fair bit as well.
 

Users who are viewing this thread

Back