Question on the R/M 1/48th P-61 Black Widow

Ad: This forum contains affiliate links to products on Amazon and eBay. More information in Terms and rules

Mr. Ed

Airman 1st Class
153
0
Oct 27, 2009
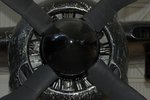
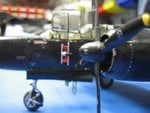
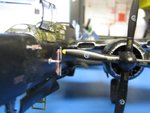
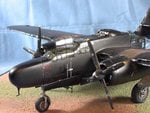
I've seen a couple of you have built the venerable Monogram P-61 Black Widow. Well, I'm working on this kit right now and noticed that the cooling flaps on the cowling are open on one side and closed on the other. I'm doing an in-flight build so I would think that both sets of flaps should be either open or closed, not both of them different. Am I correct in this assumption? If so, it seems an awful lot of work to either close or open one side. I'm aware that there is a replacement cowling set from Cutting Edge. Is this worth buying? Is it readily available and if so where can I find it?

One more thing: I've been told that the canopy parts don't fit particularly well on this kit. Is there a replacement canopy set out there somewhere?

Okay, one more question - I'm going to build Time's-a-Wastin' and saw a post around here about the decals in this kit being inaccurate. Is there a better set of decals available for this bird or am I on my own as far as making the tail stripe blue and the moon and stars white?
 
I'm afraid that if you want to make "Times' a wastin," you're going to have to paint the stripes on your own. Although you could put up the incorrect red and white one and after varnishing over it paint the blue over the red. I built this kit but missed your thread. I'm here now however and will help you with what I know. :)
 
NFN - Thanks for the links. Let me say that if you're going to build this kit, definitely spring for the vacu-formed canopies (or figure out how to make your own). This kit will give you an education in filling and sanding, and replacing raised panel lines. Also, I'm planing on replacing the kit's inaccurate red stripes with ones made from blue and white decal film. We'll see how frustrating that proves to be. This kit is not proving to be my finest moment...
 
I've already built this kit a couple of times. Once as a kid and once almost a year ago. I could help you with some of the spots I found. Like how to set the weights so that you don't need a stand to hold the rear up. :)
 
I'm done building it, except for the radar antenna, which I'll attach at the end. I'm a part of the lunatic fringe of aircraft modelers who believe in in-flight builds, so I don't have to worry about nose weights. However I did have to worry about closing the landing gear doors, building a stand, and repositioning and painting pilot figures for the interior. In other words, a whole world of additional work that I choose to do because I like to see aircraft models with their gear up.

I could use some advice on weathering the thing. It looks like P-61s typically had a lot of chipped paint. This is an effect that I'm not so experienced with. I undercoated it with silver but then used a brand of household paint meant for plastics(gloss black). This was a mistake as the paint is too thick and had trouble covering the underlying silver. It also adheres very well, making it very difficult to chip away to reveal the silver underneath. On the other hand, the paint has helped hide the many pits and cracks that my not-so-great job of filling and sanding has left. Needless to say I'm not planning on entering this one into any competitions.

So how would you go about chipping paint and dirtying it up? I imagine I'll have to paint the silver on with a small brush, but I'm afraid of going too far with this. What was your experience with the decals?
 
For the paint chipping along the panel lines I used a needle dipped in sliver. Carefull not to have a drop form on it. Just enough to get it wet. Then I would do a kind of scatching motion to give it a chipping look around the cowling and leading edges of the wing.
 
Here are some examples of chipping. The first is from the cowling of a P-61C. Notice how the chipping looks like scratches. The other two photos of from one of my P-61B attempts. Hope it helps.
 

Attachments

  • chipped.JPG
    chipped.JPG
    52.9 KB · Views: 233
  • chipping.JPG
    chipping.JPG
    42.7 KB · Views: 240
  • more chipping..JPG
    more chipping..JPG
    46.2 KB · Views: 266
For the dirtying it up part I used a combination of pastels and colored chalk. The pastels I used very lightly, mostly near the exhaust origination points. The colored chalk I used to finish the exhaust staining which on some planes goes all the way to the tail.
 
Some examples of exhaust staining. For those with airbrushes, they use a very large ratio between thinner and paint. There are plenty of others with more experience than I have in this area. Don't forget that there are some stains under the wing as well.
Hope this helps.
 

Attachments

  • p61-13.JPG
    p61-13.JPG
    37.6 KB · Views: 311
  • P-61-005.JPG
    P-61-005.JPG
    48 KB · Views: 263
  • P-61A.JPG
    P-61A.JPG
    80.9 KB · Views: 354
This does help a lot. Thanks. I fooled around with sanding over the weekend using some 600 grit paper to reveal the silver primer. Also, I noticed that the propeller hub on the first photo is glossy while the propeller blades are very flat black. This leads to another question - should there be a flat or gloss finish on this aircraft? Perhaps I should mask off certain panels and spray them flat while leaving others gloss? Or spray some a very dark grey to increase contrast?
 
All Black P-61's were painted with a glossy black. It was found after some testing that the glossy black was near impossible to see even with search lights pointing at it. I painted mine with a semigloss coat to account for wear and dusty landing fields. The propeller hub in the first photo is from a P-61 C sitting in a museum and is probably the original color of the plane. It might also be a newer piece since the rest of the plane is showing some wear. I don't know about the propeller blades. I would figure them to be glossy also but for some reason they are not in this picture. Places where there would be more wear on the aircraft are around access panels around the engine, especially on the top where the ground crew would walk or sit while working on the engine from above. There would also be some wear around the fuel caps as these would show staining from fuel spills.
 
WOW I just came across this thread.

Mr Ed the other way of doing realistic scratching is to use a small natural sea sponge and dab silver paint on to the original surface. To get it to look right press the sponge against a tissue or paper towel until most of the paint is removed, just like when you dry brush, then work slowly on the original paint. A little goes a long way so don't over do it.

To Night fighter Nut, can you show us some more pictures of your finished P-61 or put a link up to the finished model as I just HAVE to see more pictures of her and that great base that you have made for her.

Cheers Switch
 
To Night fighter Nut, can you show us some more pictures of your finished P-61 or put a link up to the finished model as I just HAVE to see more pictures of her and that great base that you have made for her.

Cheers Switch

My P-61 is already posted on the completed models thread back when I first joined this group.

http://www.ww2aircraft.net/forum/your-completed-kits/p-61-close-real-i-could-get-22456.html

It was my first real attempt at modeling in over 20 years. :rolleyes: As for the base, the picture with that in it isn't mine. The picture was only as a reference for Mr. Ed to show what others have done. I am, however, planning to build two more Widows. I have been able to do some more research into this plane and the model and have amassed a few after market goodies. I would really love to do the group builds but I'm afraid my camera isn't all that great. I have recently though come across a large magnifying glass with light and may be able to take better pictures with it. Will let everyone know then. :)
 
Thanks for the information Night Fighter.
Most camera's have a macro setting which allows you to take close up pictures. Look for a setting with a flower symbol on it as that is the most common symbol used. I bought a cheap $99.00 digital camera a few years ago and it has the macro setting as does my Kodak 4.0mega Pixel compact camera which is now 8 years old now.

Most people don't know what Macro is or what it is used for, find it and the world of close up pictures is at your finger tips :)

Cheers Switcha
 
macro was the one thing I insisted on when I bought my camera years ago...even took a model with me so sales Guy would understand exactly why I wanted the feature!:D
 

Users who are viewing this thread

Back