Airframes
Benevolens Magister
From RCAF to RDAF.
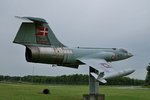
After integration into Canadian Armed Forces, the aircraft had a change of serial number, to 104771 and, eventually, was re-painted in the overall green colour scheme. Struck off charge on 23rd November 1971, it was in storage at Prestwick, Scotland, until being transferred to the Royal Danish Air Force, as R-771, on 24th November, 1973, and originally finished in the light grey colour scheme, as seen in the first pic.
This scheme eventually gave way to an overall matt green finish, which was very prone to weathering, and was eventually changed to a gloss version, FS 14079, the same shade, and the same as the USAF 'Forest Green' as used on aircraft in Viet Nam.
After a number of years service, 'R-771' was eventually used as an airfield decoy, still in the green scheme, before being transferred to Aalborg air base, in North Jutland, and eventually re-painted in the original grey colour scheme, and placed on a pole as a 'Gate Guard'.
I'll be painting the model in the matt green finish, with light weathering, to simulate it's early service when finished in this colour scheme.
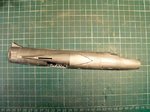
As shown in the previous thread, the kit being used is the old ESCI kit of the F-104C (PIC 2), which needs to be converted to resemble the CF-104/F-104G, which had about 25% more fin area.
First job was to remove the raised surface detail, and re-scribe, before tackling the conversion on the tail, and the work to date is shown in the pics below.
PIC 1. Fuselage sanded after removing raised detail, and awaiting polishing.
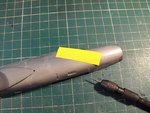
PIC 2. Panel engraving underway, using 'Dymo' label tape as a guide, and a sharpened compass point in a pin vice.
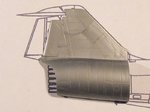
PIC 3. The scale drawing shows the difference in the shape of the tail.
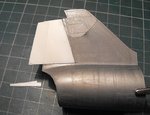
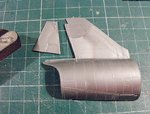
PICS 4 and 5. The F-104C rudder and rear fin area were removed, ready to 'inplant' a new section made from plastic card, and the rear fuselage halves joined.
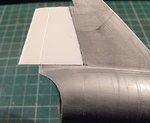
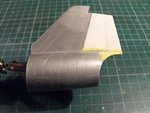
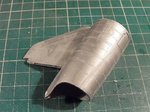
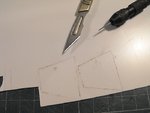
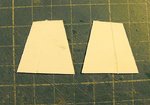
PICS 6 and 7. Using a paper template traced from the scale plan, the shape of the new fin and rudder sections were scribed onto plastic sheet, before being cut out, the rudder hinge line engraved, and the edges lightly sanded.
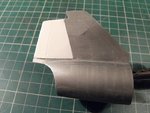
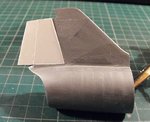
PIC 8. The new sections cemented in place. Once fully set, the trailing edges will be filed and sanded to shape, and the joint with the kit parts filled and blended as required.
The top of the fin will need to be raised slightly, and this will be done once the 'stabilator' has been fitted.
That's it for now, but more soon, once the 'original' 771 has had some more work done to it.
After integration into Canadian Armed Forces, the aircraft had a change of serial number, to 104771 and, eventually, was re-painted in the overall green colour scheme. Struck off charge on 23rd November 1971, it was in storage at Prestwick, Scotland, until being transferred to the Royal Danish Air Force, as R-771, on 24th November, 1973, and originally finished in the light grey colour scheme, as seen in the first pic.
This scheme eventually gave way to an overall matt green finish, which was very prone to weathering, and was eventually changed to a gloss version, FS 14079, the same shade, and the same as the USAF 'Forest Green' as used on aircraft in Viet Nam.
After a number of years service, 'R-771' was eventually used as an airfield decoy, still in the green scheme, before being transferred to Aalborg air base, in North Jutland, and eventually re-painted in the original grey colour scheme, and placed on a pole as a 'Gate Guard'.
I'll be painting the model in the matt green finish, with light weathering, to simulate it's early service when finished in this colour scheme.
As shown in the previous thread, the kit being used is the old ESCI kit of the F-104C (PIC 2), which needs to be converted to resemble the CF-104/F-104G, which had about 25% more fin area.
First job was to remove the raised surface detail, and re-scribe, before tackling the conversion on the tail, and the work to date is shown in the pics below.
PIC 1. Fuselage sanded after removing raised detail, and awaiting polishing.
PIC 2. Panel engraving underway, using 'Dymo' label tape as a guide, and a sharpened compass point in a pin vice.
PIC 3. The scale drawing shows the difference in the shape of the tail.
PICS 4 and 5. The F-104C rudder and rear fin area were removed, ready to 'inplant' a new section made from plastic card, and the rear fuselage halves joined.
PICS 6 and 7. Using a paper template traced from the scale plan, the shape of the new fin and rudder sections were scribed onto plastic sheet, before being cut out, the rudder hinge line engraved, and the edges lightly sanded.
PIC 8. The new sections cemented in place. Once fully set, the trailing edges will be filed and sanded to shape, and the joint with the kit parts filled and blended as required.
The top of the fin will need to be raised slightly, and this will be done once the 'stabilator' has been fitted.
That's it for now, but more soon, once the 'original' 771 has had some more work done to it.
Attachments
-
 Danish 771 number 2.jpg62.3 KB · Views: 176
 -
 DSCF0008 (10).JPG90.8 KB · Views: 166
 -
 DSCF0005.JPG92.9 KB · Views: 190
 -
 DSCF0009.JPG108.5 KB · Views: 165
 -
 DSCF0002.JPG67 KB · Views: 186
 -
 DSCF0001 (2).JPG123.7 KB · Views: 181
 -
 DSCF0003 (2).JPG116.8 KB · Views: 191
 -
 DSCF0001 (3).JPG47.2 KB · Views: 172
 -
 DSCF0002 (2).JPG91.5 KB · Views: 179
 -
 DSCF0003 (3).JPG81.3 KB · Views: 177