Revell 1/32 Spitfire MK1 #4555

Ad: This forum contains affiliate links to products on Amazon and eBay. More information in Terms and rules

prem895

Staff Sergeant
1,172
55
Oct 7, 2012
Toronto/Beijing
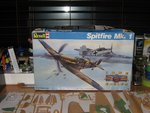
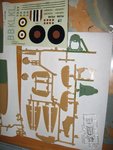
I decided that I would give this a go.This is only my second build so I thought this one might look good if I take my time and do it right. I bought this kit for $5, As you can see it was started but really nothing that can not be corrected. If I can make look like a $10 model then I will have suceeded.BTW is it cheating if I ask Wurger for advice?:lol:
 

Attachments

  • 013.JPG
    013.JPG
    663.9 KB · Views: 410
  • 014.JPG
    014.JPG
    540.2 KB · Views: 384
  • 015.JPG
    015.JPG
    614.3 KB · Views: 393
Yep.. I agree with Wayne. Also another tip here.... you have started the assembling with painting the fuselage interior and wings. Also you have already coloured all pieces of the cockpit interior. Are you sure whether these pieces fit the fuselage and other parts of the cockpit? The model isn't the new tool ( although there appear trash goods as well.) So the "dry fitting" is very important if you don't want to be surprised. The way you should have been follow , should be cutting off of these bulkheads and cleaning them of traces of the sprue frame firstly. Then their fitting to the fuselage and checking if it is possible to put both halves together with bulkheads inside. At the stage of the build you can correct and improve a few details there ( e.g. the indicator panel ) If all is fine with them you should assemble the cockpit using these main pieces only. Those small bits like the pilot's stick , seat, rudder-bar with pedals might be attached when both halves of the fuselage are put together via the cockpit hole using tweezers for instance. Many of modellers use another way for attaching of the cockpit interior though. Assembled cockpit is stuck to one of the fuselage halves. It might be painted or not before attaching.
Please remember that a paint is a very good preservative agianst a glue.

Anyway I'm looking forward to the farther work.
 
Wurger,when I bought this kit it had already been started by the previus owner. The paint is wrong so I will correct that,and re-paint the cockpit bits and wings. I will cut them off the sprues and drt fit for fit issues ans sand and or scrape the little buggers until the fit togeter properly. I have to remember "This is NOT a race" and go slow.I don't want to encounter the Big wreck.
 
I will re-paint all the green Revell #32168 or Humbrol #78 BTW does anyone have a spare pilot figure for this? Your eyesight seems fine CR noticing the paint
 
I'm at work and I am doing research on camo paint for this bird and I am a little confused,FS:34096 Hu:102 (6*Hu:116 + 6*Hu:117 + 1*Hu:163) How do I read this FS34096=Hu102 or FS34096=6 parts Hu116+6partsHu117=1partHu163. I know this stage is down the road but I may as well use company time for this seeing as I can't do the other things at the moment
 
Firstly FS numbers are not really relevant when dealing with British WW2 paint colours. They are used by some paint charts as approximations of the correct colours and approximations is all they are.

I suspect the colour being referred to above is the British colour Dark Green,one of the upper surface camouflage colours. Many paint manufacturers make equivalents for this colour. I don't know which you normally use. If you use Humbrol you can use Humbrol 163 out of the tin. Humbrol 116 is in the ball park too. Some advocate adding a drop or two of red to those Humbrol colours to give a more olive tone.
Don't use Humbrol 30,it lacks the olive tones of the real RAF Dark Green and just looks wrong.

I don't believe that attempting to exactly match a 1940s colour on a scale model is a particularly useful excercise. Far better to get something that looks right on the model

Cheers

Steve
 
Last edited:
I'm at work and I am doing research on camo paint for this bird and I am a little confused,FS:34096 Hu:102 (6*Hu:116 + 6*Hu:117 + 1*Hu:163) How do I read this FS34096=Hu102 or FS34096=6 parts Hu116+6partsHu117=1partHu163. I know this stage is down the road but I may as well use company time for this seeing as I can't do the other things at the moment

You think correctly reading the mixture for the colour, Gary. Also I agree with Steve that the FS numbers are just an aproximation only.

Here you are samples of colours you might use......

1343466615102.jpg
1343463772116.jpg

humbrol_163.jpg


and the RAF Green - Humbrol 30 which isn't a good one but it was recommended for that many years ago. However the Humbrol 116 ( FS34095 ) is considered to be the better one in our times .

humbrol_30.jpg
 
For the RAF colours you might use... The FS34095 the RAF Dark Green - Humbrol116. For the Dark Earth FS30118 - Humbrol29 and for the Sky type S ,FS34583 - Humbrol90. This is a quite standard set of colours.

humbrol_29.jpg
131184936990.jpg
 
Last edited:
Are you stuck on Humbrol? Model Master make some nice enamels with specific formulations to make thinks easy and they are widely available. The make the RAF Dark Green, RAF Dark Earth, and the Sky Type S thay you'll want for your bird, not to mention the RAF Interior Green for the pit.

I say this as there's been some vociferous (ooo, big word) moaning from certain quarters about the quality of the current Humbrol offerings
 
I'll second Wurger's choice above. Those colours are certainly close enough for modelling out of the tin. By the time you've done a bit of shading and applied various coats of varnish they'll look good.
The disruptive pattern (Dark Earth/Dark Green) would be Humbrol 28/116 over the lower colour (Sky) Humbrol 90. Straight out the tinlet,no messy mixing.

Bear in mind that the demarcations between both the two upper colours and the upper and lower colours were tightly regulated. I believe that masks were used in the factories (a view not always accepted despite a considerable weight of evidence). Later resprays do show some feathering but in scale this is very minimal.

In 1941 an attempt was made to feather the demarcation between upper and lower colours but it was soon rescinded.

Hard_demarcation_nomergingtoptounders.gif


With thanks and credit to Edgar Brooks who originally posted this document.

"A defined line of demarcation" is self explanatory.

Cheers

Steve
 
Last edited:
Never used them. Can't vouch for recent Humbrols but loved their old batches (I have some tins that are 25 years old and they're still good). MM are good but I hate the paper seal caps.
 

Users who are viewing this thread

Back