BombTaxi
Tech Sergeant
Hi folks
I was caught a little offside by the request to do a thread for this build, so the first stage of the instructions is actually done (I work quick when I'm motivated ). So here's a few pics of where I'm up to, and I shall do my best to explain how I got there.
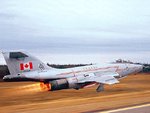
The kit itself is moulded in fairly hard grey plastic, except for the canopy components. Decals are provided for two F-101Bs, both in overall aircraft grey finish, belonging to 15th FIS, Davis Monthan AFB and the 18th FIS, Grand Forks AFB. The 18th FIS machine is shown on the box art:

The first stage of assembly is actually some tiny fuselage details, and the wing module, rather than the cockpit, as you might expect. Firstly, the two fuselage halves, joined spine to spine by a single sprue, are removed and cleaned up, and a fuel vent is fitted to each side of the aft fuselage...


Having got this small task out of the way, the fuselage is put aside, and work begins on the wings, which essentially consist of a lower wing, two upper wings, two landing gear doors, and the engine intake assembly. The model can only be built wheels down, unless you indulge in some surgery - unusual, but not a problem as I wanted it that way anyway.
Firstly, the two undercarriage doors are fitted to the lower wing. The door piece actually includes the door, and the interior of the flap bay, as highlighted below:

The method of fitting is surreal, to say the least, as it involves placing the part inside the landing gear opening, and then rotating it into the correct alignment. I got it right by fluke after about a dozen dry-fits, then had to replicate it twice more with glue, as well as another dry-fit. I may have been a little bamboozled Anyway, here's a pic of the instructions for that phase (which weren't a great deal of help):

Having got the doors in, next job was the intake assembly. Simply an upper and lower half with turbine fans at the aft end of the intake tubes. Once completed, it was placed onto the lower wing. The turbine blades are actually not visible due to the shape of the intake ducts and the lack of light, so I haven't shown them here, and the ducts will be painted when the exterior of the aircraft is, to cut down on masking. Here's the assembly in place. The upper wing halves were added directly after the assembly was fitted:

Finally, splitter plates were added to each intake. There were a bit fiddly, as the intakes seem to be slightly the wrong shape for the splitters. Still, with some glue and firm pressure on the intakes, everything lined up nicely:

And finally, the completed module from below:

Next up is the pit, this *looks* fairly straight forward, and I will post as soon as I have some progress
Cheers
BT
I was caught a little offside by the request to do a thread for this build, so the first stage of the instructions is actually done (I work quick when I'm motivated
The kit itself is moulded in fairly hard grey plastic, except for the canopy components. Decals are provided for two F-101Bs, both in overall aircraft grey finish, belonging to 15th FIS, Davis Monthan AFB and the 18th FIS, Grand Forks AFB. The 18th FIS machine is shown on the box art:
The first stage of assembly is actually some tiny fuselage details, and the wing module, rather than the cockpit, as you might expect. Firstly, the two fuselage halves, joined spine to spine by a single sprue, are removed and cleaned up, and a fuel vent is fitted to each side of the aft fuselage...
Having got this small task out of the way, the fuselage is put aside, and work begins on the wings, which essentially consist of a lower wing, two upper wings, two landing gear doors, and the engine intake assembly. The model can only be built wheels down, unless you indulge in some surgery - unusual, but not a problem as I wanted it that way anyway.
Firstly, the two undercarriage doors are fitted to the lower wing. The door piece actually includes the door, and the interior of the flap bay, as highlighted below:
The method of fitting is surreal, to say the least, as it involves placing the part inside the landing gear opening, and then rotating it into the correct alignment. I got it right by fluke after about a dozen dry-fits, then had to replicate it twice more with glue, as well as another dry-fit. I may have been a little bamboozled
Having got the doors in, next job was the intake assembly. Simply an upper and lower half with turbine fans at the aft end of the intake tubes. Once completed, it was placed onto the lower wing. The turbine blades are actually not visible due to the shape of the intake ducts and the lack of light, so I haven't shown them here, and the ducts will be painted when the exterior of the aircraft is, to cut down on masking. Here's the assembly in place. The upper wing halves were added directly after the assembly was fitted:
Finally, splitter plates were added to each intake. There were a bit fiddly, as the intakes seem to be slightly the wrong shape for the splitters. Still, with some glue and firm pressure on the intakes, everything lined up nicely:
And finally, the completed module from below:
Next up is the pit, this *looks* fairly straight forward, and I will post as soon as I have some progress
Cheers
BT