Navigation
Install the app
How to install the app on iOS
Follow along with the video below to see how to install our site as a web app on your home screen.
Note: This feature may not be available in some browsers.
More options
You are using an out of date browser. It may not display this or other websites correctly.
You should upgrade or use an alternative browser.
You should upgrade or use an alternative browser.
1:1 Spitfire K9817 Cockpit Build
- Thread starter Tony Hill
- Start date
Ad: This forum contains affiliate links to products on Amazon and eBay. More information in Terms and rules
More options
Who Replied?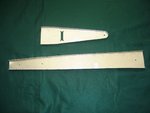
- Thread starter
- #42
Tony Hill
Tech Sergeant
Thanks Heinz.
Nate, cheers for that. I wish i had half your talent with the alu...I might even consider building metal frame!
A papre copy would be great...but I'll have to reimburse you some how. We can work something out by PM.
Thanks again guys, I'm really enjoying this build!! It's a fun build and having the working analogue instruments (half so far) is a real buzz. No longer do I have to make "engine noises" and stare at parts....now I can sit for hours increasing throttle, watching radiator and oil temps rise..then reduce throttle and watch them fall.
I feel I've grown as a person.
Darryl
Airframes
Benevolens Magister
OK, I give in. With everything else so realistic, how are you going to re-create the smells? That wonderful cockpit smell, the hot oil, coolant, exhaust...and......fear?!!! I suppose the latter could be done by a good intake of baked beans!!!
Junkers88A1
Staff Sergeant
now this i like ") more asap please
more asap please
more asap please - Thread starter
- #45
Tony Hill
Tech Sergeant
Junkers, thanks. I will try to oblige. After this weekend there should be some significant progress.
Terry.....actually I plan to run the whole sim "on the smell of an oily rag" 8)
Sorry, I am receiving treatment for that......
Terry.....actually I plan to run the whole sim "on the smell of an oily rag" 8)
Sorry, I am receiving treatment for that......
Fine work Darryl, doin' a great job keep it up mate!
Darryl,
I don't think the tiff attached. I'm so new at this stuff, I don't know what I
did wrong. I don't know how to pm either (little help). I'm sure we can cover copy and postage, it shouldn't be too much. I live in
Maine. Where are you? My youngest, is in WA for a year.
The aluminum is easy in full soft. Now I have to heat treat, that is going to be more of a problem.
- Thread starter
- #48
Tony Hill
Tech Sergeant
Thanks Wayne, I appreciate the encouragement.
Nate, I'll PM my address and email.
How do you plan to heat treat?
cheers
Darryl
Nate, I'll PM my address and email.
How do you plan to heat treat?
cheers
Darryl
ausflyboy
Airman
Hi Guys, i've been following your work with great interest. I'm a aircraft nut and love collecting aircraft parts! recently i helped dig up the old OAKEY Spitfire graveyard and have a swag of metal that used to be spits/kittyhawks etc which I intend to resuse in my metal casting of replica spit parts for the Oakey project (swords to ploughshares and back again) ironic!! I also dabble a bit in sheet metal work. Ahyhow! I recently have decided I would love to have a Spit panel completed now that I have most of the instruments collected. My question to any out here is would any of you have a copy of a Spit instrument panel CAD drawings so I could get an outer and BFP laser cut? I'm not fussy on the model of spit...or the type of BFP but if available I would prefer the round topped BFP drawing Square just looks too boring!! But as I said I won't be picky hehehe. If any of you are interested in a Boomerang Instrument panel CAD drawing...PM me as I've just finished completing my Boomerang Instrument panel for my project.
Cheers,
Chris
Square just looks too boring!! But as I said I won't be picky hehehe. If any of you are interested in a Boomerang Instrument panel CAD drawing...PM me as I've just finished completing my Boomerang Instrument panel for my project.Cheers,
Chris
Chris,
I have a Mk II all done up in design CAD (old model CAD 3000). I don't have any of a round top BFP, but that shouldn't be to difficult to change.
Some of that material you plan on melting might be of dimensional value to someone out there. Mainly me.
Just finished flanges on frame 8 forward web (stbd). When I learn how to navigate this site, I'll post it. On to the port side and lightning holes.
Let me know what I can do.
Nate
ausflyboy
Airman
Thanks Nate. I have PM'd my address and email for you
- Thread starter
- #53
Tony Hill
Tech Sergeant
Hi, not much time today but thought I'd give a quick progress report:
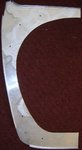
The cast of characters..these are the port side ribs and frames (ex the top part of the actual cockpit area. Visible are the instrument panel, instrument panel spacer, instrument panel main support frame, front wall, rear "seat" wall and the U shaped ribs.


My home made jigs for truing up the framework.

The starboard side substantially put together and trued up. The only thing left to do is the front firewall needs fitting to the longerons once they are cut to final length..that is tonight's job.


Pay no attention to me messy gluing...the ribs slide on and so needed a glue "base" to mould around them for strength. The detail sander will cleen it all up before it is finished.
More to come. Over Easter I should be able to get the cockpit framework just about complete..that is the plan anyway.
Hopefully some time then to catch up on some of the other excellent projects you guys are working on!
Nate, the gunsight came from a guy in Victoria..they come up all the time on Ebay as well. The holding frame came from SpitfireSpares …a cast replica and hideously expensive. I have a plan if you would like a copy but one look at the complex curves made me go for the wallet.
Ausflyboy, Nate seems to have you covered…one thing, you might like to run a Geiger counter over those instruments. They can give you a nasty surprise, particularly if are damaged. I have a P8 compass and a Triple Brake gauge that are in good condition but still set off warnings up close. Opinion is divided on their safety.
Do some research. You are welcome to have the two cheap if you are happy with the safety…I won't be using them as I will have laser cut copies as "dead" gauges.
Thanks all for your continued interest and encouragement.
Darryl
The cast of characters..these are the port side ribs and frames (ex the top part of the actual cockpit area. Visible are the instrument panel, instrument panel spacer, instrument panel main support frame, front wall, rear "seat" wall and the U shaped ribs.
My home made jigs for truing up the framework.
The starboard side substantially put together and trued up. The only thing left to do is the front firewall needs fitting to the longerons once they are cut to final length..that is tonight's job.
Pay no attention to me messy gluing...the ribs slide on and so needed a glue "base" to mould around them for strength. The detail sander will cleen it all up before it is finished.
More to come. Over Easter I should be able to get the cockpit framework just about complete..that is the plan anyway.
Hopefully some time then to catch up on some of the other excellent projects you guys are working on!
Nate, the gunsight came from a guy in Victoria..they come up all the time on Ebay as well. The holding frame came from SpitfireSpares …a cast replica and hideously expensive. I have a plan if you would like a copy but one look at the complex curves made me go for the wallet.
Ausflyboy, Nate seems to have you covered…one thing, you might like to run a Geiger counter over those instruments. They can give you a nasty surprise, particularly if are damaged. I have a P8 compass and a Triple Brake gauge that are in good condition but still set off warnings up close. Opinion is divided on their safety.
Do some research. You are welcome to have the two cheap if you are happy with the safety…I won't be using them as I will have laser cut copies as "dead" gauges.
Thanks all for your continued interest and encouragement.
Darryl
Heinz
Captain
Great stuff Darryl!
109ROAMING
2nd Lieutenant
Awesome work mate!  Your work is highly motivational .Cheers
marek
Senior Airman
Hello Derryl! Fine work. I´m looking your progres with greate intrest. Cant wait for more pictures. Keep working mate.
- Thread starter
- #57
Tony Hill
Tech Sergeant
Thanks heaps guys!
I got the firewall connected up last night, by tonight that will be strong enough to start on the Port side.
The next side I will do slightly differently. To ensure it all matches up I will attache the ribs to the established sides and THEN run teh longerons through them and glue. That will keep all the spacing identical and help keep everything square (or at least any error will be matched on both sides and therefore look "true")
More photos soon
regards
Darryl
Darryl,
Looks awesome. Thanks for the info on where to find some of the stuff I'm looking for. Pretty pricey stuff, but at least someone's making parts. Here's photo of frame 8 forward web on the starboard side. Lighening holes are now in place of the tooling holes, trimming is almost done.
More photos to come,
Nate
Attachments
- Thread starter
- #59
Tony Hill
Tech Sergeant
Darryl,
Looks awesome. Thanks for the info on where to find some of the stuff I'm looking for. Pretty pricey stuff, but at least someone's making parts. Here's photo of frame 8 forward web on the starboard side. Lighening holes are now in place of the tooling holes, trimming is almost done.
More photos to come,
Nate
No worries mate,
Your metal work is awesome. You are making me green with envy already,
cheers
Darryl
Users who are viewing this thread
Total: 1 (members: 0, guests: 1)