"Still going strong..." 15 months later...

Ad: This forum contains affiliate links to products on Amazon and eBay. More information in Terms and rules

Gerry

Staff Sergeant
979
197
Jan 4, 2009
Dublin, Ireland
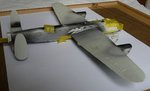
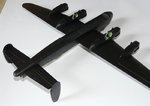
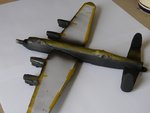
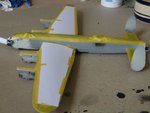
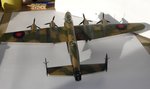
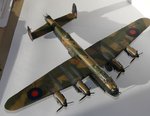
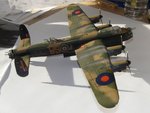
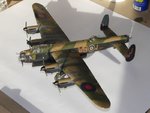
Hi, If you can stomach yet another Lancaster build, I'd like to share with you my (mis)adventures in building Revell's 1/72 Lancaster "Johnny Walker". I first contacted the site 15 months ago looking for references for this particular aircraft and got some good shots from "Airframes", which encouraged me to to search out further references - thanks Terry. However, due to builders and other distractions, I only started the build in March. As I knew there were going to be long gaps in the build, I decided not to do a build diary but, out of courtesy to Terry and to other contributors whose postings I've plundered, to summarise at the end, which I hope to do, over the next few days.

This is the first build I've attempted in 20 years, when I was trying to enthuse my son in model making (an excuse for me really) but that phase didn't last long as X Box and Playstation won out. I would consider myself a novice, having made mainly Airfix kits as a kid, straight out of the box with brush painting. This build is my first real attempt at 'proper' model making - trying for accuracy, scratch-building some added detail and airbrushing - a fairly steep learning curve.

I made a lot of mistakes on the build, due to the my inexperience, but hopefully won't make them again in the future. Most of them I hope I managed to camouflage successfully (literally!). But more of that later.

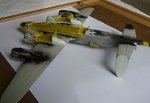
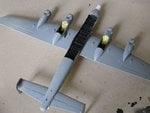
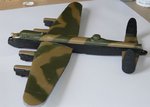
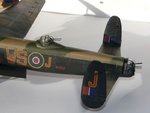
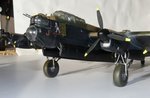
I wanted to build "Johnny Walker" as a night bomber, at about 93 missions, when I assume, the tail fins were still black. I also wanted a classic shape, without the H2S radar bulge.

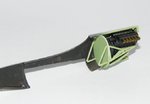
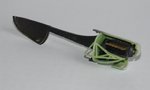
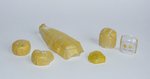
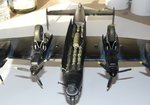
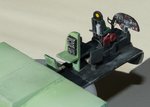
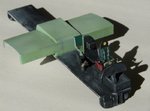
I found the fit of the kit to be very accurate, almost too accurate at times, when even a coat of paint could negatively affect the fit. I've seen a few threads about the accuracy of the kit, particularly the dihedral of the main wing, but I didn't feel confident enough to try to correct this at this stage. I also found a thread when someone (Iain?) corrected the position of a escape hatch. But my fuselage was already complete by the time I discovered this. My main area for enhancement was the cockpit area. Other than that I just added some Quick Boost gun barrels and some extra 'J' decals to the tail fins.

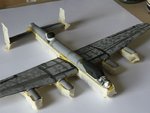
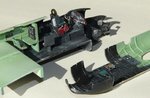
Now I'm going to attempt to upload some shots of the interior.
 

Attachments

  • Interior 1.jpg
    Interior 1.jpg
    54.2 KB · Views: 197
  • Lanc interior 2.jpg
    Lanc interior 2.jpg
    61.9 KB · Views: 190
  • Lanc interior 3.jpg
    Lanc interior 3.jpg
    82.7 KB · Views: 200
These interiors are based on photos I found of Lanc interiors on various web sites and also on an examination of the cockpit at the IWM in London. I hope that they're generic enough to this type, as I could find no interior shots of W4964. I added some detail to the seat backs, seat belts, trim wheel and undercart lever. I also added the flight engineer's seat and a bomb sight and some extra panels in the bomb aimer's compartment.
 
Thanks for all the kind comments. They've encouraged me to go a little further tonight, with some more uploads. Here are the engines, which carry a fair amount of detail. these were tricky enough to fit within the nacelles with the exhausts in place. then I found that to fit the exhaust dampers on the exterior I had to discard the exhaust pipes!
 

Attachments

  • Lanc Engine 1.jpg
    Lanc Engine 1.jpg
    36.2 KB · Views: 164
  • Lanc engine 2.jpg
    Lanc engine 2.jpg
    32.9 KB · Views: 169
My next task was to attach the cockpit interior to the fuselage halves and assemble. Despite many dry fits, when it came to glueing it together, I found that I had to force the underside nose to make it fit. This misaligned some of the openings, which I had to correct and also caused a problem with the cockpit canopy later. Very much later I found a thread that addressed this problem. The solution is to sand the fuselage stringers where they meet the bomb bay bulkheads. This solves the misalignment. Too late for me, unfortunately.

Te pictures are of the fuselage with the wings and the engines assembled. Some filling and sanding at the wing roots and engine nacelles and some spot painting to test for seams.
 

Attachments

  • Fueslage 2.jpg
    Fueslage 2.jpg
    69 KB · Views: 154
  • Underside 1.jpg
    Underside 1.jpg
    86 KB · Views: 153
  • Fueslage 1.jpg
    Fueslage 1.jpg
    58.2 KB · Views: 164
Oh man, I know exactly how frustrating it is to get a poorly-fitting model to come together. You're doing a great job, don't lose heart. Remember that the final paint scheme and weathering can do a LOT to cover the small kit defects.
 
Thanks guys. To continue with my telescoped build account: Having assembled the fuselage, wings and engines without too much difficulty, my next step was to mask for painting the airframe. I decided that I'd assemble the turrets and undercarriage later.

I spent about 6 hours masking the transparencies alone! There must be an easier way...? At this point I'd dipped the clears in (new) Klear but didn't like the result as much as the original kit pieces. Despite polishing they came out a bit cloudy. I'd decided to paint the black surfaces first. When I came to re-mask to paint the top surfaces, I realised that this was a mistake as it would have been easier to do it the other way around. Oh well... I used Revell Matt Black mixed with Anthracite to tone it down, for all blacks. A couple of coats of Klear have been oversprayed at this point. Here's the outcome of this section of the build.
 

Attachments

  • Black underside 2.jpg
    Black underside 2.jpg
    54.1 KB · Views: 138
  • Black coat 1.jpg
    Black coat 1.jpg
    59.5 KB · Views: 138
  • Fueslage 3.jpg
    Fueslage 3.jpg
    74 KB · Views: 138
  • Canopy masking.jpg
    Canopy masking.jpg
    31.9 KB · Views: 147
So, then on to re-masking to paint the Dark Earth/ Dark green camouflage scheme.

First I underpainted all heavy lines in washes of black to bring out detail on the wings, in particular.

At this stage I permanently attached the cockpit canopy, for painting. As mentioned earlier, I had a fit problem, with either one side or the other leaving a gap with the fuselage which needed filling. On filling, I was using a Revell filler which seems to dry as it comes out of the tube, leaving no time for shaping/smoothing. Are there other better fillers that give more manipulation time?

I then chose a Revell Dark Earth and visually mixed it down with other tints to match colour photos of Lancs I have as references. I sprayed a couple of coats of this on the upper surfaces and left overnight.

Next, I scanned and blew up the painting instructions to full size and cut out masks for the Dark Green pattern. These I sat on small balls of Blu Tac to give a feathered appearance. I mixed a little white into the Dark Green to allow for scale and sprayed a couple of coats and left to dry.

I then lifted the masks. DISASTER! I hadn't sealed the Dark Earth coats and the Blu Tac had left grease marks on the paint. I also had some unwanted paint bleed under the masks. So, no option but to completely repaint.

This I did, taking care to spray a couple of coats of Klear between colours, which solved the grease marks. I also tried get the feathering more even, without underspray but found it very hard to get an even result throughout. Any tips for future projects?

The shots below are of the 2nd painting attempt.
 

Attachments

  • Canopy  Fueslage.jpg
    Canopy Fueslage.jpg
    71.2 KB · Views: 149
  • Dark earth fueslage.jpg
    Dark earth fueslage.jpg
    88.4 KB · Views: 139
  • Dark green camou.jpg
    Dark green camou.jpg
    55.5 KB · Views: 137
The spray painting needed some retouching, which I did on a spot by spot basis. Next, I painted and assembled the sub-assemblies: bombs, turrets and I assembled the undercarriage as I positioned it. No photos of these, you'll be relieved to hear!

I had a problem with the sit of the mid upper turret canopy. When fitted, it looks far too high for the aircraft profile. This I solved by sanding about 2mm off the bottom and now looks more realistic. I think to solve it properly, though, the entire turret structure would heed to be lowered inside the fuselage on assembly.

I also found I had a problem when I went to peel the masking tape from the cockpit canopy. Too many layers of paint and Klear had almost fused them to the perspex. I had to chisel them free with a scalpel, unfortunately scratching some of the panels in the process. I didn't have any problem with the turret transparencies, as these were only painted once and positioned at the very end of the build.

I had a real struggle fitting the bomb bay doors because of the earlier mis-alignment, but also there seemed very few points of contact for cementing, but got there in the end.

I used the kit decals without any major problems, first giving all surfaces a few coats of Klear before applying. Some of the longer "Don't walk" decals are difficult to keep absolutely straight. I modified the mission total to 93 and added the extra 'J" to both tail fins. I sealed the decals under two coats of Klear, but found I still lifted part of one with some masking tape I was using for spot retouching. (I was able to repair the damage with the spare decal kit I had).

The wheels I modified using tips from Airframes 'Heavy Hitter" build. Hope you're feeling a lot better lately, Terry.

In trying to make the old girl look like a well used kite, I dirtied her up using washes of Lamp Black and Burnt Umber oil paints well diluted.

The antennae and balance horns were added at the last pass. Finally, everything was sealed using a spray mixture of matt and semi-matt varnish.

And these are the final results:
 

Attachments

  • Finished Lanc 2.jpg
    Finished Lanc 2.jpg
    65.2 KB · Views: 135
  • Finished Lanc 3.jpg
    Finished Lanc 3.jpg
    51.7 KB · Views: 143
  • Finished Lanc 5.jpg
    Finished Lanc 5.jpg
    66.9 KB · Views: 134
  • Finished Lanc 8.jpg
    Finished Lanc 8.jpg
    78.1 KB · Views: 133
  • Finished Lanc 1.jpg
    Finished Lanc 1.jpg
    70.6 KB · Views: 144
  • Finished Lanc 6.jpg
    Finished Lanc 6.jpg
    64.4 KB · Views: 133
  • Finished Lanc 9.jpg
    Finished Lanc 9.jpg
    78.4 KB · Views: 135
  • Finished Lanc 10.jpg
    Finished Lanc 10.jpg
    102.2 KB · Views: 141

Users who are viewing this thread

Back