Stringbags gives me a headache! WWI aircraft...

Ad: This forum contains affiliate links to products on Amazon and eBay. More information in Terms and rules

Lucky13

Forum Mascot
47,836
24,279
Aug 21, 2006
In my castle....
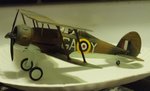
Having a few WWI stringbags sitting. As with all these lovely wee kites, one thing keeps me from starting one.....wires!
I do have the Fokker DrI and DVII, not many strings to get cought in there, but....
But what about the Albatros D.III, D.V, SE5a's and Nieuport 17 that I have....enough strings there to catch a canary!
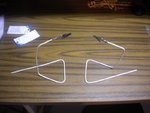
Sometimes I wish that they had made some small marks where to drill for the rigging instead for the drawings...
Is there an easy way to do this, how do you do it??? :oops: :lol:
 
Do like I do Jan and conveniently forget to do the rigging all together! :lol:
The few times I've rigged a biplane I drilled a small hole where the rigging is anchored then used stretched silver sprue, gluing it in the hole with a small dab of Testors tube glue. The silver sprue looks like steel wire and doesn't to be painted. When the glue is dry, light a match and blow it out then place it near the string and it will tighten up real nice. I'll have to post the Hawker Fury I did. The rigging turned out great but took me longer to to then the whole rest of the model! That's why I tend to skip it.
 
I've used Glenn's method, and one which was included in an 'Inpact' Gladiator kit, back ion the mid 1960s, which I've used since, and will be trying again soon. Their kits included a small 'bobbin' of 'invisible thread'. This was inserted into holes all the way through the wing, for example (already drilled in the kit), the stretched to the next point and so on. Once in place, the holes were glued, and the excess thead cut off.
Nowadays, with 'Superglue' around, it's much easier, as the thread can be held immediately with a small spot of the CA, and the holes filled at the same time, cutting off the 'loose ends' there and then.
As I haven't built or rigged a biplane in well over twenty years, I'll be re-starting on the SE5A (Smer) for the 56 Sqn build fairly soon, to see how it goes. Thought I'd try this simple, inexpensive kit, before I touch the Roden Gladiator, or Inpact Bulldog, both of which will have a 'silver doped' finish !
Overall, the sprue method is probably easier, although time consuming, but these days, my hands don't have the dexterity to hold a model, and try to get thin stretched sprue in between the wings! Bl**dy Arthritis!!
 
That's the way I was thinking of trying, drill through the wings and use string to pull through....if there only was a diagram or something, showing where to drill! :( :lol:
 
That's the way I was thinking of trying, drill through the wings and use string to pull through....if there only was a diagram or something, showing where to drill! :( :lol:

Usually three view drawings will give you a good idea of where the rigging needs to be attached - but some kits like the Huma and even some of the Aurora Heller kits either come with hole locations already marked OR have rigging diagrams included.

Otherwise look on Google for images from someone who has built and rigged the model! :)
 
I did one biplane - Hawker Fury - way back and I also used Glenn's method - conveniently forgetting to do the rigging at all. :lol: I was around Harrison's age (or younger) at that time and I simply chose to pretend they already there. Child's imagination and kit in 1/72 scale made that possible. Not sure if that would work now... :lol:
 
In most cases, it's fairly logical, with 'flying wires' and 'bracing wires'. These will be between verical struts, and diagonally between the outer and inner struts, and are normally fitted to a turnbuckle near the base and top of each strut. Examination of a photo of the type being modelled, as a 'worst case' source, should help, or scale drawings if you can get them.
 
Have this thread bookmarked. Planning on a Gladiator for the BoB build. This one I'm motivated for unlike the Stug....but is the Lindberg kit the reboxed Impact kit? It comes with wire and I didn't check the wings. Also comes with PE but the seller included it.
 
Yep, the original Inpact kit has been re-boxed under the Lindbergh, Pyro and Lifelike lables and, I believe, Merit also. Each had a few minor changes, but it's the same basic kit. Haven't seen one for some time, as I got the Roden kit, but I remember it being way, way ahead of it's time for detail and finesse, back in about 1965, and still gets good reviews today. I reckon it can stand alongside the Roden kit, and could be better in parts.
I think the Lindbergh kit has the three-bladed prop (?), which is correct for the BoB period, as the original kit was a Mk1 with the Watts two blade prop.
 
I built the Lindbergh kit quite a wile ago and it was quite a nice kit although it had no cockpit detail to mention. It did have a three blade prop. Here's a picture of the built kit.(No rigging though.:oops:)
 

Attachments

  • glad.jpg
    glad.jpg
    62.2 KB · Views: 262
My tip for rigging:

Grow an extra arm or maybe TWO.

Joking aside a "must have" IMHO for rigging a plane is some type of Second hands or other way of securing the model in a bunch of different attitudes. There are a couple of ready made, but kind of expensive ones on the market. I of course didn't want to spend the money so I made my own with some heavy duty electrical wire with alligator clips soldered on. They can be bent into whatever shape is needed to hold the model in the attitude needed to get at the rigging spot.
 

Attachments

  • extrahands.jpg
    extrahands.jpg
    67.3 KB · Views: 236

Users who are viewing this thread

Back