Tempest experts (1 Viewer)

Ad: This forum contains affiliate links to products on Amazon and eBay. More information in Terms and rules

typhoonken

Airman
21
4
Jan 14, 2007
New Jersey USA
Hello,
I could sure use some advice.
I'm building an Eduard 1/48th Tempest. Now I'm a die-hard Monogram/ Tamiya/ Hasegawa fan and builder but to have a Tempest, Eduard was the way to go.
Cockpit in, horizontal stabs on, and wing is on. But wing is funky.:(
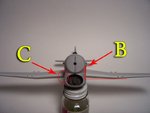
A textbook head-on view of the Tempest shows the wing extends straight out from the fuselage then rises in a dihedral. My bird, however, has an inverted gull wing look, like a Corsair or Stuka but not as severe, just noticable.:cry:
Advice I've received suggested heating and re-forming the wings but I'm chicken, having lost a Mosquito attempting this.
I've considered Dremel-ing at the wing root a new gap, then applying superglue and holding the wing at a 90 degree to the fuselage until set.
My trial manipulations have already weakened and cracked my putty work on the fuselage so I'm getting skittish concerning more major surgery.
Any suggestions?
I'm doing this for a Group Build and time is short now, can't get another. The Tempest used to be my favorite fighter, but I'm leaning back towards its big brother Typhoon.
Anything is most appreciated.

Ken
 
Wurger,
Thanks for responding. This is what I'm dealing with:
tempestwing001.jpg


I've been building kits a long time and this is one foul-up that I can't overlook, really messes up the whole look of the bird.
 
Hi Typhoonken !!!
Something wrong with uploading of the pic.I cannot see this.
 
Hi !!!

Now it is O.K.I see your problem.So,it seems that you have broken the one of the main rules of the modelling, I'm afraid.Try it on three times, glue (fix) once.I don't know how Eduard suggested assembling the wings but unfortunately,you have probably no choice and have to unglue (cut off) the wings.It is the first thing you have to do.You can use the razor-blade or scalpel blade for this.Certainly be careful.The second thing ,using the Tempest drawings in scale of your model, make a pattern "A" in a shape like the red area showes in the pic with Tempest front drawing.It help you to keep the proper elevation of the wings.You can use for this a thick cardboard sheet.
 

Attachments

  • tempest 1pomoc.jpg
    tempest 1pomoc.jpg
    25.3 KB · Views: 196
O.K. go ahead.
If you would decide to separete both wings from the fuselage by cutting off or simply ungluing you have two ways to make the correction.The first is like the "B" point shows in the pic.Using a sandpaper you can remove the plastic from the red marked space, The angle of sandpapering should be between the lower and the upper edges of the cross-section of the wing( I don't know if it is a good translation in English).The second way to correct the elevation is to glue the thin strip of plastic at the lower edge of the cross section of the wing - point "C".Of course you have to use the sandpaper to fit the elevation angle.Than use the "A" pattern to test the elevation.Don't be in a hurry.When the elevation is correct glue the wing.The same way you should use for the second wing.

If you wouldn't decide to cut off the wings you could try to remove some plastic from the upper edge of the fuselage cross-section of the wings ( like the "B" showes ).Then use the "A" pattern to control the elevation of the wing.The same way for the second wing you should follow.

In addition, no matter what of the ways you 'll choose you should remember that it is better think twice then to make haste.I hope I've put you in a proper way.

BTW. Personally, when I glue the wings I use the flat surface ( a board for instance ).Then I prepare two small pieces of the wood in this way that their biggest thickness will be like the "A" pattern one.On the flat board I mark three lines with a pencil.The first is the middle line of the fuselage and two ones are the lines where the wings should be supported to make the angle of elevation properly.Next I put the model with fixed wings on the wooden pieces ( the glue shouldn't be dry yet,therefore i use the cement for plastic - not cyanoacrylate glue) and I charge a bit the model at the top. In the Tempest case, because of the liquid cooler in the front part of the fuselage, I had to put the model with the nose beyond the board.Two days later the model was O.K. and I could continue my work.
 

Attachments

  • tempestwing002.jpg
    tempestwing002.jpg
    49.8 KB · Views: 190
Thanks again for responding, Wurger. It may not be too much cutting, as I did not apply any glue to the wing roots, only where the wing assembly meets the fuselage at the belly and behind the radiator. The wing is very rigid at the wing root and doesn't want to flex enough to meet the fuselage.
And the "A" template idea in your picture is great, I'll use it.

Ken
 
As I was writing just now your second reply with the "B" and "C" drawings came in.
I'll post a finished pic if all goes well.

Thanks, Wurger
 
Tere two pics of my Tempest Mk.V
 

Attachments

  • Tempest_MkV_2.JPG
    Tempest_MkV_2.JPG
    32.3 KB · Views: 231
  • Tempest_MkV_4.JPG
    Tempest_MkV_4.JPG
    24 KB · Views: 248
THX Matt.:D
I've forgotten to mention that it is 1:72 scale model.The cockpit conopy was scratch-built by me 'cos the inclouded one from the kit was poor quality.
 
Nice model Wurger, and well done on the 'fix' issue with the other typhoon, typhoonken should be back in business in no time!
Just remember typhoonken check, check, check your alignment before you reattach those wings.
Best of luck.
 
No, Please do not change that beautiful anomaly on that gloriously reverse engineered FW190!! Pleeeeeez build it as it is!!! It is a Masterpiece!!!
 
THX Wayne.
But I don't understand Slaakman, I'm afraid.Why do you want Typhoonken to make a model that wouldn't be like its real "ancestor"? In modelling it is very importand to make the model that would be related as much as it possible to its prototype.As memory serves the wings of Typhoon were fixed to the fuselage as we can see in the drawing above.
 
(whispering) me and the old lady are trying to buy our first home so keep this quiet.

I restatrted on an ESCI/ Ertl Tempest but the re-scribing was taking too long. I made a large credit card payment recently and decided to re-purchase the Eduard kit on credit and have at it.:D

I bought it and began assembly. Pictures to follow. Shhh, she might hear...

Ken
 
Of course, it's a top secret.It is a good news Ken.Post them as soon as possible,please. :)
On the other hand, why modelers have to use a trick to buy their favourite model?
I've bought a P-11c model in 1:48 scale recently and it would be better if my wife didn't know about it.
 
Nice looking models those ones. Wish I could do that but I don't have the patience or the co-ordination to really be to stick all those intricate pieces together...
 

Users who are viewing this thread

Back