T Bolt
Colonel
User name: T Bolt
Name: Glenn
Category 2, Intermediate
Kit: Airfix Tiger I
Scale: 1/76th.
Accessories: Scratch-built parts, 6"x 6" diorama
This is my entry for the Kursk Armor Group Build.
I bought this kit quite a while ago with a lot of other Airfix armor kits I found on sale for about $4 a piece with the intention of building them with my kids, but their interest wasn't there at the time. My compressor is broken so I'm stalled on the XF-85 until the new one arrives, so I pulled out the Tiger to have a look and was presently surprised. It looks like a decent little kit.
I have not built armor since grade school so any help / advice would be welcome, in particular with color and marking.
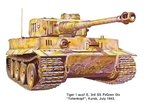
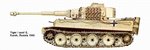
The kit has 2 options. One in North Africa, and one at Normandy. I know the Tiger I was used at Kursk, but all I have found of these machines is black white photos. I like the muli-color camo on the Normandy machine, but don't know if it is proper for the Kursk battle.
Any help would be appreciated.

 User name: T Bolt
Name: Glenn
Category 2, Intermediate
Kit: Airfix Tiger I
Scale: 1/76th.
Accessories: Scratch-built parts, 6"x 6" diorama
This is my entry for the Kursk Armor Group Build.
I bought this kit quite a while ago with a lot of other Airfix armor kits I found on sale for about $4 a piece with the intention of building them with my kids, but their interest wasn't there at the time. My compressor is broken so I'm stalled on the XF-85 until the new one arrives, so I pulled out the Tiger to have a look and was presently surprised. It looks like a decent little kit.
I have not built armor since grade school so any help / advice would be welcome, in particular with color and marking.
The kit has 2 options. One in North Africa, and one at Normandy. I know the Tiger I was used at Kursk, but all I have found of these machines is black white photos. I like the muli-color camo on the Normandy machine, but don't know if it is proper for the Kursk battle.
Any help would be appreciated.
Last edited:
")