trackend
Chief Master Sergeant
Goodmorning,Goodafternoon,Goodevening or Goodnight (please select the the approprieate greeting to match your time zone)")
This is my second ever model build the first being a Tamiya 1/35th Bren carrier and with much swearing and mountains of help form you fellas I ended up with a reasonable result.
Again I will be asking lots of daft questions about kit building (some I have already emailed to our resident experts) Instead of bunging your own threads up I think it is best I have my own one.
I am a total novice at this so I will be making loads of errors but I hope it will help guys who are in the same boat as me not to give up hope but perciever.
Before I even started this build I had a problem as my eyesight is not very good, so not being backward in coming forward I spoke with Airframe (Terry) as he is doing some very fine work. I now know he is around my age and also lacks 20/20 vision but he uses a helping hands bit of kit that has a mag glass attached I had a look on google and I believe I now know what he uses.
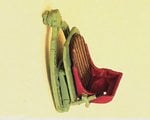
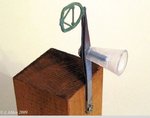
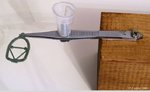
As it's Sunday and no chance of getting one of these for a while I went into my garage and came up with this
(see below) I found a piece of 2X2 , and a pair of tweezers. I then drilled 2 holes screwed one end to the wood and epoxed a small bolts head to one blade of the tweezers and left the bolt loose through the other hole.
I then rummaged around and found a soft plastic end from a bathroom light pull cord (these have a hole for the cord to go through) by letting it cut its own thread onto the bolt I can use it to tighten the blades together
The wood is heavy enough that it does'nt move about but I can stand it up or lay it down as required.
it seems to be really effective if i use it under my homade lamp magnifier it clamps the smal parts firmly without any damage problems.
All of what I am doing from now on I have picked up from reading the threads on this site or articals and info kindly supplied by various members of this site, so it is readily available to all of us here.
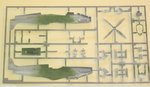
So now down to the build. Revell 1/48th Spitefire MK IX
First I washed the parts to get rid of grease and releasing agent that may be left after the injection molding, then an airbrushed flat base coat (light grey in this case) to give me a good keying surface last for today I applied the airframe green to the major internal surfaces.
More when I have done a bit but be warned Im very slow at doing modeling I read,digest re read then take my time.... then swear and start again so it may be a little while before my next post on this build
This is my second ever model build the first being a Tamiya 1/35th Bren carrier and with much swearing and mountains of help form you fellas I ended up with a reasonable result.
Again I will be asking lots of daft questions about kit building (some I have already emailed to our resident experts) Instead of bunging your own threads up I think it is best I have my own one.
I am a total novice at this so I will be making loads of errors but I hope it will help guys who are in the same boat as me not to give up hope but perciever.
Before I even started this build I had a problem as my eyesight is not very good, so not being backward in coming forward I spoke with Airframe (Terry) as he is doing some very fine work. I now know he is around my age and also lacks 20/20 vision but he uses a helping hands bit of kit that has a mag glass attached I had a look on google and I believe I now know what he uses.
As it's Sunday and no chance of getting one of these for a while I went into my garage and came up with this
(see below) I found a piece of 2X2 , and a pair of tweezers. I then drilled 2 holes screwed one end to the wood and epoxed a small bolts head to one blade of the tweezers and left the bolt loose through the other hole.
I then rummaged around and found a soft plastic end from a bathroom light pull cord (these have a hole for the cord to go through) by letting it cut its own thread onto the bolt I can use it to tighten the blades together
The wood is heavy enough that it does'nt move about but I can stand it up or lay it down as required.
it seems to be really effective if i use it under my homade lamp magnifier it clamps the smal parts firmly without any damage problems.
All of what I am doing from now on I have picked up from reading the threads on this site or articals and info kindly supplied by various members of this site, so it is readily available to all of us here.
So now down to the build. Revell 1/48th Spitefire MK IX
First I washed the parts to get rid of grease and releasing agent that may be left after the injection molding, then an airbrushed flat base coat (light grey in this case) to give me a good keying surface last for today I applied the airframe green to the major internal surfaces.
More when I have done a bit but be warned Im very slow at doing modeling I read,digest re read then take my time.... then swear and start again
so it may be a little while before my next post on this buildAttachments
Last edited: