**** DONE: 1/48 RF-8A Crusader VFP-62 Operation "Blue Moon" 1962

Ad: This forum contains affiliate links to products on Amazon and eBay. More information in Terms and rules

Thanks for the nice comments guys but please if you have any comments, criticisms, please shout, your input will be appreciated.

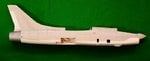
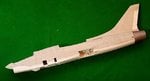
Just a little more to post today, namely the main undercarriage wheel bay which is shown upside down in these pictures.

BTW It still has to weathered yet.

Have also been hard at work in the spray shop and have found that a lot of work is required on the resin fuselage halves, they are full if pin-prick marks which will need filling and then the whole lot gently sanding back with soapy wet and dry.............what a pain

Am flying down to Melbourne tomorrow for a couple of days, going to the Model Expo.......so am hanging up the paint brush for a couple of days.

7-1 Main Wheel Bay Stbd.jpg

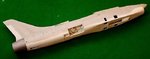
Starboard side of the bay.
7-2 Main Wheel Bay Stbd.jpg


7-3 Main Wheel Bay Port.jpg

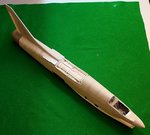
Port side of the bay.
7-4 Main Wheel Bay Port.jpg

7-5 Main Wheel Bay Port.jpg


:hotsun: :hotsun:
 
Last edited:
Love the detail in those bays Vic. For the pin-pricks on the resin parts, have you tried car body primer? The grey stuff works well, like the type you've probably seen in Halfords back in the UK. A couple of coats and light rub down should fill the dimples, and gives a great key for the finishing coats.
Have a great time at the Expo, and get pics of you and Wayne together!
 
Great work!

As for the weights (I know I'm a tad late), I haven't put any in mine. Hasegawa would specify if weight was needed methinks. I guess we'll see how it goes! My F/A-18s didn't need any, nor did an A-7 that my dad just finished, and they're Hasegawa.
 
Thanks guys and thanks for the tip Terry but I'll see how normal filler applied with a toothpick works first and thanks also Cory, your not to late as I'm still working on all the bits that have to be fitted into the fuselage before the two halves can be joined.

:hotsun: :hotsun:
 
Thanks guys, much appreciated

It's been a couple of week since I've posted anything, but I've not been idle. The two halves of the airframe are now together with all the appropriate bits squeezed inside. This was not without its problems with the resin fuselage but we got by with a bit of ingenuity and determination. All the parts have now been sprayed and some weathering has been applied, though in these pictures it's not so evident. Next up is to add the finishing touches to the fuselage with some additional paintwork, before a clear gloss spray and decal application.
 

Attachments

  • 7-9 Airframe.JPG
    7-9 Airframe.JPG
    18.7 KB · Views: 138
  • 7-8 Airframe.JPG
    7-8 Airframe.JPG
    25.7 KB · Views: 114
  • 7-7 Airframe.JPG
    7-7 Airframe.JPG
    23 KB · Views: 129
  • 7-6 Airframe.JPG
    7-6 Airframe.JPG
    48.8 KB · Views: 123
Last edited:
Thanks guys, really appreciated.
Not too much had been going on even though I've seemingly spend hours in the model room. After a bit of spraying and a coat of clear gloss, some bits added and were ready for the decals.

8-1 Decaling.jpg


1. The main wing all decaled up.

8-2 Decaling.jpg


2. A little closer look at the port wing tip with its green navigation light on the forward wing tip and the unusual blue light on the wing end.

8-3 Decaling.jpg


3. The main airframe port side all decked out with the VFP-62 livery, all the detail bits will be added tomorrow.

:hotsun: :hotsun:
 

Users who are viewing this thread

Back