Amodel decal disintegration

Ad: This forum contains affiliate links to products on Amazon and eBay. More information in Terms and rules

SirFrancis

Airman 1st Class
163
76
Feb 10, 2022
Hey guys
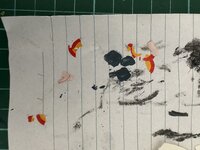
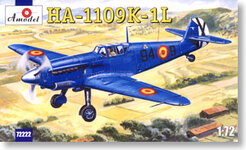
Finally completed my HA1109 Tripala. Just had to apply the decals.......and they basically disintegrated. Even while in the water soaking some started to break apart. I had no hope trying to apply them. Has anyone else had same issue with Amodel decals? If this is just a bad one off set of decals it would be cheaper to buy another kit and try those decals than buying aftermarket decal set.

Any suggestions?

PS I bought it online from Eastern Europe from memory so no hope of complaining.
 

Attachments

  • IMG_0951.JPG
    IMG_0951.JPG
    1.3 MB · Views: 12
  • IMG_0949.JPG
    IMG_0949.JPG
    1.1 MB · Views: 14
  • 10154818.jpg
    10154818.jpg
    25.4 KB · Views: 14
When making your own decals with decal paper on the computer, two coats of clear coating from a spray can seals the decal. I have wondered if old decals should have a coat before soaking. My own experience is two coats as per the instructions for making the decals is best because I decided on one I was making needed to be more sturdy for application, and put seven coats. The application thickness shows and should be removed and remade, but I'm lazy.
 
When making your own decals with decal paper on the computer, two coats of clear coating from a spray can seals the decal. I have wondered if old decals should have a coat before soaking. My own experience is two coats as per the instructions for making the decals is best because I decided on one I was making needed to be more sturdy for application, and put seven coats. The application thickness shows and should be removed and remade, but I'm lazy.
I've done that in the past with the Microscale Gloss to save decals that would explode on hitting water. Use a Decal from the sheet that wasn't going to be used to test.

Today, I would probably use AK Interactive Gloss Varnish than Microscale
 
Sounds like you have an oldish kit and the decals will have dried out over time. With old decals it is best to give them a brush coat or two of a Liquid Decal Film, I use Microscale. This forms a sort of membrane over the decals and helps to hold them together. To be honest, if I have any doubt about the age of the decals even if I have just purchased the kit, I will give the decals a coat of the film just to be on the safe side. :D
 
Sounds like you have an oldish kit and the decals will have dried out over time. With old decals it is best to give them a brush coat or two of a Liquid Decal Film, I use Microscale. This forms a sort of membrane over the decals and helps to hold them together. To be honest, if I have any doubt about the age of the decals even if I have just purchased the kit, I will give the decals a coat of the film just to be on the safe side. :D

Sounds like you have an oldish kit and the decals will have dried out over time. With old decals it is best to give them a brush coat or two of a Liquid Decal Film, I use Microscale. This forms a sort of membrane over the decals and helps to hold them together. To be honest, if I have any doubt about the age of the decals even if I have just purchased the kit, I will give the decals a coat of the film just to be on the safe side. :D
I bought the kit a few weeks ago 'new' from an online model shop. The decal sheet looked new, no aged look to them at all. I've got plenty of old kits and know what old decals look like.
 
The kit may look new but the production run is stated to be in 2011 and if storage was not good, your decals even in the box could have been effected. Anyway, whatever the outcome I hope your able to sort the problem, there is nothing more frustrating than having decal fail on you at such a late stage in the build. :D
 
I agree with Vic and all posted above. The main reason for a such issue with decal markings is the time the decal sheet was printed. Also the conditions of storaging may affect the decals. Addtionally the kind and thickness of the paint coat used for printing can have the impact on. A couple of yours ago I discussed about the issue with Terry to whom I sent decals that seemed to be new. Unfortunately the decal markings got apart while soaking. :( Actually there should have been any reason for that because a week earlier my mate here had used the same decal sheet from the same series and these were applied without any problems. So I concluded that this might have been the chemical composition of water. Possible the water "ingridients" of the water in Poland and the UK could be different. Anyway the best solution to the problem is applying of a clear gloss coat at the entire sheet like S special ed mentioned that. No matter how old the decal sheet is. In the way the decal markings are always protected against the cracking and falling apart. Just a note .. although the clear gloss coat may be both of the acrylic and oil kind I would suaggest the oil one. The varnish is more elastic/flexible than the acrylic one. Personally I use the Humbrol non yellowish oil Gloss Cote. It may be applied both with a brush and airbrush.

hgc.jpg
 
I agree with Vic and all posted above. The main reason for a such issue with decal markings is the time the decal sheet was printed. Also the conditions of storaging may affect the decals. Addtionally the kind and thickness of the paint coat used for printing can have the impact on. A couple of yours ago I discussed about the issue with Terry to whom I sent decals that seemed to be new. Unfortunately the decal markings got apart while soaking. :( Actually there should have been any reason for that because a week earlier my mate here had used the same decal sheet from the same series and these were applied without any problems. So I concluded that this might have been the chemical composition of water. Possible the water "ingridients" of the water in Poland and the UK could be different. Anyway the best solution to the problem is applying of a clear gloss coat at the entire sheet like S special ed mentioned that. No matter how old the decal sheet is. In the way the decal markings are always protected against the cracking and falling apart. Just a note .. although the clear gloss coat may be both of the acrylic and oil kind I would suaggest the oil one. The varnish is more elastic/flexible than the acrylic one. Personally I use the Humbrol non yellowish oil Gloss Cote. It may be applied both with a brush and airbrush.

View attachment 719590
Hi Wojtek, so is this the same as clear gloss paint? I don't understand how the decals don't become stuck to the backing sheet if glossed over? Clearly they don't as you do it, but I'm mystified....
 
Yes this is the same as clear gloss paint. Regarding your understanding .. the question is how the decal markings are made. The kind of markings is printed with paints on a paper as a mover. But it is a half of the truth only. The paper sheet is covered with a layer of a water clear glue firstly. Usually the entire sheet is covered with it. Even these days. Then the clear gloss background film is applied. As I said, the clear gloss film is nothing more but the clear gloss varnish/paint. And then the correct ( mostly but not always ) colours are applied making the destination markings. In the past, the whole paper sheets were covered not only with the water clear glue but also with the clear gloss film. Then the colours were printed on the sheet. The way of making decal sheets required cuting out of all the markings before soaking and applying. Therefore ( also because of making savings ) the gloss film was started to be applied just at the areas only where the colours were going to be printed. Certainly , this made the applying easier because you don't need them to cut out. I'm sure you noticed that each of decal markings has the clear thin "outline " around the markings. It is just the background film that additinally causes the silvering effect often. So what should be done when you covered the whole decal sheet with the clear coat? Let's say , you have to get back to the old way and use the sccissors or scalpel blade for cutting out of the decal markings leaving the thin clear outline for them. Actually, all decal markings should be cut out before soaking and applying to limit the clear film around and the silvering effect finally. No matter if the whole sheet was covered with the clear gloss background or not.
To answer the question how the decals don't become stuck to the backing sheet if glossed over. Just because there is still the layer of the water glue between the paper and the clear gloss film/background. When soaking the paper with the water, the glue gets dissolved allowing the decal markings to be slided onto the model surface easily.
To sum up .. the glue is the separator between the paper and the gloss background film plus the colour markings. If you applied one more layer of the clear gloss paint on the top you make a kind of a sandwich (clear + colour + clear) still separated from the paper with the layer of the glue.

I hope the explanation helps to understand.


BTW .. the water clear glue can be dissolved by the water not only form the top but also from the bottom and side edges of the paper mover.
 
I've used hairspray in the past but any decent, non-yellowing (acrylic preferably) gloss will work. Always spray it on and only use thin coats. You'll have to trim each decal like it's on a common carrier film but it works. Soaking the decals in warm water seems to help the process.
 
Micro-Scale's Super Decal Film is worth having on hand. Your decal issue may not even be an issue of age of the sheet, just bad printing technique. I try to (even on reputable decals) to use an image I know I'm not going to use as a test subject.

It shouldn't be too hard to find replacement Spanish roundels to replace your items, though.
 

Users who are viewing this thread

Back