**** DONE: GB-60 1/48 Avro Anson Mk.I - Zombie Build

Ad: This forum contains affiliate links to products on Amazon and eBay. More information in Terms and rules

Crimea_River

Marshal
45,147
13,176
Nov 16, 2008
Calgary
Username: Crimea River
First name: Andy
Category: Judge – Non-competing
Scale: 1/48
Manufacturer: Classic Airframes
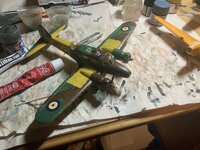
Model Type: Avro Anson MkI
Aftermarket addons: None planned. Just some additional scratch-built details.

This project was started back in 2017 as an entry for GB-34 and was ditched after not much was done. Here is the original build thread: >> 1/48 Avro Anson MkI - Prototype / Weird Aircraft / Trainers

I'll hopefully maintain enough enthusiasm to push this one through to completion based on the below scheme of Anson Mk I s/n 9982 of No. 33 SFTS RAF at Carberry, Manitoba in 1941.

Screenshot 2023-11-27 150026.jpg


Depending how I feel, I may also restart a Fairy Battle in training colours as all the paints that I will need will be similar to this one.
 
Last edited:
Nice one Andy and it brings back memories of my childhood, these guys often flying over the house. I did live on a RAF station where there was a squadron if them. :D
 
Oh boy, I remember now one of the reasons that I parked this kit. Today I tried to figure out how to locate the roof of the wheel well and the firewall. There are no locating pins and the instructions are about as good as a hand wave so I'm off to my references. Looks like some pics I got from Terry and an online IPMS review will set me straight. Details to come.
 
Wayne the slave driver, geez!

So below is what the instructions look like. The issue we have is with locating parts A6 and A15 and if we take the instructions literally, it looks like A15 lines up with the front of the nacelle opening.

23120510.jpg


If you can pardon the fact that I used the inside of this wing as a paint mule, the two next photos show what we are dealing with in reality. Part A6 fits into the nacelle contour but where? Here? Note that A15 is well back of the nacelle face to make this work.

23120502.jpg


How about here? Hmmmm....

23120503.jpg


Doesn't look right I agree, BUT there's some logic to it being there. If you flip the wing over and look at the opening, we see that it is bell-shaped and that the wider part at first glance seems to be where the undercarriage struts fit into the wider opening.

23120505.jpg


Even more so if you try to ft the struts further back - the opening is too narrow.

23120506.jpg


HOWEVER....... it turns out that the last pic above is indeed where the struts go when you look at reference photos. The wider part of the opening is there to accommodate a couple of axle extentions which are probably for attaching tow bars (see below pic given me by Terry).

DSC_0323.JPG


So, the rear part of the opening needs to be made more openinger, like so:

23120508.jpg


And then we have to translate the location of part A15 back up to the inside of the wing to locate A6. I pencilled a couple of marks there.

23120507.jpg


On top of that, one needs to be really careful that A15 is correctly oriented so that the nubs line up with the opening to allow the struts to be positioned. Good thing this plane has a flat dihedral otherwise it would be almost impossible to make sure the struts are vertical.

23120509.jpg


With A6 thus located, it was glued in place with both TET and CA, the latter to hopefully prevent A6 from coming loose. Here's how it all looks when glued together. Note that A15 is well back of the nacelle opening.

23120501.jpg


That was tough. The wing uppers are also now glued in place and the cowls added. Fits are good.

Thanks for looking in.
 
Well done Andy. :thumbright:

Just found ...

The only potential head-scratchers were the wheel wells, as I went back and forth fitting the roof and bulkhead in various positions, then comparing the gear leg position to photos. As shown in my photo, all you need to do is install the wheelwell roofs (parts A5/A6) to fit the well, then trim and attach the bulkheads A14/A15 to the front edge of the roofs. I did need to sand them back a bit in diameter, but once fitted, no problems. Be sure to dry-fit the gear legs in position; I needed to slightly widen the wheelwell openings where the struts protrude.

ansonjv_2.jpg

the source: Avro Anson Mk.I by John Valo (Classic Airframes 1/48)
 

Users who are viewing this thread

Back