Bullet Holes

Ad: This forum contains affiliate links to products on Amazon and eBay. More information in Terms and rules

armourkit51

Recruit
3
0
Jan 16, 2015
Ontario, Canada
Hi,

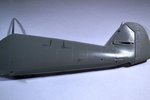
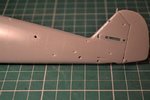
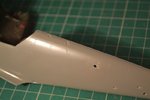
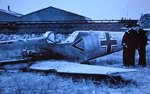
I saw a diorama with bullet holes on the plane wings. I was wondering if there is a guide that I could follow to make realistic bullet holes coming from underneath the plane with metal tear? if I use a drill it will come out as very smooth holes and not realistic looking.

Thanks for all your help.
 
Haven't seen too many models with damage but the few I've seen always start out by thinning the plastic from the inside to the point of almost going through the plastic. Then a hole is punched through, forcing the plastic outwards. Larger holes can have tiny pieces of tinfoil attached to represent torn metal. A spare wing or fuselage would be good to practice on. Lots of damaged aircraft to give you some ideas, from here on the site...http://www.ww2aircraft.net/forum/aircraft-pictures/battle-damaged-aircraft-ww2-15431.html and here...Battle-Damaged B-17 Flying Fortresses: Contents Sorry I couldn't be of more help but someone might be along to help you better.

Geo
 
Is this for entry, or exit holes ?
Also, you'd need to decide where on the aircraft the holes are to be, and how they got there, from what angle, by which weapon(s) and, of course, which type of aircraft has been holed.
Sounds picky, but the angle, and calibre of the weapon, make a heck of a difference to the 'look' of both entry and exit holes, as does the range fired from, to some extent.
Entry holes, for example, are very often more of a 'slit', with the area around the 'hole', if on metal, normally being dented by the shock wave of the round. However, if the strike is 'square on', rare in air combat, then the hole could be neat and round, but probably still with 'dimpled' metal.
Whatever damage is required on a model invariably has to be done before construction, often working from both sides of the plastic, so some thought and planning is needed.
 
You'll find that for the most part, only AA and aircraft cannon rounds (20mm, 30mm) make the "dramatic" damage to aircraft surfaces unlike the machinegun damage, which tends to be as Airframes described.

I certainly agree with fubar's suggestion to browse through this thread to get an idea: http://www.ww2aircraft.net/forum/aircraft-pictures/battle-damaged-aircraft-ww2-15431.html

Many of the photos in that thread are captioned, so you will be able to get an idea of what caused the damage.
 
Here's a couple of pics showing the start of making holes in a 1/32nd scale Bf109E, a project currently 'on hold'.
This is a specific aircraft, flown by Paul Temme of JG2 in the BoB, and crash-landed at Shoreham. The bullet strikes are well documented in a series of photos of the actual aircraft, and their positions were first marked out on the kit's fuselage sides, referring constantly to the photos.
Each strike was then filed and ground down to create the 'dimple' exactly as seen on the real aircraft, with the plastic also being thinned on the inside where required. The holes, slits or larger areas of damage where then replicated by drilling, and careful work with a scalpel and file, to re-create the same shape and size of hole as seen on the real aircraft, and these will then be gently sanded to ensure a smooth surface around each hole and any indentation.
Once the model is constructed, painted and the decals applied, the holes will then be painted as required, to show either bare metal or base primer, again replicating the real thing.
Note that the small amount of work shown in the pics took quite a few hours to achieve, but of course, this is a miniature replica of the real thing, so accuracy was paramount.
Re-creating damage of any kind is a long and delicate job, unlike the 'real life' cause of the damage, and has to be planned and thought-through carefully. It's easy to remove plastic, but it's a darned site harder to replace if too much is removed !
 

Attachments

  • Bf109 Temme build 001.jpg
    Bf109 Temme build 001.jpg
    116.6 KB · Views: 301
  • Bf109 Temme build 013.jpg
    Bf109 Temme build 013.jpg
    120.5 KB · Views: 759
  • Bf109 Temme build 018.jpg
    Bf109 Temme build 018.jpg
    109.4 KB · Views: 273
  • Bf109 Temme build 002.jpg
    Bf109 Temme build 002.jpg
    152.9 KB · Views: 383
Thanks chaps. It's been lying around, part done, for a year or so. It was originally going to a museum, but they don't currently have display space, so I put it to one side for now.
What you see took me, from memory, around 12 hours to achieve, and that's just part of the overall combat damage to the real aircraft. Admittedly, a lot of time was spent going back and forward to the photos of the real aircraft, to ensure the holes are in the right place, as some of them have to align precisely with the aircraft's markings which, of course, being mainly in decal form, can't be applied until after the model has been assembled and painted.
I have an almost completed diorama of another Bf109E from the BoB, flown by Meyerweissflog, in 1/24th scale, but I'd need to remove a few years' worth of dust in order to photograph it !
 

Users who are viewing this thread

Back