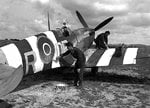
To answer the last question first, the majority of the time, the AEAF stripes were hand-painted, using brushes, brooms, sponges, rags, a passing cat, or whatever was immediately available, and in most cases using a 'washable' distemper-type paint (this could be removed with petrol/gasoline). The stripes weren't applied until the evening of June 5th, as, had they been seen earlier, the enemy might have guessed they were special recognition markings for 'something big', and guessed it must be the invasion. However, it is entirely possible that some units might have had the time, and facilities, to spray -paint the stripes, although I suspect this was at a later date. There is evidence to suggest that aircraft held in MU's or BAD's, or other storage facilities, after D-Day itself, very well may have had the stripes applied there, before delivery to units. This is reinforced by some pictures which show, for example, the under-surface stripes only, looking neat, and with no evidence of the 'full' stripes having been in place and removed, as is very noticeable on aircraft in the field.
So, the time period, the location, and the actual aircraft being modelled will all have a bearing on what the stripes looked like, or how they were applied. Reference pics of the subject are really the only way to confirm these details. As general rule though, if the aircraft was in service before D-day, it's virtually certain the stripes would be hand-painted, as neatly as possible, but with a very wide latitude on the definition of 'neat'!!
Now that that's out of the way, the actual application to a model shouldn't be a problem. personally, any kit decals provided for stripes I stuff into the spares files, to be used for strips of solid colour where needed, as I think they are a real PITA to try to apply, and look far too neat and bright. I normally brush-paint the stripes, unless it's a bare metal finish, which i'll explain later. After the model is painted, I roughly mask the total area where the stripes are going, having measured the scale dimensions, and paint this matt white. Once dry, the black stripes are brush-painted, using matt or satin black (clear coated later anyway, so no problem) and mostly done freehand, following pencil lines. Although the white may need more than one coat, depending on the base colour, I don't bother to achieve a perfect finish, as this should replicate the appearance of the 'real thing'. Remove the edge masking and the job's done - simple!!
The only difference for a natural metal bird is that the white is applied before any other painting, and sprayed in the general area of the stripes, allowing an overlap, which is feathered. This is for two reason; first, the feathering will prevent a rudge and shade change showing under the 'metal' finish, and second, 'solid' colours should always be applied before metallics, to prevent reaction with the metallizer in the paint, which will give a 'speckled' effect to the 'solid' colour, especially white. Once the white is dry, mask the area of the stripes, and then apply the metal. (The black stripes can be hand-painted before masking, which also lessens the possibility of masking tape lifting the NMF later.) Agai, simple, no dramas, and job done!


 I think the wings are going to be okay but I'm stumped on the fuselage.