User Name: destrozas
Name: sergio
Category: Intermediate
Kit: Italery F6f-3 # 1213
Scale: 1/72
Accessories: out of the box
In 1942-43 the F4U program was bogged down with delays and the USN needed a top notched carrier-based fighter. The Grumman F6F-5 was exactly what they were looking for with the first production model flying in October 1942 and 12,274 Hellcats built by the end of the war. In terms of size, the Hellcat was the second largest single engine fighter of the war, being just slightly smaller than the Republic P-47 "Thunderbolt".
In 1944 Grumman Hellcat F6F-3 "White 17" belonged to VF-27's Lt. Richard "Dick" Stambook on board the USS Princeton. Before VF-27; Stambook served with VS-3 flying a Dauntless, VF-3 and VF-6 piloting Wildcats. His best day was June 19, 1944, while flying "White 17" Dick brought down 3 Japanese aircraft. On October 18, 1944 Stambook scored his tenth and final victory, a Kawasaki Ki-45 Nick. Six days later Stambook was lucky to be alive when the USS Princeton was destroyed and he had to swim to safety.
F6F-3 SpecificationsTotal production:F6F-3 (4,403)
Power-plant:1 x 2000hp Pratt & Whitney R-2800-10 Double Wasp 18-cylinder air cooled radial engine, Wingspan:42 ft. 10 in. (13.1 m)Length:33 ft., 7 in. (10.2 m)Height:13 ft., 1 in. (4.0 m)Weight:9,238 lb. empty Maximum speed:380 mph at 23,400 ft.Ceiling:37,300 ft.Climb rate:to 14,000 ft. 6 minutes 42 seconds Range: 945 miles, Armament:Six .50-caliber M2 Browning machine guns, 2,000 lb. bomb-load, or six 5-inch rockets
box

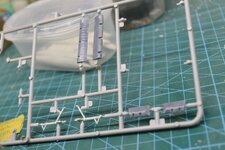
kit


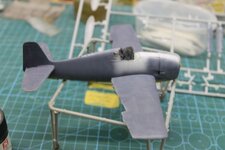
Hello everyone, since I finally have some time to work on my models and post them on the forum, even though I'm short on time, I'll do this model quickly out of the box without any detailing. I'm focusing more on regaining my airbrushing skills, mainly for the next Group B, where I want to put extra effort into the plane I'm planning to build in honor and memory of the Spanish Republican pilots.I'll post what I've done today
Name: sergio
Category: Intermediate
Kit: Italery F6f-3 # 1213
Scale: 1/72
Accessories: out of the box
F6F-3 "Hellcat" White 17 of VF-27, Lt Richard E. Stambook USS Princeton,1944.
In 1942-43 the F4U program was bogged down with delays and the USN needed a top notched carrier-based fighter. The Grumman F6F-5 was exactly what they were looking for with the first production model flying in October 1942 and 12,274 Hellcats built by the end of the war. In terms of size, the Hellcat was the second largest single engine fighter of the war, being just slightly smaller than the Republic P-47 "Thunderbolt".
In 1944 Grumman Hellcat F6F-3 "White 17" belonged to VF-27's Lt. Richard "Dick" Stambook on board the USS Princeton. Before VF-27; Stambook served with VS-3 flying a Dauntless, VF-3 and VF-6 piloting Wildcats. His best day was June 19, 1944, while flying "White 17" Dick brought down 3 Japanese aircraft. On October 18, 1944 Stambook scored his tenth and final victory, a Kawasaki Ki-45 Nick. Six days later Stambook was lucky to be alive when the USS Princeton was destroyed and he had to swim to safety.
F6F-3 SpecificationsTotal production:F6F-3 (4,403)
Power-plant:1 x 2000hp Pratt & Whitney R-2800-10 Double Wasp 18-cylinder air cooled radial engine, Wingspan:42 ft. 10 in. (13.1 m)Length:33 ft., 7 in. (10.2 m)Height:13 ft., 1 in. (4.0 m)Weight:9,238 lb. empty Maximum speed:380 mph at 23,400 ft.Ceiling:37,300 ft.Climb rate:to 14,000 ft. 6 minutes 42 seconds Range: 945 miles, Armament:Six .50-caliber M2 Browning machine guns, 2,000 lb. bomb-load, or six 5-inch rockets
box
kit
Hello everyone, since I finally have some time to work on my models and post them on the forum, even though I'm short on time, I'll do this model quickly out of the box without any detailing. I'm focusing more on regaining my airbrushing skills, mainly for the next Group B, where I want to put extra effort into the plane I'm planning to build in honor and memory of the Spanish Republican pilots.I'll post what I've done today