Airframes
Benevolens Magister
After some problems with the budget-priced but reliable AB series airbrush I've used for some time, due to damage presumably caused by the AK Xtreme Metal paints, I decided to go "up market" a bit, and buy a more 'refined' airbrush.
Having looked at many well-known brands, I settled on the Harder & Steenbeck 'Ultra' airbrush, which is one of the less expensive, 'entry level' examples from their range, this decision being based mainly on the nozzle size and price, as I'd set a budget at no more than £125 to £150 max, and couldn't justify, to myself, spending more than this on something that is only used maybe six times a year - if used daily, for hours at a time, then maybe a more expensive 'brush could be justified. There were other 'brushes which fell into this price range, but most had a 0.3mm or larger nozzle / needle, and I wanted the finer line capability of a 0.25mm or 0.2mm nozzle / needle set-up.
The H&S 'Ultra' is available as the 'Ultra X', which is a suction feed, double action instrument, or as the direct gravity feed, double action 'Ultra', available as the 'Ultra Solo', with 0.2mm nozzle and 2ml paint cup, or as the 'Ultra Two in One', which is supplied with the 0.2mm nozzle / needle, and an additional 0.4mm nozzle and needle, and additional 5ml paint cup, therefore allowing more flexibility in paint coverage, from very fine lines to wider area coverage., along with the option of larger paint capacity.
Harder & Steenbeck are a German company, and have been producing their own airbrushes and equipment since the 1930s, and their classic 'Aerograph' range were once one of the industry standards in the graphics, illustration and porcelain painting fields I had experience using an 'Aerograph' back in the 1970s, and remember that it was easy to use, and performed faultlessly, and with the 'Ultra' airbrush being a 'direct descendant, I reckoned that this would be a good choice for my intended price range.
I opted for the "Two in One" package, with a UK retail price, including tax at 20%, of around £90 (approx $118 US). Ordered late yesterday afternoon from Everything Airbrush in Poole, Dorset, it was dispatched within minutes of my 'phone conversation, and arrived at 11.45 this morning - the usual excellent service from this company.
So, what's it like, and how does it perform ?
A general description and a brief review of it's use is shown below, along with some photos illustrating some of the points mentioned, and a quick 'spray test'.
Description
The "Ultra Two in One"kit comes in a neat presentation / storage case, which contains the airbrush, fitted with the 0.2mm nozzle / needle, the 2ml paint cup and a screw on 'quick change' adapter. The additional 0.4mm nozzle and needle are in a clear plastic tubular container, capped at each end, set within a recess in the case, with the additional 5ml paint cup housed in another recess in the case lining. (Note that lids for the paint cups are not supplied, but these are available, if required, as optional accessories, as are the paint cups, with the 5ml cup being around £12 in the UK.).
A colour illustrated instruction book, which includes an 'exploded' parts diagram, hints and tips and a trouble-shooting section, in nine languages, is also included, along with a separate sheet giving cleaning instructions.
It is immediately obvious, by the 'feel', weight and balance, that this is a quality, precision instrument, and closer examination confirms this. The body is smooth, chrome plated and substantial, with the trigger action being positive and very smooth, and using machined parts (many 'brushes use pressed components here). The needle is stainless steel, and the atomising nozzle cap is of the perforated type, which prevents paint build up. This can easily be removed, without tools, along with the nozzle, for deep cleaning or fitting the alternative head / nozzle supplied with the kit.
The attached 'quick release' hose attachment can easily be unscrewed to reveal the standard, threaded connection, which fits directly to standard hoses and in-line moisture traps / filters.
Needle adjustment, or change to the alternate needle is performed in the usual way, by unscrewing the rear section of the body, loosening the lock nut, and adjusting or withdrawing the needle.
The chromed paint cups are a 'plug in' type, fitting directly into the opening in the top of the body, allowing unrestricted paint feed, and simple fitting / removal and cleaning.
With the cup removed, the needle can be seen through the relatively shallow hole, and if desired, a very small amount of paint can be dropped into this, to allow small volume painting or touch-up work. Being direct feed, cleaning of this area is quick and simple and, unlike some 'brushes which have a paint channel feeding from the cup, build-up of paint deposits is very much minimised, if not totally eliminated.
As mentioned, the 'feel' and balance are excellent, with the trigger action being smooth and even, with a positive return once pressure is released. Even with my arthritic hands, and with the larger paint cup fitted, I found this much easier to hold and control, compared to my previous airbrushes, with the possible exception of the long defunct Humbrol 'Studio One' airbrush I used over 40 years ago - although I doubt my stiff fingers would allow me to use that 'brush these days !
Using the airbrush.
With the 'quick release' connection removed, the 'brush was connected directly to the threaded collar on the in-line moisture trap at the 'brush end of the compressor hose.
Due to the length of this moisture trap (about 3 inches overall), there is some restriction, at times, when trying to get in close at certain angles, but it's a simple job to remove the fitting, connect the 'brush directly to the hose, and rely on the moisture trap fitted to the compressor.
Even with the moisture trap fitted, it was quickly apparent that the balance of the 'brush, and the angle of the trigger, and it's action, were nothing less than superb, and I found handling much smoother and more comfortable than my previous 'brushes.
First, I practised operating the trigger, from 'fine' to 'full' travel, with just air, before loading the 5ml paint cup with neat thinners, and 'getting the feel' of the balance, and the trigger when spraying.
Satisfied with that, I then mixed some paint / thinners, ready to spray a second coat on the F-5E mode in the current GB.
Being used to the previous 'brush, the ratio was around 40% paint (Humbrol enamel) to 60% thinners, which was sprayed onto a scrap model first, to test the ratio, and get at least a little accustomed to the new 'brush, with the pressure set at around 15 psi.
It was soon evident that the paint was slightly over-thinned, although it sprayed without problems, and covered evenly, if somewhat 'wet', compared to the way I prefer it.
The ratio was therefore adjusted, to around 50 / 50, and sprayed again, with a more acceptable result, and this also suggested that this airbrush can handle an even 'heavier' paint / thinners ratio, and a lower pressure if desired or required.
Still with the 50/50 paint ratio, the pressure was reduced slightly, to around 12 psi indicated, and a light coat sprayed overall onto the F-5E model, varying the trigger between 'light' and about half full travel. The paint went on beautifully, with a smooth, even flow, and no struggling or spitting.
Note that this was with the 0.2mm nozzle / needle set-up.
With the remaining paint, I then tried some various patterns, including heavy coverage, fine lines, squigles, graduations, mottles, 'spot' areas and a check to see what the widest usable coverage was, with this nozzle / needle fitted. This was sprayed onto the back of a white envelope, of relative;y absorbent paper, and the results were very encouraging, allowing for the nature of the surface being sprayed. The results are shown, and described, in the pic below.
Cleaning the airbrush.
With the paint used, some thinners was poured into the paint cup, and the 'brush 'blown through' until the thinners ran clean, which was very quickly indeed. The paint cup was removed, wiped out with a tissue, and then given a quick rinse with thinners, leaving it as clean and gleaming as when first taken from the case.
Some drops of thinners were then fed into the opening on top of the body and 'blown through', and again, ran clean.
The needle was inspected, through the opening, and no traces of paint could be seen, but a quick brush out with a paint brush soaked in thinners was performed, just in case.
The atomiser nozzle cap was inspected, and although no paint deposits could be seen, a quick rub over with a soft paint brush soaked in thinners ensured that this area, also, was thoroughly clean. Air was then run through and all was in order - overall, a much easier, quicker and tidier clean-up than on my previous brushes, mainly due to the direct feed system, perforated nozzle cap and the quality materials the 'brush is made from.
Conclusions
It was immediately apparent that this airbrush is a quality, precision instrument, very well made, using high-grade materials. The fit and operation of parts is excellent, and typical of high-quality German engineering products.
Weight, balance, feel and operation are excellent, and with the well respected back- up and spares supply of Harder and Steenbeck, and their agents in various countries, I suspect that, handled correctly and looked after, this 'brush should see many years service.
For the price, it is well worth the relatively modest investment, and should certainly meet my needs over the coming years. With my 'old' brushes as back-up, or for such jobs as clear coating with that sticky acrylic stuff (which is 'dirtier' than enamels, no matter what people might say or think ! ), I should be covered for virtually any painting job.
To sum up this airbrush in one word - superb !
The pics below show the 'Ultra 2 in 1' kit, key parts of the airbrush and some test spraying results as mentioned above.
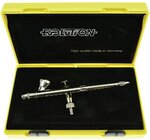
Pics 1 and 2. The Harder & Steenbeck "Ultra 2 in 1" kit and contents.
Pic 3. The airbrush as supplied, fitted with the 0.2mm nozzle / needle and 2ml paint cup, with the additional 5ml cup above, and the 'quick release' hose fitting below.
Pic 4. 'Plug in' paint cup.
Pic 5. Perforated, or vented, nozzle cap.
Pic 6. Machined trigger assembly.
Pic 7. Trigger detail and direct paint feed opening.
Pic 8. Colour Instruction Manual and separate Cleaning Instruction sheet,
Pic 9. Test results, sprayed onto a white, paper envelope, at around 15 psi, with a 50 /50 paint mix ratio, using a medium grey enamel. Wide stripe areas are 10mm wide, sprayed from approximately 1.5 and 2 inches. Narrowest line (extreme bottom right) is 0.5mm, sprayed from approximately 1/4 inch, at an angle of approximately 40 degrees.
All with the 0.2mm nozzle / needle fitted.


Having looked at many well-known brands, I settled on the Harder & Steenbeck 'Ultra' airbrush, which is one of the less expensive, 'entry level' examples from their range, this decision being based mainly on the nozzle size and price, as I'd set a budget at no more than £125 to £150 max, and couldn't justify, to myself, spending more than this on something that is only used maybe six times a year - if used daily, for hours at a time, then maybe a more expensive 'brush could be justified. There were other 'brushes which fell into this price range, but most had a 0.3mm or larger nozzle / needle, and I wanted the finer line capability of a 0.25mm or 0.2mm nozzle / needle set-up.
The H&S 'Ultra' is available as the 'Ultra X', which is a suction feed, double action instrument, or as the direct gravity feed, double action 'Ultra', available as the 'Ultra Solo', with 0.2mm nozzle and 2ml paint cup, or as the 'Ultra Two in One', which is supplied with the 0.2mm nozzle / needle, and an additional 0.4mm nozzle and needle, and additional 5ml paint cup, therefore allowing more flexibility in paint coverage, from very fine lines to wider area coverage., along with the option of larger paint capacity.
Harder & Steenbeck are a German company, and have been producing their own airbrushes and equipment since the 1930s, and their classic 'Aerograph' range were once one of the industry standards in the graphics, illustration and porcelain painting fields I had experience using an 'Aerograph' back in the 1970s, and remember that it was easy to use, and performed faultlessly, and with the 'Ultra' airbrush being a 'direct descendant, I reckoned that this would be a good choice for my intended price range.
I opted for the "Two in One" package, with a UK retail price, including tax at 20%, of around £90 (approx $118 US). Ordered late yesterday afternoon from Everything Airbrush in Poole, Dorset, it was dispatched within minutes of my 'phone conversation, and arrived at 11.45 this morning - the usual excellent service from this company.
So, what's it like, and how does it perform ?
A general description and a brief review of it's use is shown below, along with some photos illustrating some of the points mentioned, and a quick 'spray test'.
Description
The "Ultra Two in One"kit comes in a neat presentation / storage case, which contains the airbrush, fitted with the 0.2mm nozzle / needle, the 2ml paint cup and a screw on 'quick change' adapter. The additional 0.4mm nozzle and needle are in a clear plastic tubular container, capped at each end, set within a recess in the case, with the additional 5ml paint cup housed in another recess in the case lining. (Note that lids for the paint cups are not supplied, but these are available, if required, as optional accessories, as are the paint cups, with the 5ml cup being around £12 in the UK.).
A colour illustrated instruction book, which includes an 'exploded' parts diagram, hints and tips and a trouble-shooting section, in nine languages, is also included, along with a separate sheet giving cleaning instructions.
It is immediately obvious, by the 'feel', weight and balance, that this is a quality, precision instrument, and closer examination confirms this. The body is smooth, chrome plated and substantial, with the trigger action being positive and very smooth, and using machined parts (many 'brushes use pressed components here). The needle is stainless steel, and the atomising nozzle cap is of the perforated type, which prevents paint build up. This can easily be removed, without tools, along with the nozzle, for deep cleaning or fitting the alternative head / nozzle supplied with the kit.
The attached 'quick release' hose attachment can easily be unscrewed to reveal the standard, threaded connection, which fits directly to standard hoses and in-line moisture traps / filters.
Needle adjustment, or change to the alternate needle is performed in the usual way, by unscrewing the rear section of the body, loosening the lock nut, and adjusting or withdrawing the needle.
The chromed paint cups are a 'plug in' type, fitting directly into the opening in the top of the body, allowing unrestricted paint feed, and simple fitting / removal and cleaning.
With the cup removed, the needle can be seen through the relatively shallow hole, and if desired, a very small amount of paint can be dropped into this, to allow small volume painting or touch-up work. Being direct feed, cleaning of this area is quick and simple and, unlike some 'brushes which have a paint channel feeding from the cup, build-up of paint deposits is very much minimised, if not totally eliminated.
As mentioned, the 'feel' and balance are excellent, with the trigger action being smooth and even, with a positive return once pressure is released. Even with my arthritic hands, and with the larger paint cup fitted, I found this much easier to hold and control, compared to my previous airbrushes, with the possible exception of the long defunct Humbrol 'Studio One' airbrush I used over 40 years ago - although I doubt my stiff fingers would allow me to use that 'brush these days !
Using the airbrush.
With the 'quick release' connection removed, the 'brush was connected directly to the threaded collar on the in-line moisture trap at the 'brush end of the compressor hose.
Due to the length of this moisture trap (about 3 inches overall), there is some restriction, at times, when trying to get in close at certain angles, but it's a simple job to remove the fitting, connect the 'brush directly to the hose, and rely on the moisture trap fitted to the compressor.
Even with the moisture trap fitted, it was quickly apparent that the balance of the 'brush, and the angle of the trigger, and it's action, were nothing less than superb, and I found handling much smoother and more comfortable than my previous 'brushes.
First, I practised operating the trigger, from 'fine' to 'full' travel, with just air, before loading the 5ml paint cup with neat thinners, and 'getting the feel' of the balance, and the trigger when spraying.
Satisfied with that, I then mixed some paint / thinners, ready to spray a second coat on the F-5E mode in the current GB.
Being used to the previous 'brush, the ratio was around 40% paint (Humbrol enamel) to 60% thinners, which was sprayed onto a scrap model first, to test the ratio, and get at least a little accustomed to the new 'brush, with the pressure set at around 15 psi.
It was soon evident that the paint was slightly over-thinned, although it sprayed without problems, and covered evenly, if somewhat 'wet', compared to the way I prefer it.
The ratio was therefore adjusted, to around 50 / 50, and sprayed again, with a more acceptable result, and this also suggested that this airbrush can handle an even 'heavier' paint / thinners ratio, and a lower pressure if desired or required.
Still with the 50/50 paint ratio, the pressure was reduced slightly, to around 12 psi indicated, and a light coat sprayed overall onto the F-5E model, varying the trigger between 'light' and about half full travel. The paint went on beautifully, with a smooth, even flow, and no struggling or spitting.
Note that this was with the 0.2mm nozzle / needle set-up.
With the remaining paint, I then tried some various patterns, including heavy coverage, fine lines, squigles, graduations, mottles, 'spot' areas and a check to see what the widest usable coverage was, with this nozzle / needle fitted. This was sprayed onto the back of a white envelope, of relative;y absorbent paper, and the results were very encouraging, allowing for the nature of the surface being sprayed. The results are shown, and described, in the pic below.
Cleaning the airbrush.
With the paint used, some thinners was poured into the paint cup, and the 'brush 'blown through' until the thinners ran clean, which was very quickly indeed. The paint cup was removed, wiped out with a tissue, and then given a quick rinse with thinners, leaving it as clean and gleaming as when first taken from the case.
Some drops of thinners were then fed into the opening on top of the body and 'blown through', and again, ran clean.
The needle was inspected, through the opening, and no traces of paint could be seen, but a quick brush out with a paint brush soaked in thinners was performed, just in case.
The atomiser nozzle cap was inspected, and although no paint deposits could be seen, a quick rub over with a soft paint brush soaked in thinners ensured that this area, also, was thoroughly clean. Air was then run through and all was in order - overall, a much easier, quicker and tidier clean-up than on my previous brushes, mainly due to the direct feed system, perforated nozzle cap and the quality materials the 'brush is made from.
Conclusions
It was immediately apparent that this airbrush is a quality, precision instrument, very well made, using high-grade materials. The fit and operation of parts is excellent, and typical of high-quality German engineering products.
Weight, balance, feel and operation are excellent, and with the well respected back- up and spares supply of Harder and Steenbeck, and their agents in various countries, I suspect that, handled correctly and looked after, this 'brush should see many years service.
For the price, it is well worth the relatively modest investment, and should certainly meet my needs over the coming years. With my 'old' brushes as back-up, or for such jobs as clear coating with that sticky acrylic stuff (which is 'dirtier' than enamels, no matter what people might say or think ! ), I should be covered for virtually any painting job.
To sum up this airbrush in one word - superb !
The pics below show the 'Ultra 2 in 1' kit, key parts of the airbrush and some test spraying results as mentioned above.
Pics 1 and 2. The Harder & Steenbeck "Ultra 2 in 1" kit and contents.
Pic 3. The airbrush as supplied, fitted with the 0.2mm nozzle / needle and 2ml paint cup, with the additional 5ml cup above, and the 'quick release' hose fitting below.
Pic 4. 'Plug in' paint cup.
Pic 5. Perforated, or vented, nozzle cap.
Pic 6. Machined trigger assembly.
Pic 7. Trigger detail and direct paint feed opening.
Pic 8. Colour Instruction Manual and separate Cleaning Instruction sheet,
Pic 9. Test results, sprayed onto a white, paper envelope, at around 15 psi, with a 50 /50 paint mix ratio, using a medium grey enamel. Wide stripe areas are 10mm wide, sprayed from approximately 1.5 and 2 inches. Narrowest line (extreme bottom right) is 0.5mm, sprayed from approximately 1/4 inch, at an angle of approximately 40 degrees.
All with the 0.2mm nozzle / needle fitted.