Airframes
Benevolens Magister
In an attempt to answers Lucky's questions about aircraft servicing platforms etc., here are some rough sketches illustrating ways how these can be scratch-built in various scales.
These can be made from a variety of materials, such as plastic rod and strip, stretched sprue, brass wire or tube.
With the various types of 'Superglue' (CA) available today, construction can be made a little easier, although for the main joints, with plastic, liquid poly cement is reccommended, as this physically 'welds' the parts together. The joint can then be reinforced with a spot of 'Superglue'.
For more complex structures, such as engine cradles, winch gantries etc., materials from archtiectural model-making ranges can be used. In the U.K., one of the better known suppliers is 'Plastruct', offering a range of plastic sections including 'I' beam, 'H' beam, angle strip, tubes etc. Though not exactly cheap compared to 'standard' plastic strip, these products are not overly expensive, and allow a wide range of possibilities.
There are now products on the market, from 'Flightpath', that provide P.E. kits for servicing platforms, ladders and other accessories, including 1/48th scale buildings, but of course, they come at a price!
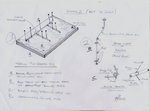
SKETCH 1 shows an example of a typical servicing tower, with a 'wooden plank' platform, and is based on an original which would have been made from steel tube frames, welded together.
A) shows a general view.
B) is one side section, with a ladder.(C)
D&E) are scrap views of a wheel and the platform itself.
The wheel can be made from discs of punched-out plastic card, a piece of plastic rod or wood dowel, a slice of sprue, or even a small wheel from the spares box, depending on scale.
The paltform, in this case representing wooden planks or boards, is simply a piece of thicker plastic card, or paper card, scored to represent planking. To simulate a grid pattern, for instance 'chequer plate', either use a commercially available product (eg Verlinden) or use a piece of fine mesh, such as used for curtains or wedding veils, available from fabric shops. Glue this onto the card sheet and, when painted and dry-brushed, it will look very convincing. (NB. This material, in various mesh sizes, can also be used to represent wire-mesh or chain-link fencing, camouflage nets etc.This will be covered in my forthcoming Diorama Guide.)
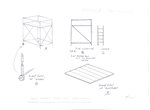
SKETCH 2 (1)shows the basic method of construction, using a pin-board jig.
Having produced a scale plan of the item to be built, by measuring to your requirements, trace this onto thick tracing paper or baking (greasproof) paper, and then tape or pin this to a sheet of balsa, styrofoam or thick cardoard. The trace not only allows accurate alignment of the components, but also helps prevent them sticking to the board when glued.
The required lengths of rod/wire are laid out on the plan, and 'gripped' either side by dress maker's pins, or those long, coloured-topped pins used by aero-modellers.
The various components are butt-jointed and glued with liquid poly cement (for plastic parts, CA for metal.). When fully dry, a spot of 'Superglue' over the joint provides reinforcement. When set, each sub-assembly can be joined together and glued, to make the complete structure, then painted and weathered as desired.
(2) Illustrates a method of achieving simple bends or curves with plastic rod or sprue. 2B shows basic curves, whilst 2C shows more acute bends, where a larger peg, tube or dowel is used to 'wrap' the plastic around. This method can also be used to produce various sized rings or hoops, by curling the rod around the tube, keeping the rod/sprue under tension to achieve the desired size ring.
I realise this is a very basic description, but it is a way of making what at first seems like a complex piece of equipment easily. It takes a bit of time and patience, but doesn't all modelling?
I have re-sized the scans to 800x600, but if they are still too big, go into 'view' and select 'zoom'!
Hope this is useful. Terry.
These can be made from a variety of materials, such as plastic rod and strip, stretched sprue, brass wire or tube.
With the various types of 'Superglue' (CA) available today, construction can be made a little easier, although for the main joints, with plastic, liquid poly cement is reccommended, as this physically 'welds' the parts together. The joint can then be reinforced with a spot of 'Superglue'.
For more complex structures, such as engine cradles, winch gantries etc., materials from archtiectural model-making ranges can be used. In the U.K., one of the better known suppliers is 'Plastruct', offering a range of plastic sections including 'I' beam, 'H' beam, angle strip, tubes etc. Though not exactly cheap compared to 'standard' plastic strip, these products are not overly expensive, and allow a wide range of possibilities.
There are now products on the market, from 'Flightpath', that provide P.E. kits for servicing platforms, ladders and other accessories, including 1/48th scale buildings, but of course, they come at a price!
SKETCH 1 shows an example of a typical servicing tower, with a 'wooden plank' platform, and is based on an original which would have been made from steel tube frames, welded together.
A) shows a general view.
B) is one side section, with a ladder.(C)
D&E) are scrap views of a wheel and the platform itself.
The wheel can be made from discs of punched-out plastic card, a piece of plastic rod or wood dowel, a slice of sprue, or even a small wheel from the spares box, depending on scale.
The paltform, in this case representing wooden planks or boards, is simply a piece of thicker plastic card, or paper card, scored to represent planking. To simulate a grid pattern, for instance 'chequer plate', either use a commercially available product (eg Verlinden) or use a piece of fine mesh, such as used for curtains or wedding veils, available from fabric shops. Glue this onto the card sheet and, when painted and dry-brushed, it will look very convincing. (NB. This material, in various mesh sizes, can also be used to represent wire-mesh or chain-link fencing, camouflage nets etc.This will be covered in my forthcoming Diorama Guide.)
SKETCH 2 (1)shows the basic method of construction, using a pin-board jig.
Having produced a scale plan of the item to be built, by measuring to your requirements, trace this onto thick tracing paper or baking (greasproof) paper, and then tape or pin this to a sheet of balsa, styrofoam or thick cardoard. The trace not only allows accurate alignment of the components, but also helps prevent them sticking to the board when glued.
The required lengths of rod/wire are laid out on the plan, and 'gripped' either side by dress maker's pins, or those long, coloured-topped pins used by aero-modellers.
The various components are butt-jointed and glued with liquid poly cement (for plastic parts, CA for metal.). When fully dry, a spot of 'Superglue' over the joint provides reinforcement. When set, each sub-assembly can be joined together and glued, to make the complete structure, then painted and weathered as desired.
(2) Illustrates a method of achieving simple bends or curves with plastic rod or sprue. 2B shows basic curves, whilst 2C shows more acute bends, where a larger peg, tube or dowel is used to 'wrap' the plastic around. This method can also be used to produce various sized rings or hoops, by curling the rod around the tube, keeping the rod/sprue under tension to achieve the desired size ring.
I realise this is a very basic description, but it is a way of making what at first seems like a complex piece of equipment easily. It takes a bit of time and patience, but doesn't all modelling?
I have re-sized the scans to 800x600, but if they are still too big, go into 'view' and select 'zoom'!
Hope this is useful. Terry.
")