Question about Floquil Crystal Cote

Ad: This forum contains affiliate links to products on Amazon and eBay. More information in Terms and rules

Good point. It's best to let the Future harden for at least 24 hours before doing any decalling, even without decal solutions. If the surface does go cloudy, let it dry, and apply another coat of Future, which should rectify the problem. To be honest, I only use Micro Sol, having discovered, many years ago, that 'Set' didn't really have any big advantage, as the 'Sol' does the same job, but may take a little longer to settle.
 
Hi, T bolt,

I've read good things about Micro Sol, but the one I have here is "Mr mark softener" recommended by the owner of the hobby store (A well recognized modeler here in San Diego) Your suggestion is great; I'll do a trial before proceeding with the "real deal"

Terry,

Roger that!; The model will be ready for the first future cote tomorrow and I will definitely wait "at least" 24 hrs to lay on the markings.

BTW, I dipped my painted canopy on the future "bouillon" tonight and put it in a sealed container afterwards as you indicated. Preliminary I could say the piece looks mint.

Regards.
 
Sounds good. I only dip canopies occassionally, depending on what's being built, but I found it better to paint the frames first. The canopies are so sparkling after dipping, it's hard to see where the frame should be, and paint doesn't adhere too well unless given two or three coats.
 
Gentleman,

Just a little follow up on my project: The painted canopy was dipped in future solution following the protocol described by Terry and now that dry looks pristine (will post pictures later, although this might not be of to much interest)

Second: After removing the crystal coat and repainting the model, I waited 5 days before I applied the Future. Two misty coats of future were airbrushed on the model at 20 psi, and let dry 1 hour between coats. A third coat was applied 45 min after, but this was rather heavier. The model was stored under a sealed plastic dome in between coats and overnight. Next day the surface showed an irregular coat with alternate shiny, opaque or clumped sections. An interesting finding was that the areas were the crystal cote clumped more previously, matched now the areas showing the worse clumping with future (Where the raised panels intersections are tight and frame smaller areas) plus, this pattern was symmetric on both wings. BTW, Wurger, this is the reason why I though the clear coat was getting "contained" like in a dam and therefore not spreading evenly across the model surface, although I also completely failed to think that the coating was also cumulating on the raised areas of the panels, you are absolutely right.

After all this, I was about to grab the mallet and smash the model (after all, I started modeling to help control my BP, but this clear coat thing was just defeating the purpose…:|) After to sips of vodka I decided to go watch YouTube videos and found a couple of crazy guys polishing cured unspecified clear coat with a 2000 grit paper and a car-polishing compound until the surface looked like a mirror. I felt inspired, rushed back to the bench, (had another two sips of vodka) and started polishing the thing with Tamiya course and fine compound like there was no tomorrow. It took around an hour, but the surface developed smooth and shiny (The raised panels were not damaged by the polishing). The decals went on beautifully on the smoother surface and snuggle well on the irregular features using the solvent (Mr. Mark softener) and could not detect any silvering.

Do you guys have to polish future sometimes? Or perhaps there was something wrong during the application? I am leaving the model at least 24 hours to rest for the marks to set after I repeat the future coat. And this time I expect the future to spread more evenly, but any tips would be greatly appreciated.

Have a great week, gents.
 
Last edited:
Gentleman,

Just a little follow up on my project: The painted canopy was dipped in future solution following the protocol described by Terry and now that dry looks pristine (will post pictures later, although this might not be of to much interest)

Second: After removing the crystal coat and repainting the model, I waited 5 days before I applied the Future. Two misty coats of future were airbrushed on the model at 20 psi, and let dry 1 hour between coats. A third coat was applied 45 min after, but this was rather heavier. The model was stored under a sealed plastic dome in between coats and overnight. Next day the surface showed an irregular coat with alternate shiny, opaque or clumped sections. An interesting finding was that the areas were the crystal cote clumped more previously, matched now the areas showing the worse clumping with future (Where the raised panels intersections are tight and frame smaller areas) plus, this pattern was symmetric on both wings. BTW, Wurger, this is the reason why I though the clear coat was getting "contained" like in a dam and therefore not spreading evenly across the model surface, although I also completely failed to think that the coating was also cumulating on the raised areas of the panels, you are absolutely right.

Try diluting the Future with 91% Isopropyl alcohol at a 4 to 1 ratio (Future to Iso). It helps break up the inherent surface tension in the future coat and lets its self leveling properties work better.
 
Hey, kgambit,


reducing tension sounds like a great option. Only one pertinent question: Is Isopropyl innocuous to decals?

Nice meeting you.
 
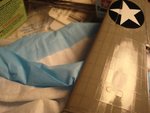
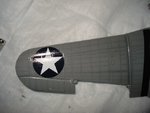
Just a few pics to show the decals and the surface finish previous to the second coat. The stains at the marks edges are from the solvent and need to be cleaned still. Any comments are always welcome.

Regards.
 

Attachments

  • Wing_Future.jpg
    Wing_Future.jpg
    57.2 KB · Views: 70
  • Wing_mark.jpg
    Wing_mark.jpg
    50.8 KB · Views: 74
Hey, kgambit,


reducing tension sounds like a great option. Only one pertinent question: Is Isopropyl innocuous to decals?

Nice meeting you.

My pleasure.

Once the future (with the ISO thinner) gloss base coat dries, it doesn't matter. I've never had any problems with the thinned mixture reacting to the decals when using it as a decal sealer or when mixed with Tamiya flat base as a final flat coat.

I HAVE had problems with setting solutions causing the milky haze on the future base gloss coat that Terry mentioned and contrary to what I have read, re-applying the future did NOT cause the haze to disappear entirely. There was still an obvious lightening of the affected area even after a second coat was applied. What I ended up doing was either stripping of the entirety of the future coat with windex and then re-airbrushing, OR putting a second coat of future on and then masking off the decal and re-airbrushing around it.
 
Hey, Kgambit,

I applied the future/Isopropyl mixture you suggested and I have to say it works phenomenal. I airbrushed 3 coats last night, and from the first application I knew things were different because the coat distributed very evenly. I still waited 1 hour after the first application and the following 2 at 30 min intervals, and kept the model covered (as Terri suggested) This morning I inspected the surface and it looks great and the decals did not suffer a bit.

You're the man Kgambit, thank you very much.

PS: I did have some staining around the decals after the decal solvent was applied that did not come out when I cleaned the model with mild soap, and under the magnifying lens it appeared as it the previous future coat was "etched" in those areas. I was able to remove them by rubbing a small amount of coarse Tamiya compound with a Q tip very carefully and the stains disappeared.

:lol: I have my moments. :)

The haze that you see MIGHT be caused by the Future coats not be totally cured. From past experience, I usually allow 48 hours for the future to cure. Not sure, Future does funny stuff some times for me.
 
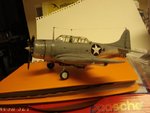
Just a final photo of my model....I want to thank Wurger, Airframes, gambitt and all you guys for your wise guidance. Sorry about the low quality image.
Cheers.
 

Attachments

  • Dauntless.jpg
    Dauntless.jpg
    91.5 KB · Views: 59
Last edited:
T-Bolt, Kgambit,

You are very kind and with your advice things went much easier. I will post the complete model in the right section and after I add some pieces that got eaten by the carpet monster (I always wanted to write about the mythical creature).

Regards.
 

Users who are viewing this thread

Back