RAF Disruptive pattern , tips on how to airbrush

Ad: This forum contains affiliate links to products on Amazon and eBay. More information in Terms and rules

pinehilljoe

Senior Airman
747
579
May 1, 2016
Hi, I'm in the middle of a Monogram Hawker Typhoon. I'm doing it stock out of the box. I didn't even sand the "MMC 1969" raised letter on the underside of the wings. Looking for tips on how to mask and paint RAF patterns. I assume cut mask to look reasonable, apply and airbrush the green over blue/grey?
 
That's what I've started to do on the wings and stabilizers. I purchased some Oramask 810 stencil film..... ORAMASK 810 Stencil Films : Oracal & Siser Premier Distributor in Canada!, Super craft store for Siser Easy weed and Oracal 651 Enlarge the paint diagram to fit your aircraft, lay a piece of the film on the diagram that you want to mask, cut it out, detack it slightly and lay it on you model. I find the fuselage can more easily be done starting with thin masking tape to make the bends and filling in the rest with tape. This is how my Typhoon ended up by the above method.

1731377541912.jpeg


Yes ... the first step .. paint the undersides with the Medium Sea Grey paint. When hardened mask the undersides and apply the Ocean Grey on the tops. Then mask the areas that are going to be the OG camo spots and apply the RAF Dark Green coat.

BTW .. if there is the Sky S type band on the tail apply the colour firstly and then mask. The same if there are the D-day strips. You may apply the white colour as the first and mask the whole area and make the OG/DG camo spots. The black strips you may add later.
 
Good advice. I have a roll of 6 inch blue tape left over from painting a room. I was going to try scanning the instruction page, scale up as best a possible, print and use that as a guide to cut the mask. More to come. I love these old Monogram kits. The detail is good enough for me, I don't need to spend hours on a cockpit interior you will never see. I picked up the kit on ebay, it has an Eduard brass interior sheet, and skipped using it.

 
Last edited:
As an Amazon Associate we earn from qualifying purchases.
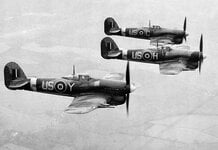
Looking at photos of the Typhoon, there looks like variation plane to plane. The Hawker factory probably did not use templates, just someone with a spray gun, and told to paint the green to look about like this...
 

Attachments

  • W-Ordnance-2-HT-Mar12.jpg
    W-Ordnance-2-HT-Mar12.jpg
    37.3 KB · Views: 7
Last edited:
They are early production Typhoon Mk1b of 56 Sqn, with the "car door" canopy, and yes, there is some variation in the pattern, along with possible replacement panels.
I'm assuming your kit is the Monogram "bubble" canopy ?
By the time this version entered service, there was more control over the "standard" camouflage pattern which, in general, tended to be more uniform in appearance, and would look like the kit painting instructions drawing.
Of course, there could still be minor variations, and a study of period photos, and particularly any photos of your chosen subject, would help clarify this.
 
When you airbrush the paint over the masks and plastic, take care not to swamp the surface with paint, because no matter how tightly the mask is stuck on to the plastic, capillarity will suck part of that wet paint under the mask. Many short bursts with the airbrush, allowing the paint to dry between bursts avoids the problem. That's my $0.02 advice!
 

Users who are viewing this thread

Back