Re Extract 2 HMAS Sydney Commsioning to Final Voyage

Ad: This forum contains affiliate links to products on Amazon and eBay. More information in Terms and rules

diversdream

Airman
56
2
Jan 10, 2010
Centeral Coast Area
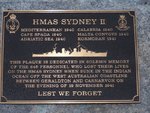
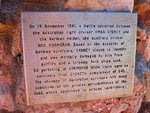
HMAS SYDNEY (ex HMS Phaeton)

Type - Modified Leander Class Cruiser

Sisters - HMA Ships Perth and Hobart

Pendant Number - 148 upto 1940 then Changed to D48 as of 1940 but Never Painted on Ship in Either Case

Builders - Swan, Hunter, and Wigham Richardson Ltd, Wallsend on Tyne England.

Laid down - 08 June1933 as HMS Phaeton

Launched - 22 September 1934 by Mrs SM Bruce, wife of the Australian High Commissioner, Engalnd.

Commissioned - 24 September1935 into the RAN under the Command of Capt John U P Fitzgerald RN

Displacement - 6830 Tons (7000 Tons Standard)

Tonnage - 6952 Gross Tons
- 3391 Net Tons


Length - 562ft and 3.6in Overall or from Bow to Stern only 530ft

Beam - 56ft and 8in

Depth (moulded) - 32ft

Max Sea Speed Achived - 32.5 Knots
(at Full Power During her Trials and Working up Period in England with her 'Commsioning Crew')

Armament -

8 x 6 Inch Breech Loading MK XXXIII Guns located in 4 Twin Turrets - A/B Forad and X/Y Aft.

Max Range 24 800 Yards
Max Elevation 60 Degrees

Each Turret had an Independent Shell Room while the 6 Inch Magazine's were Shared between the Forward and Aft parings of Guns with both Magazines Located Below the Waterline and Capeable of being Flooded in Any Emergency.
All Turrets were Powered by Electrical Systems using Individual Turret Pumps which were Located below each Gunhouse for whenever the Mounts were to be Trained onto target's etc.
All Shell and Cordite Hoists were Hand Operated With a well Trained Gun Crew able to Maintain a Rate of Fire of 8 Shells per 60 Seconds.

Each 6 Inch Shell Weighed in at 112 Pounds per Shell.

Main Armament was Controlled by Either the Director Controll Tower or what was Refered to as Local Control.

DCT Controlled meant that the Guns were fired Via an Electrical Siginal from the DCT All as One Salvo, while Local Meant that in effect Each Turret and Each Gun was Expected to Fire as an Individual Gun on their Own Target Bearings in their Own Time.
In the event of any kind of Loss of Electrical Power for Any Reason the Turrets had their Own Battriey Supply for Lighting inside the Turrets and also to Continue Firing the 6 Inch Guns.
At this Event All Training and Loading was Done by Manual Equipment inside Each of the Turrets.
Each Turret had its Own Local Sighting Equipment and was able to Fire Effectivley while Under the Control of the Turret Officer that Manned each Turret.
 
The DCT was the Usual Method of Firing and the Sighting was by what is Now called a Centerlised Fire Control System, with the DCT Effectivley the 'Ships Eyes' and as such was Located on the Highest Point on the Ship's Superstructure for this Reason.
This was Maninly to avoid Smoke and Spray Effecting the Aiming of the Turrets onto their Assigned Targets and it had a Complete 360 Degree View All Around the Ship.

The DCT was Made up of 3 Seperate Compartmets which were known as the Front Compartment, Gunnery Control Compartmet and the Rangefinder Compartmet.

The Front Compartment Housed the Director Layer, Director Trainer, Range to Elevation Operator and the Cross Level Operator.

The Gunnery Control Compartment Housed the Gunnery Officer, Gunnery Rating, Spotting Officer, Communications Rating and if Desired a Wireless Telegraphist - they were all Housed Above and Abaft of the Front Compartment.

The Final Compartmet was Located Directly Below the Gunnery Control Compartment and it Housed the Rangefinder Compartment which was the Main 15 Foot Rangefinder with its Operator and the Range Taker who were Both Located inside this Compartment.

All of these Key Personel in the DCT as a Whole were Protected by Only Half an Inch of Armour at Most.

The DCT's Prurpose was to Pass Down Electrically their Targets Course, Bearing, Speed and Range Down to the 6 Inch Transmitting Station at which Point Additional Details such as Windspeed and Air Temperature or Ship Movements Up and Down etc were then taken into Consideration.
The Trasmitting Station was Located Below the Waterline and Forward of the No 1 Low Power Room - it was in Essence the 'Brains' of the Gunnery System.
Inside it Contained the Admiralty Fire Control Table MK V, the Fire Controll Communiactions Exchange and a W/T Table with Remote Control Capeabllity for the Type 45 W/T Set in the Aux W/T Office and the Type 49 W/T Set in the Second W/T Office.
From the Transmitting Station the Relevent Bearing/Range Deatils were Passed to Each Gun Turret by an Electrical Signial and When Director Firing was used the Guns were Fired by the Use of a Firing Pistol by the Director Layer.

It was Originally Proposed that the RAN Modified Leander Class Carry 2 DCT's with One Above the Bridge and the Other on the Aft Superstructure - Thus meaning that in Effect 2 Targets could be easily Engaged at the Same time.
However Due to 'Budget Restrictions' the Second DCT was Abandoned over the Objections of the Director of Naval Ordanance who Objected on the Grounds that if the Single DCT were to be Damaged - 'Control of the Guns would then Pass to the Turret Officers and with this Loss of Centeral Controll the Efficancy of the Main Armamnet would be Immesurably Slower' in any type of Gun Action.

As a Compromise, it was Sugested that there instead be Fitted a Non Revolving Control Poistion on the Aft Superstructire which would Now be Refered to as the Aft Control Poistion and in Turn it would now be Equiped with a Mk II Training Sight - However it was not Capeable of Controlled and/or Cetrelized Firing.
Additionaly Due to this, the Modified Leander Class had to Now Loose One of its Independent Range Finding Systems to make Room for the Aft Control Poistion.

This Class's Range Finding System was now to be Made up of a Main 15 Foot Rangefinder Located in the DCT, and Now had Only Two 12 Foot Type UK1 Rangefinders which were Located to Either Side of the Upper Bridge.
This Concievably meant that a Single or Series of Strikes to the Bridge Area would then Render all Guns into Local Control Only - Therfore Effecting their Overall Abillity to Return Fire in Any kind of 'Accuirate and Speedy Manner'.

Secondary Armament

4 x 4 Inch Quick Firing MK V High Angle Guns Mounted on 4 High Angle MK IV Mountings which were Located on the 4 Inch Gun Deck which was immeaditley Forward of the Aft Superstructure.
All 4 Inch Mounts were without gun sheilds or any other form of protection, which in close action would make them open to defensive fire by any enemy target to a 'critical degree'.
2 Guns were Mounted on the Port Side and Desiganted P1 and P2 with the other 2 Guns Mounted on the Starboard side which were Designated as S1 and S2.
Designed Primarily as an AA Gun, the Use of the MK IV Mounts meant that they were Fitted with Platforms so that they Could be Used for Low Angle Loading as Well as High Angle, Thus Meaning that they Could be used Against Low Flying Aircraft as well as Surface Targets when Needed.
In the Role of High Angle Defensive Measures they were able to fire a 31lb Shell upto a height of 28 750ft Effectivley, while in the Low Angle Defensive Measure they were able to Safely Engage Surface Targets upto a Range of 16 300 Yards with the Same Weight of Shell.

Ammuntion was Supplied by the use of 12 Ready Use Shell Lockers which each Contained approx 20 Shells and were Mounted on the 4 Inch Gun Deck in various locations.
Another 800 Shells were also Stored Below Decks in the 4 Inch Magazine which was itsef Located Abaft of the 'B' Shell Room for the Main Guns.
The Fire Controll for these 4 Guns which had their Own Elevation and Training Receivers built into them was Controlled by the High Angle Control Station which was Located in the High Angle Calcuating Poistion.
In effect this was a Smaller Version of the DCT Method descibed Above with the Added Capeabllity of Height, Range and Bearing Data being Transmitted in the Same Manner.
 
Close Range Armament

This Comprised of 12 x 0.5 Inch Vickers Machine Guns Mounted on 3 MK II Quadruple Mountings, one Mounting was Fitted on Top of the Aft Control Poistion and the 2 Reamining Mounts were Located to Either Side of the 'Flag Deck'.
These were Supplemnetd by 9 0.303 Inch Lewis Machine Gun Mounts which were Mounted when Needed on Pedestals on the Aft 36 Inch Searchlight Platform, the Midships 36 Inch Searchlight Platform and the Lower Bridge Areas.
HMAS Sydney was Also Equiped Pre War with 4 Quick Firing Hotchkiss 3 Pound Guns for the Purpose of
'Offical Occasions' like Gun Salautes or to Start Sailing Regettas etc - these were Removed from the Ship Sometime Around July-August 1940 as being No Longer Necessary.

Torpedoes

HMAS Sydney carried 8 x 21 Inch QR MK VII Above Water Torpedo Tubes Mounted in Quadruple Mounts on the Upper Deck with Each Quadruple Mount Mounted on the Port and Starboard Side which were Located Directly under the 4 Inch Gun Deck.
The Torpedoes Apart from Servicing were always Housed in their Tubes and they were 21 Inch MK IX in Type and had an Exploisive Warhead of 750lb.
No Reload's were Carried on board Ship - Meaning they Only had the 8 in the Tubes and Nothing Else.
The Torpedoes were also Capeable of Being Fired by the DCT or Locally Depending on the Situation they were to be Used in.

Searchlights

HMAS Sydney was Equipped with 3 x 36 Inch (Diameter) MK V Searchlights which were Mounted as 1 Each onto a Platform above the Aft Superstructure and to Port and Starboard of the Forward Funnel.

ASW Equipment

HMAS Sydney was Completed with a Type 125 ASDIC which was Housed insdie an Pattern 3069 Dome and could be Retracted when Not in use.
Offensivley HMAS Sydney carried 5 MK VII Depth Charges on a Rail at the Stern, each Charge Contained a 300lb Charge of Explosive made up of Either TNT or Amatol.
The Charges could be Detonated at Depths ranging from 50, 100, 150, 250, 350 or 500 Feet by Making use of the Depth Setting Key and when the Charges were Not Required for use they were Usually set at a 'Safe Setting'.
While at Sea Depth Charges were Primed for Use but Always Disarmed thanks to the use of the Depth Setting Key and Before Entering ANY Harbour these Primers would always have been Removed and the Charges Rendred Safe.

Communications Equipment

HMAS Sydney was fitted with -

Main W/T Office - Type 48 Trasmitter Set (Intrenal Power) and Battrey Powered W/T Reciver Sets that were Capeable of Transmitting and Receiving, they were located on the Centreline of the Ship along the Lower Deck immeaditley Below the Mainmast.
6 Transmitting Areails were 'strung' between 24 Foot Wide W/T Yards on the Main and Fore Mast, the Receiving Areials were made up of 5 Aerails Supspended from the Main Mast.

Second W/T Office - Type 49 Transmitter Set (Intrenal Power) and Battrey Powered W/T Reciver Sets which were Located on the Platform Deck Directly Above the No 1 Low Power Room and Almsot Immeaditley Below the Foremast, which Supported its Arielas.
Also with a Transmitting and Reciving Capeabllity.

Aux W/T Office - Type 43 and 45 Transmitter Sets and W/T Reciver Sets which were Located also on the Platform Deck and its Primary Use was in Gunnery Matters and Not Signil or Message Matters.

Also Carried Direction Finding (NOT RADAR OR RDF) Equipement which was Loacted in a Compartment to the Rear of the Lower Bridge and could give the Crew a Bearing to Steer on when Intercepting Enemy Radio Traffic.

Visual Signilling Methods Included Signil Flags/Pennenants to be Displayed on the Signial Halyards or Signil Projectors, which could also be Used to Transmit Morse Code Light Signils.
For this purpose HMAS Sydney was Equiped with 4 x 10 Inch and 4 x 18 Inch (Diameter) Signil Projection Systems.
On the Port and Straboard Signil Projector Platforms which were Mounted to the Rear of the Upper Bridge there were Fitted 1 each of the 10 and 18 Inch Lights to Either side.
Another Pair of 10/18 Inch Lights were Mounted on the Port and Starboard Extension of the Flag Deck Location as well.
 
Aircraft - One Seaplane for ASW, Gunnery Spotting and GR Patrols which upto July 1940 was the Australian Seagull MK V Type of Seaplane.
Seagull MK 5 Aircraft Carried during the War - A2-2, A2-4, A2-6, A2-9, A2-18, A2-21 and A2-22

or

Walrus Used to Replace Shot Down Seagull MK V duirng Shore Bombardment of Bardia in 1940 while Spotting Fall of Shot - Pilot Awarded DFC for this Action (Thomas Macbride Price RAAF).

Walrus Aircraft Carried were K8542 and L2177.

Aircraft were Launched by the use of a 53 Foot Revolving Catapault Mounted Amidships Between Both Funnels, and if the Catapult Failed or Malfunctioned the Aircraft was also Capeable of being Lowered into the Water for a Sea Take Off.
A 6-7 Ton Capacity Electric Powered Seaplane Crane was Mounted on the Ships Centerline Abaft of the Forward Funnel for Aircraft Recovery and Transport Ashore after Reaching Port if Deemed Necessary.
It Could have Also been used to Lower the Aircraft into the Water - However this was NOT the Prefered Manner of Launching.

This Crane was also used to Launch the Boats Stored on HMAS Sydney.

The 1600 Gallons of Avation Fuel was Stored inside the Avation Spirt Room which was Located in the Bow and was Piped as required to the Upper Deck in the area of the Catapults Support Arm.
The Fuel was Transfred by the use of Compressed Air which was Delivered by the Ships own Internal Systems.
The Catapult was Powered by a Specail Cordite Charge that was used to in Effect 'Fire' the Catapult into Action.

RAAF Detachment Commanders 1939-1941

F/L Thomas Mcbride Price RAAF 1939 -1941
F/O Raymond Barker Barrey RAAF April 1941 - Sunk

Aircrew - RAAF Pilot, RN Observer and RAN TAG (Telephargist Air Gunner)
Aircraft Manitence and Launching/Recovery Team - RAAF
Photographic Expert for Development of any Photos taken Operationaly by Aircraft also RAAF.

Life Saving Equipment -

As Completed HMAS Sydney Carried -

1 x 36ft Motor and Pulling Pinnance - 76 Souls

2 x 35ft Motor Boats - Capacity 46 Souls Each

2 x 32ft Cutters - Capacity 59 Souls Each

1 x 30ft Gig - Capicity 26 Souls

2 x 27ft Whalers - 27 Souls Each

1 x 16ft Skiff Dinghy - 14 Souls

and

2 x Pattern No 17 Carley Floats - 45 Souls Each

2 x Pattern No 18 Carley Floats - 67 Souls Each

2 x Pattern No 20 Carley Floats - 20 Souls Each

Total 644 Souls


Complement Pre War -

RAN/RN - 635 made up of 41 Officers and 594 Ratings and Leading Seamen

RAAF - 6 made up of 1 Officer, 3 NCO and 2 Airmen

Civilian Canteen Staff - 4

645 Souls on Board in Total

Complement by November 1941 -

36 RAN, 1 RAAF and 5 RN Officers

592 RAN, 5 RAAF and 2 RN Ratings, Airmen, Leading Seamen and NCOs.

Civilian Canteen Staff - 4 (from Malta)

645 Souls on Board in Total

Machinery -

HMAS Sydney was Fueled by 4 Admiralty Type Yarrow 3 Drum Boiler's which Supplied Superheated Steam upto a Max Pressure of 300 Pounds Per Square Inch and Powered 4 Parsons Geared Turbine Sets which by the Use of Coupled Gear Cases Turned 4 Propeller Shafts that were Capeable of Producing 72000 Shaft Horse Power.
The Forward Boiller Room Housed A1/A2 Boillers and the Aux Boiller which was used for Hot Water and other Domestic Purposes on Board Ship, A1 and A2 were Mounted Side by Side while the Aux Boiler was Mounted Forward of these on the Side Centerline of the Ship - A1 and A2 Powered the Forward Engine Room which in turn Turned the 2 Outer or Forward Shafts of the Ship.

The Aft Boiller Room Housed B1/B2 Boillers and these were Mounted in Line on the Centerline of the Ship, B1/B2 were used to Power the Aft Engine Room and Turned the 2 Inner or Aft Propeller Shafts.
Boillers and Turbines were also 'Cross Connected' and this Enabled Any Boiler to Supply Steam to Any Turbine Set if the Need should Arise.

The Boillers were Oil Fired and of the Type Referd to as being 'Water Tube' in Design which were Fed to the Turbine Sets through 'Manouvering Valves' and a System of Steam Pipes or 'Leads'.
This System of Leads would be Refered to as the 'Main Steam System' and was also used to Power Turbo Generators or Dynamos and Certain Aux Gear some of which would have been Pumps, Ejectors and Fire Extinguishers etc.

Protecting this Vital Area of Any Naval Ship was a Layer of 3 Inch Armor Plate that was Fixed to the Already Present 1 Inch Thick Hull Plating which in Turn Surrounded the Boiller Rooms and Engine Rooms.
There were also Hull Plates Fore and Aft of this Armour Belt which were 7/8 Inch Thick.

During HMAS Sydney's Power and Fuel Consumption Trials which took Place in October 1938 these Sea speeds were Achived -

Full Speed - 31.5 Knots

With All Dispatch - 30.4 Knots

With Dispatch - 28.2 Knots

With All Convieneint Dispatch - 25.9 Knots

With Moderate Dispatch - 21.1 Knots

At Most Ecconimical Sea Speed - 12.0 Knots

Total Sea Endurance - 9000 Miles at 13.9 Knots

Fuel Stowage -

Oil fuel - 1767 Tons

Motor Sprit - 800 Gallons

Aviation Sprit - 1600 Gallons

Casualties when Sunk by HSK Kormoran - 645 Souls on Board

RAN 36 Officers and 592 Ratings

RAAF 1 Pilot and 5 ground staff

RN 5 Officers and 2 Ratings

Civilian Canteen Staff - 4

Also on 20 Decemeber 1940 School Master Alan Kidd RAN from Victoria Died of Illness and Not Due to Enemey Action while on Board HMAS Sydney, Aged 28.
Son of John and Emma Kidd of Northcote Victoria, Australia at Eternal Rest in the Alexandria Millitary and War Memorial Cemetery, Egypt.

Fate - Missing with All Hands 19/20 November 1941 Due to Enemy Action off the Coast of Western Australia.
All Personal Classed as Missing Presumed Dead Effective from 11 December 1941.
Memorial Service for Crews of HMAS Sydney and also HMAS Parramatta was held at the Cathedral of
St Andrew's Sydney,4 December 1941.

Commanding Officers -

Capt JUP Fitzgerald RN - 29 September 1935

Capt JWA Waller RN - 9 October 1937

Capt JA Collins RAN - 16 November 1939

Capt J Burnett RAN - 14 May 1941

Battle Honors For All Ships Named Sydney upto Present Adelaide Class FFG Type -

"Emden" - 1914

Medetreranean Sea - 1940

Battle of Calabria - 1940

Battle of Cape Spada - 1940

Indian Ocean - 1941

"Kormoran" - 1941

Korea - 1951/1952

Vietnam - 1965/1966/1967/1968/1969/1970/1971/1972

Persian Gulf - 1991 (Still Active)
 
Hi Diver and welcome to the forum. This is great stuff but ya might want to put in another section like "WWII General" instead of this section which is for posting pics. Is this for a book you are writing?
 
When HMAS Sydney was first sighted by one of her future officers on 25 September 1935 he described their first meeting in this way -

'After Leaving Bound for Portsmouth to Carry Out Her Steaming Trials off the East Cost of England HMAS Sydney Reached Spithead on 25 September 1935 and on the Next Morning Entered the Harbour Her White Ensign Flying to come Alongside the Basin at which Point the HMAS Brisbane was Secured to Her so as to Transfer over Her Remaining Members of Her Commsioning Crew.
It was an Exciting and Proud Moment for Us as We Watched this Brand New Australian Naval Ship

- the Last Word in Cruiser Design -

Come Gliding in, Her New Paintwork Shining and Her Deck Snow White in the Morning Sunlight and We felt Reasured that this would be Our New Home'.

WH Ross RAN.

HMAS Sydney - Whats in a Name ?

The Name Sydney is a very Appropiate Name for Any Australian Warship to Carry and this is Demonstrated Clearley by the Fact that it is Still Carried by the curent RAN on Board an FFG of the Adalaide Class to this Very Day and has been Annouched as the Name for One of the New Class of Ships that are Schduled to Replace the Adaladie Class at the End of their Service Life.
The Name Honors Australias Largest and Best Known City and Reflecte's the Naval Heritage of Australia from the Days of the 'First Fleet' to the Modern Day Navy.
Sydney Cove which is inside of Port Jackson was the Location of the First European Settlement in Australia, the Name Sydney Deriving from the Choice of Captain Arthur Phillip RN (the Colony of New South Wales 1st Governor and Commander of the 'First Fleet') who Named the Area Sydney after Lord Sydney the Secreteray of State for the Home Department back in the 'Motherland' - England.

So with the Strong Traditions and Connection Australia has with England it was Unsurprising that 120 Years Later One of the Ships that were Commsioned after Federation by the Newly Anounced RAN - Royal Australian Navy - was to be Named HMAS Sydney.

On 25 July 1910 the Austrlian Federal Government authorised the building of two light cruisers for the planned RAN, the cruisers were to be named Sydney and Melbourne.
Then on 5 October 1911 the existence of the new Australian Navy was formally advised when the Naval Board issued an historic order promulgating the designation - 'Royal Australian Navy'.
The order also also went on to direct that the permanent naval forces of the Commonwealth, along with the ships of the Navy to be designated here on as 'His Majesty's Australian Ships', and that all ships and vessels of the Royal Australian Navy were to fly at the stern the White Ensign as the symbol of authority of the Crown, and at the jack staff, the flag of Australia.
HMA Ships Australia and Sydney left in company bound for their new Home Ports - 'Austrlia' and 'Sydney' NSW - July 1913.

The Motto of HMAS Sydney almost sums up her carrer to date - 'Thorough and Ready'.

HMAS Sydney 1911-1929 - Birth of a Legend

The first Ship to Carry the Name HMAS Sydney was a Town Class Light Cruiser which was Laid Down in Febuary 1911 at the London and Glasgow Engineering Co Shipyards Glasgow Scotland, she was Launched 29August 1912 by Lady Henderson the Wife of Admiral Sir Reginald Henderson, She was Commsioned 26 June 1913 by Captain JCT Glossop RN before Sailing into Her Home Port for the First Time, 4 October 1913.
HMAS Sydney entered Sydney Harbour in Company with HMAS Austrlia which was the flagship and carried the flag of Rear Admiral Sir George Patey RN, other ships that made up the Fleet when it entered Sydney Harbour were -

HMAS Austrlia (Battle Cruiser) Captain SH Radcliffe RN
HMA Ships Melbourne and Sydney (Cruisers) Captain's M L'Estrange Silver RN and JCT Glossop RN (Respectivley) (Both same Class as was the under construction Brisbane)
HMS Encounter (Cruiser) (Loaned to RAN til HMAS Brisbane was Ready) Captain BM Chambers RN
HMA Ships Parramatta, Yarra and Warrego (Torpedo Boat/Deystroyer) Captain T F Ticknell CNF(later RAN) Leutenant Commander TW Biddlecombe CNF (RAN) and Commander GF Hyde RN.

Even before the declaration of war between Britain and Germany, the Australian Cabinet met in Melbourne and promptly offered the Australian fleet to Britain.
Additional Duites included - Port wartime lookout and examination stations, which were manned by members of the Royal Australian Naval Brigade, Stations were established at all major ports for this purpose.
As well All wireless stations in Australia were placed under the control of the Naval Board and Censorship of all cable and wireless traffic was enforced with immeadite effect.
The message conveying the news of the outbreak of war with Germany was received in Australia at 12.30pm on 5 August 1914 and Austrlia declared war almost immeaditley afterwards.

On 10 August 1914 An Australian Government Order in Council was gazetted which placed all Commonwealth
Naval Forces, including the Naval Board, under British Admiralty control, for the duration of the War.

HMAS Sydney's Major 'Claim to Fame' was the Sinking of the Imperial German Naval Raider SMS Emden which was Captained by Kotvettenkapitan Karl von Muller and the sinking of the German Coillier Buresk shortly afterwards (9 November 1914) and the 'Clearaing Out' of Germany's Pacific Colonies - Such as New Guniea and Rabual (August - September 1914 during which the First RAN Casulaty of the Great War was suffered Able Seaman William George Vincent Williams ANMEF RAN) (11 September 1914 - Rabual - a place many more Austrlians were to die in defence of in the next war...)

SMS Emdens Casualties were 134 Killed, 61 Wounded and 117 POWs - HMAS Sydney suffered 4 Dead and 8 Wounded - 3 of those killed were RN attached to the RAN like the HMAS Sydneys Commander.
The SMS Emden Shore Party under the command of the SMS Emden's first officer Kapitaenleutnant Kurt Hellmuth von Mucke (Later a noted anti Nazi during the 1930s) evaded capture and safely reached German Terriorty after escaping from the area.

HMAS Sydney first saw duty after the 'Excitment of 1914' on the 'Amercia Station and the West Indies Station 1915 -1916 hunting for more of the German Raiders bleived at loose in the area, before she was ordered to join the RN's 'Grand Fleet' as part of 2 Light Cruiser Squadron from November 1916.
Her Major Extcitment in this period was when she was invloved in a mid sea Collision while leaving Halifax Nova Scotia with a harbour ferry to undertake a partrol off the coast of New York, 20 August 1915.

HMAS Sydney was not damaged however the Ferry was badly damaged but did not sink.

While she was a member of the RN's Grand Fleet she Undertook Mostly Convoy Protection Duites, Captain Glossop commanding her still until he was relived of his Command and Replaced on 2 April 1917 by Captain JS Dumaresq RN who took over Command.
Captain Glossop was not done with the RAN and proceedeed back to Austrlia to take over Command of the RAN Garden Island Naval Base - Fittingly enough in Sydney Harbour!
His Final role was as the Captain-in-Charge of Naval Establishments in Sydney, he was promoted on 1 March 1919 to Commodore 2nd Class and after returning to the RN 1920 was promoted to Rear Admiral 21 November 1921 and then retired from the service the very next day!
He reamined in Engalnd with his Austrlian wife who he had married January 1918 in Sydney and died shorltty before the New HMAS Sydney was born, 23 December 1934.

He was awarded the CB, MID, the Japanese Order of the Rising Sun and the French Legion d'Honneur for his efforts in the 'Great War'.
 
HMAS Sydney saw her first action in this new theatre on 1 December 1916 when She made Her first North Sea Patrol as part of the RN Grand Fleet, her Sister HMAS Melbourne was also present and her squadrons Flagship was HMAS Australia.
Tragedy Struck on this patrol off the coast of Norway on 20 December 1916 wich led to the death of another RAN sailor killed doing his duty.
HMS Hoste (Commander Graham RL Edwards RN Survived) and HMS Negro (Leutenant Commander Alexander H Gye RN Killed) were part of the Escort for this offensive sweep - HMS Hoste was only 38 Dyas old and both were members of the M Class.
At some point on the sweep between Norway and the Shetland Islands, HMS Hoste reported suffering a complete steering failure and at this point she was ordered to return to Scapa Flow under HMS Negro's Escort.
The weather conditions were already far from good and reports all backed up the surviving captain when he reported that they were getting much worse and not better at the time of the incident occuring.
At some point in the return leg the temperary repairs to the steering failed once more and HMS Negro then ran into HMS Hoste from the rear, in the process jarring 2 of her depth charges loose which then exploded with Catastophic effect - blowing the bottom out of HMS Negro which sunk very quickly afterwards.
HMA Ships Melbourne and Sydney were nearby when this occured and such was the force that one seamen was killed on each ship while another 7 were injured on both ships combined.

HM Ships Marmion and Marvel then attempted to take the badly damaged HMS Hoste under tow but when it was reported that the ship was now considered to be in danger of breaking in half the order was given to abandon her and the two deystroyers stood by ready to recover her crew the task of which fell onto the crew of HMS Marvel.
HMS Marvel then closed up on no less then 13 seperate occasions to recover the crew while HMS Marmion stood by to assist if they were needed, which they were not.
Shortly after revovering all the survivors from on board HMS Hoste the ship foundered and also sunk rapidly.
The Final Death Toll from this accidnet was - 2 RAN Killed and 7 Injured while HMS Negro had 50 Dead and 48 Recovered, HMS Hoste had 186 recovered and at least 7 Dead exact number's being uncertain at this date for HMS Hoste.

The next bit of excitment for HMAS Sydney saw her once more at Sea in Company with HMS Dublin (Cruiser) and an escort of 4 RN Deystroyers when the 5 Engine German Navy Zepplin L43 was sighted at 1025 Hrs by HMS Dublin coming from the East at a range of 17 Miles and clearley making for them.
Both Cryusers took up the challenge preserned to them and turned to face the threat head on before opening fire while the Zepplin was still at an extreme range.
Captain Dumaresq RN was the Fleet's Commander and he next moved his ships into poistion so that when battle was engaged proper warshups would be to all sides of the Zepplin and when fire was recommenced this was indeed the case.
The Zeppelin made for HMS Dublin as its first to target to attack, causing HMS Dublin to swerve to hard a'starboard, at which point the Zepplin released 3 Bombs targeting the Cruiser and some of the escorts with no hits recorded.

After 20 minutes of playing areial tag the zeppelin attacked HMAS Sydney from 20 000ft by dropping at least 12 Bombs onto the RAN Cruiser below them, in return HMAS Sydney expended all her AA Ammunition at the Zeppelin - however due to the range most of the AA Shells were exploding too low.
L43 then called up another Zepplin which HMAS Sydney sighted coming up hard towards them from the N/E at around 1300 Hrs, however by this point HMAS Sydney had decided to call it a day and as one RAN officer put it afterwards - ' ..The Combatants Parted on Good Terms..'
Captain Dumaresq RN reported - 'The gunnery officers of HMAS Sydney and HMS Dublin made very good shooting with the HA AA guns, keeping the Zeppelin at such a height as to make her bomb dropping inaccurate'.
His XO Commander Cayley RAN recorded it this way - '...differences of opinion' between ship and a Zeppelin which amused herself by sitting up overhead, well out of range, and thoroughly bombing us'.
Another First for the RAN was also achived by HMAS Sydney in that she was the first ship of the RAN to be subjected to any kind of air attack.

On 9 July 1917 the RN Battleship HMS Vanguard exploded without warning after having earlier returned from carying out routine drills, while berthed at Scapa Flow.
According to eye witneeses at 2320 Hrs Flames were sighted near HMS Vanguards foremast only to be fowlloed by 2 large explosions at which point HMS Vanguard disapaered behind smoke and was rapidly lost to sight.
After the smoke cleared there was no trace of HMS Vanguard and gone with her were at least 843 Seamen from her crew, while on the sea's surface there was buring wreckage and debris everywhere, with bits of twisted metal later found ashore such was the force of the explosion.
The RN Later gave the casue of the Diasaster as being due to coal sacks being stacked up incorectley in her Coal Hold which then was able to increase the temperature inside one of her magazines until her Cordite load self detonated inside that particular magazine, which resulted in her being blown apart and sunk.

She was Commanded by Capatain JD Dick RN and there were only 2 survivors from her crew - the 3rd died of injuries from the explosion shorlty after being pulled from the water.
Among those killed was an officer of the Imperial Japanese Navy and 2 RAN Stokers who were both on board atending a cinema presentation, they were both members of the Comploment of HMAS Sydney.

In an Echo of the Future HMAS Sydney's to Come, the Name Sydney Began its First of Many Assocations with the Aircraft

- Something that She Again Carries on Now and is Intened to Do in the Future -

HMAS Sydney has in All its Incarnations to Date been Suported by its Own Shipboard Aircraft, be it a Sea Plane or Rotary in Nature as the current Incarnation Presently Does.

This All Started with the 12 Week Refit at Chatham that HMAS Sydney Underwent starting in August 1917 during which She was Fitted with the First Revolving Aircraft Launching Platform to be Installed in a Warship (as against Fixed Platforms).

On Arrival at Scapa Flow during December 1917 Her New Commanding Officer, Captain Dumaresq,'Borrowed'
a Sopwith Pup then being Operated from a Fixed Platform on the RN Cruiser HMS Dublin.
On 8 December 1917 the Aircraft was Launched Successfully from HMAS Sydney's Platform in the Fixed Position -This being the First Aircraft to become Airborne from an Australian Warship.

Capatin Dumaresq RN then sent this signil to the airfield at Scapa Flow -

'As HMS Dublin's pilot has to return shortly request that HMS Campania (Seaplane Tender) may be asked to supply a pilot and Camel or standard Pup, complete with two mechanics to HMAS Sydney'.

Nine Days Later, 17 Decmber 1917 the Pup Flew Off the Platform Turned into the Wind - the First Time Any Aircraft had been Launched from such a Platform in the Revolved Position.

Early in January 1918 HMAS Sydney took on Board a Float Equiped Sopwith Camel, the Standard Fighter Plane of the RFC/RNAS - Superseding the Sopwith Pup.

On 1 June 1918, while Entering the Heiogoland Bight Two German Seaplanes were Sighted by HMAS Sydney at 0933 'Diving Towards' Her Sister Ship HMAS Melbourne

- Both Dropped Bombs -

But No Hits were Scored.

F/L A C Sharwood RAF was Strapped into the Cockpit of his Sopwith 2-F1 Ship's Camel N 6783, and Turned into the Mean Wind 20 Degrees off the Centerline of the Ship.
The Launching Party Comprised of His Engine Fitter Birch, Rigger Radcliffe and Joiner/Mechanic Graffy who were all under the Command of HMAS Sydney's First Lieutenant - Leutenant Commander Garcia RAN.
F/L Sharwood was Successfully Launched at 0955 and Shortly Afterwards was to be Fowllowed by HMAS Melbourne's Camel N 6756, which was Launched at 1000 Hrs while being flown by F/L L B Gibson RAF.

F/L Gibson Climbed into Cloud Cover and Failed to Locate the Enemy, Playing No Further Part in the Action He Returned to Circle the Fleet Protectivley from Above.

This led the Captains of HM Ships Courageous and Glorious to in Turn Think that the Enemy had been Driven Off - They did Not Launch their Aircraft for this Reason.

F/L Sharwood RAF meanwhile Climbed to 10 000 ft and Pursued the German Aircraft for 60 miles before He was Able to Engage, Diving onto One of the Aircraft and Firing Bursts into it.

Official Accounts Mention Only the Two Seaplanes but His Log Book says -

'Flight from HMAS Sydney after Three Hun Sea Planes (Two 2 Seaters and One 1 Seater)'.

Evidently it was the Single Seater which He had Hit.

He Saw it 'Shudder and Dive into the Sea'.

Whilst He followed it Down he was 'Bounced' by Another German aircraft, which He engaged only to have his guns jamm mid Combat.
He 'Broke Off at Once' and Tried to Return to HMAS Sydney - now Over 70 Nautical Miles Away.

By 'Pure Luck' He Sighted the Deystroyer HMS Sharpshooter Cruising Below Him and Landed Alongside, Whereupon He was Rescued by the Deystroyer's Sea Boat.
The Cruiser HMS Canterbury then set about Safley Recovering the still Floating Aircraft, and did So Successfully.
F/L Sharwood's Claim of One Enemy Seaplane Forced Down was Not Recognized by the Admiralty because there was No Independent Corroboration and His Gallantry was Never Rewarded

- but the Interception Confirmed the Faith in Aircraft that was Held by HMAS Sydney's New Commander.

end of Extract
 
1) HMAS Sydney Memorial Plaque, HMAS Sydney Memorial Western Australia

2) HMAS Sydney Memorial Cairn Western Australia at site of Landing of HSK Kormoran Survivors

3) Memorial Stained Glass Window for HMAS Sydney's first 3 Incarnations Garden Island Chappel Sydney

4) Welcome Home March HMAS Sydney Febuary 1941 Sydney NSW.

(Some People have said that for emotion that the welcome home to HMAS Sydneys Crew was higher in Emotion then that of VE Day in Australia and even VJ-Day)
 

Attachments

  • 800px-HMAS_Sydney_memorial_01_gnangarra.jpg
    800px-HMAS_Sydney_memorial_01_gnangarra.jpg
    126.1 KB · Views: 150
  • This%20plaque%20tells%20the%20story%20of%20the%20Sydney.jpg
    This%20plaque%20tells%20the%20story%20of%20the%20Sydney.jpg
    80.5 KB · Views: 62
  • stainedglass004.jpg
    stainedglass004.jpg
    19.5 KB · Views: 146
  • 24051r.jpg
    24051r.jpg
    110.6 KB · Views: 129

Users who are viewing this thread

Back