Builder 2010
Staff Sergeant
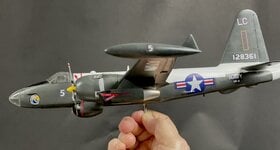
I mentioned this model in my Apache thread, and thought I might as well post it in it's entirety. The back story is about my wife's first cousin, Larry. For no special reason, they had stopped interacting years ago, and recently reconnected. I learned things about his background that I never knew. I knew that he worked for years at Boeing Vertol building Chinooks, and working in manufacturing, but didn't know that he was in the US Navy in the early 1960s serving as a flight chief on a P2V-5 Neptune. His plane was the one that dropped the first nuclear depth charge. I offered to build his plane for him. He sent me photos from which I could derive the plane and squadron numbers. I found an old kit on eBay for $45. It's a vintage kit in all of its shortcomings.
I'm totally spoiled. All my recent builds are with high tech modern plastic (not counting my custom builds) with spectacular detail, recessed panel lines and rivets, perfect fits and great engineering. This kit, sad to say, is none of these. Fits weren't good, detail was lacking, raised panel lines and poor engineering. But it's a plane that was not modeled much with the only other one being a 1960s Revell kit, which had to be worse. So I soldiered on and am building the kit. It only has four pages of instructions, and resides on three sprues. I will have it finished next week and will be delivering it along with the delivery of the 5"38 project to the BB New Jersey.
Making custom decals with white in them was the most challenging part of the job. Ink jet printers can't print white! To do so you print the decal on white background decal paper. That's okay if you are printing Stars and Bars where the white is contained within the graphic where you can razor cut the decal out of the background paper. But when the white IS the decal, such as the "NAVY" lettering, you have two choices: razor cut each letter and apply them one at a time. Good luck with that one. Or print the decal on a background that exactly matches the plane's base color and trim the decal wider. If you get the match right, the decal background basically disappears. This is easier said than done.
The steps are:

To ensure that the decals are correctly sized, I draw them directly on top of a scanned decal set. I import them into CorelDraw at full size. I missed one of the decals since the orginal, old decals were very yellowed and the small NAVY decal was very hard to see.

Larry sent me a picture of his squadron insignia which was on a plaque and photoed at an oblique angle so I couldn't trace directly over it. I found the insignia on the web and used that. Larry had the insignia made and had it on both sides of the planes nose. It took an entire morning to draw that decal.
This is the patch in 1:72. I printed a bunch.

Raised panel lines make it impossible to fill seams without destroyed detail. And this plane had a lot of seams to fill. The canopy and nose glazing had to be hand masked. I have no problem with that and used Tamiya Curvy Masking tape. It's actually white vinyl (electrical?) tape that's narrow and will stretch over compound curves nicely.

Sanding the seams obliterated the surface details, but with Tamiya filler, this was necessary.

All the subassemblies were built off the model. One of the gear parts, the brace, had to be trapped between the two back nacelle halves. Almost forgot to do this since the instructions were a bit vague.

The engines lack details, but you hardly can see them in the tightly cowled engine.

Yesterday, I got all of it put together ready for the first coat of primer. I'm going to prime the upper, white surface, with Tamiya white, and the rest with Tamiya gray. Originally, I was led to believe, by the instructions, that the color was Glossy Sea Blue. However, Larry informed me that his plane was Gray. More research showed that the later colors was Glossy Engine Gray. I took the blue back to the hobby shop and got the correct color. It's a tough gray to match.

I painted the NATO black fore part of the radar dome, but forgot to do the same for the anti-glare panel on the nose. I did that this morning. I will mask both of these surfaces before doing the primer paint.

The tailpipe region on the jets is ALLClad light burned metal, overcoated with Stainless Steek moving forward from the exhaust.
One of my blog readers informed me that there are some differenes between the -5 (Larry's plane) and the later -7 version. Primarily, the canopy is raised on the -7 since they raised the pilot's seat for better forward visibility a la, the later Corsairs. The radar dome was moved 4' forward. Some -5 versions show no jets, but Larry's plane had them. They also went from the R3350-30W to R3350-32W with slightly higher horsepower, but both were turbo-compouds with the same exhaust layout. I'm not going to attempt to make thse mods and Larry's okay with that. The fact that he's going to a have a nice model of a plane with all the correct markings. He said, "It brings a tear to my eye." so I'm assuming he's happy.
I'm totally spoiled. All my recent builds are with high tech modern plastic (not counting my custom builds) with spectacular detail, recessed panel lines and rivets, perfect fits and great engineering. This kit, sad to say, is none of these. Fits weren't good, detail was lacking, raised panel lines and poor engineering. But it's a plane that was not modeled much with the only other one being a 1960s Revell kit, which had to be worse. So I soldiered on and am building the kit. It only has four pages of instructions, and resides on three sprues. I will have it finished next week and will be delivering it along with the delivery of the 5"38 project to the BB New Jersey.
Making custom decals with white in them was the most challenging part of the job. Ink jet printers can't print white! To do so you print the decal on white background decal paper. That's okay if you are printing Stars and Bars where the white is contained within the graphic where you can razor cut the decal out of the background paper. But when the white IS the decal, such as the "NAVY" lettering, you have two choices: razor cut each letter and apply them one at a time. Good luck with that one. Or print the decal on a background that exactly matches the plane's base color and trim the decal wider. If you get the match right, the decal background basically disappears. This is easier said than done.
The steps are:
- Paint a sample of the back ground color.
- Scan the sample
- Import the scan into your graphics program, in my case CorelDraw 2021
- Print the scan on glossy photo paper that closely matches the white decal paper in highest resolution
- Examine print against sample. They WILL NOT MATCH!
- With the color selection set for CMYK, adjust the colors to bring the color closer. Make at least four samples varying the colors that you think get you close. Be sure to document the CMYK numbers so you can repeat the best match.
- Repeat this step as many times as you need to get the match. It takes a lot of patience and it's probably not going to be exact.
- When you think you've got it, print the decals out on the decal paper. Decal paper is expensive so I usually wait as long as I can before committing to printing on it. Even with that, I find that under different lighting conditions, the colors shift and don't look as they did where you printed it.
To ensure that the decals are correctly sized, I draw them directly on top of a scanned decal set. I import them into CorelDraw at full size. I missed one of the decals since the orginal, old decals were very yellowed and the small NAVY decal was very hard to see.
Larry sent me a picture of his squadron insignia which was on a plaque and photoed at an oblique angle so I couldn't trace directly over it. I found the insignia on the web and used that. Larry had the insignia made and had it on both sides of the planes nose. It took an entire morning to draw that decal.
This is the patch in 1:72. I printed a bunch.
Raised panel lines make it impossible to fill seams without destroyed detail. And this plane had a lot of seams to fill. The canopy and nose glazing had to be hand masked. I have no problem with that and used Tamiya Curvy Masking tape. It's actually white vinyl (electrical?) tape that's narrow and will stretch over compound curves nicely.
Sanding the seams obliterated the surface details, but with Tamiya filler, this was necessary.
All the subassemblies were built off the model. One of the gear parts, the brace, had to be trapped between the two back nacelle halves. Almost forgot to do this since the instructions were a bit vague.
The engines lack details, but you hardly can see them in the tightly cowled engine.
Yesterday, I got all of it put together ready for the first coat of primer. I'm going to prime the upper, white surface, with Tamiya white, and the rest with Tamiya gray. Originally, I was led to believe, by the instructions, that the color was Glossy Sea Blue. However, Larry informed me that his plane was Gray. More research showed that the later colors was Glossy Engine Gray. I took the blue back to the hobby shop and got the correct color. It's a tough gray to match.
I painted the NATO black fore part of the radar dome, but forgot to do the same for the anti-glare panel on the nose. I did that this morning. I will mask both of these surfaces before doing the primer paint.
The tailpipe region on the jets is ALLClad light burned metal, overcoated with Stainless Steek moving forward from the exhaust.
One of my blog readers informed me that there are some differenes between the -5 (Larry's plane) and the later -7 version. Primarily, the canopy is raised on the -7 since they raised the pilot's seat for better forward visibility a la, the later Corsairs. The radar dome was moved 4' forward. Some -5 versions show no jets, but Larry's plane had them. They also went from the R3350-30W to R3350-32W with slightly higher horsepower, but both were turbo-compouds with the same exhaust layout. I'm not going to attempt to make thse mods and Larry's okay with that. The fact that he's going to a have a nice model of a plane with all the correct markings. He said, "It brings a tear to my eye." so I'm assuming he's happy.