syscom3
Pacific Historian
"A bar room brawl after the lights had been shot out"
The 12 th of November, 1942. Two fleets on the go, and looking for trouble. Little did each side know that they were in for the most savage naval battle of the whole war. There were lots of bravery by everyone that night. Hats off to the gallant sailors of the USN and IJN who fought that night and early morning of the 13th!!!!!
Prelude
Abe's warship force and the transports assembled near the Shortland Islands and proceeded down "The Slot" towards Guadalcanal on November 12 with an estimated arrival time for the warships of early morning, November 13, with the slower transport ships travelling some distance behind. In addition to the two battleships, the Japanese force included the light cruiser Nagara and 11 destroyers: Samidare, Murasame, Asagumo, Teruzuki, Amatsukaze, Yukikaze, Ikazuchi, Inazuma, Akatsuki, Harusame, and Yudachi. Three more destroyers (Shigure, Shiratsuyu, and Yugure) would provide a rear guard in the Russell Islands during Abe's foray into "Iron bottom Sound" off the north coast of Guadalcanal. U.S. reconnaissance aircraft spotted the approach of the Japanese ships and passed a warning to the Allied command.
Thus warned, Turner detached all usable combat ships to protect the troops ashore from the expected Japanese naval attack and troop landing and ordered the supply ships at Guadalcanal to depart by early evening November 12. Callaghan was a few days senior to the more experienced Scott, and therefore was placed in overall command. Callaghan prepared his force to meet the Japanese that night in the sound. His force comprised two heavy cruisers (USS San Francisco and USS Portland), three light cruisers (USS Helena, USS Juneau, and USS Atlanta), and eight destroyers: USS Cushing, USS Laffey, USS Sterett, USS O'Bannon, USS Aaron Ward, USS Barton, USS Monssen, and USS Fletcher. Admiral Callaghan commanded from San Francisco.
During their approach to Guadalcanal, the Japanese force passed through a large and intense rain squall which, along with a complex formation plus some confusing orders from Abe, split the formation into several groups. The U.S. force steamed in a single column around Iron bottom Sound, with destroyers in the lead and rear of the column, and the cruisers in the center. Five ships had the new, far-superior SG radar, but Callaghan's deployment put none of them in the forward part of the column, nor did he choose one for his flagship.
Action
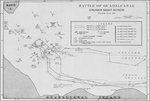
At about 01:25 on November 13, in almost complete pitch darkness because of the bad weather and dark moon, the ships of the Japanese force entered the sound between Savo Island and Guadalcanal and prepared to bombard Henderson Field. Several of the U.S. ships detected the Japanese ships on radar, beginning about 01:24, but had trouble communicating the information to Callaghan because of problems with their ship's radio equipment and lack of discipline with their communications procedures. Several minutes later, both forces visually sighted each other about the same time, but both Abe and Callaghan hesitated ordering their ships into action. Abe apparently was surprised by the proximity of the U.S. ships and could not decide if he should momentarily withdraw to give his ships time to change from bombardment ammunition to anti-ship ammunition or to continue onward. He decided to continue onward. Callaghan apparently intended to attempt to cross the T of the Japanese, as Scott had done at Cape Esperance, but—confused by the incomplete information he was receiving, plus the fact that the Japanese formation consisted of several scattered groups—he gave several confusing orders on ship movements. The U.S. ship formation began to fall apart, apparently further delaying Callaghan's order to commence firing as he first tried to straighten out his ship's locations. Meanwhile, both forces' formations continued onward and began to intermingle with each other.
At 01:48, the Japanese ships Akatsuki and Hiei turned on large searchlights and lit up Atlanta only 3,000 yards away—almost point-blank range for large naval artillery. Several of the ships on both sides spontaneously opened fire. Realizing that his force was almost surrounded by Japanese ships, Callaghan ordered, "Odd ships fire to starboard, even ships fire to port." Most of the remaining U.S. ships then opened fire, although several had to quickly change their targets in order to comply with Callaghan's order. As the ships from the two sides intermingled, they battled each other in an utterly confused and chaotic melée at close distances. Afterwards, an officer on Monssen likened it to "a barroom brawl after the lights had been shot out".
At least six of the U.S. ships, including Laffey, O'Bannon, Atlanta, San Francisco, Portland, and Helena, fired at Akatsuki, which drew attention to herself with her illuminated searchlight. Akatsuki blew up and sank within a few minutes, but not before hitting Atlanta with shells and a type 93 torpedo.
Perhaps because it was the lead cruiser in the U.S. formation, Atlanta was the target of fire from several Japanese ships, probably including Nagara, Inazuma, and Ikazuchi, in addition to Akatsuki. The gunfire caused Atlanta heavy damage, and the torpedo hit cut all of her engineering power. Atlanta drifted into the line of fire of San Francisco, which accidentally fired on Atlanta, causing even greater damage, and killing Admiral Scott and much of the bridge crew. Atlanta, without power or able to fire her guns, now drifted out of control and out of the battle as the Japanese ships passed her by. The lead U.S. destroyer, Cushing, was also caught in a crossfire between several Japanese destroyers and perhaps Nagara. She too was hit heavily and stopped dead in the water.
Hiei, with her nine lit searchlights, huge size, and course taking her directly through the U.S. formation, became the focus of gunfire from many of the U.S. ships. Laffey passed so close to Hiei that they missed colliding by 20 feet (6 m). Hiei was unable to depress her main or secondary batteries low enough to hit Laffey, but Laffey was able to rake Hiei's superstructure with 5-inch shells and machine gun fire, causing heavy damage to Hiei's superstructure and bridge, wounding Admiral Abe, and killing his chief of staff. Admiral Abe was thereafter limited in his ability to direct his ships for the rest of the battle. Sterett and O'Bannon likewise pumped several salvos into Hiei's superstructure from close range, and perhaps one or two torpedoes into her hull, causing Hiei further damage, before both destroyers escaped into the darkness.
Unable to fire her main or secondary batteries at the three destroyers causing her so much trouble, Hiei instead concentrated on San Francisco which was passing by only 2,500 yards away.[39] Along with Kirishima, Inazuma, and Ikazuchi, the four ships made repeated hits on San Francisco, disabling her steering control and killing Admiral Callaghan, Captain Cassin Young, and most of the bridge staff. The first few salvos from Hiei and Kirishima consisted of the special fragmentation bombardment shells, which reduced damage to the interior of San Francisco and may have saved her from being sunk outright. Not expecting a ship-to-ship confrontation, it took the crews of the two Japanese battleships several minutes to switch to armor-piercing ammunition. Nevertheless, San Francisco, almost helpless to defend herself, managed to momentarily sail clear of the melee. However, she landed at least one shell in Hiei's steering gear room during the exchange, flooding it with water, shorting out her power steering generators, and severely inhibiting Hiei's steering capability. Helena followed San Francisco to try and protect her from further harm.
Two of the U.S. destroyers met a sudden demise. Either Nagara or the destroyers Teruzuki and Yukikaze came upon the drifting Cushing and pounded her with gunfire, knocking out all of her systems. Unable to fight back, Cushing's crew abandoned ship. Cushing sank several hours later. Laffey, having escaped from her engagement with Hiei, suddenly encountered Asagumo, Murasame, Samidare, and, perhaps, Teruzuki. The Japanese destroyers pounded the Laffey with gunfire and then hit her with a torpedo which broke her keel. A few minutes later fires reached her ammunition magazines and she blew up and sank.
Portland, after helping sink Akatsuki, was hit by a torpedo from Inazuma or Ikazuchi, causing heavy damage to her stern and forcing her to steer in a circle. After completing her first loop, she was able to fire four salvos at Hiei but otherwise took little further part in the battle.
Yudachi and Amatsukaze independently charged the rear five ships of the U.S. formation. Two torpedoes from Amatsukaze hit Barton, immediately sinking her with heavy loss of life. Yudachi planted a torpedo in Juneau, stopping Juneau dead in the water, breaking her keel, and knocking out most of her systems. Juneau then turned east and slowly crept out of the battle area.
Monssen avoided the wreck of Barton and motored onward looking for targets. She was accosted by Asagumo, Murasame, and Samidare who had just finished blasting Laffey. They proceeded to smother Monssen with gunfire, damaging her severely and forcing the crew to abandon ship. The ship sank sometime later.