syscom3
Pacific Historian
This weekend marks the end of the 1st phase of the Battle of New Guinie. Hats off to all of the soldiers of the allies who fought this vicious campaign, against both the Japanese and the jungle! But I must give a second "hurrah" to the Aussies who fought splendidly and courageously. They showed the US how to fight a jungle war! (Sorry marines.... Guadalcanal was a defensive fight, not an offensive campaign)
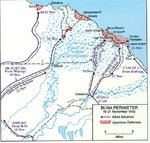
Battle of Buna-Gona
Date November 16, 1942 – January 22, 1943
Location New Guinea
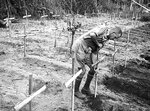
The Battle of Buna-Gona was a battle in the New Guinea campaign, a major part of the Pacific campaign of World War II. On November 16, 1942, Australian and United States forces began to attack the main Japanese beachheads in New Guinea, at Buna, Sanananda and Gona. By January 22, 1943, after prolonged heavy fighting in trying conditions, the Allied forces had overcome the defenders.
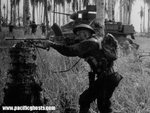
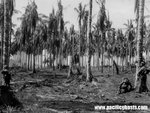
Allied intelligence in the lead-up to the battle was deficient in two key areas. While it was estimated that there were no more than 1,500-2,000 Japanese troops at the beachheads, the Allies actually faced more than 6,000 soldiers from the Imperial Japanese Army (IJA) and marines from the Special Naval Landing Forces (SNLF). The Allies also believed that widespread swampland would render the construction of strongpoints impossible. But the Japanese were able to build fortified positions above ground and to conceal them with felled trees and tall tropical grass, making them virtually invisible to attackers. These could generate devastating interlocking fields of fire, supported by many snipers hidden in tall trees. The Allies initially lacked tanks, artillery, and air support, and Japanese positions had to be taken one by one, using grenades and small arms.
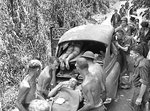
Tropical diseases, especially malaria, dengue fever and bush typhus (known to the Japanese as tsutsugamushi), caused far more casualties to the combatants than the effects of battle.
Forces, supply lines and materiel
The Japanese defences were concentrated in three strongholds. One was at Gona, under Major Tsume Yamamoto; another was around Sanananda, under Colonel Yosuke Yokoyama (who was in overall command of IJA forces in the Buna-Gona area), and the third and largest Japanaese stronghold was in the Buna area, under SNLF Captain Yoshitatsu Yasuda. Although these positions were separate, communications between them and Japanese supply lines were initially strong. The Japanese were initially able to maintain supply and to evacuate wounded personnel by sea, and submarines maintained contact with the beachheads until January.
The Japanese garrison was a mix of army and naval forces. It initially numbered about 5,500 Imperial Japanese Army combat personnel: the remnants of the 144th Infantry Regiment, the 15th Independent Engineer Regiment, the 3rd Battalion of the 41st Infantry Regiment, a divisional cavalry detachment, and the 47th Field Anti-Aircraft Battalion. A few field artillery batteries were guarding the beachheads proper. In addition to these army units, there were about 500 marines from the 5th Yokosuka and 5th Sasebo Special Naval Landing Forces.
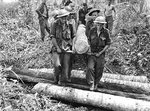
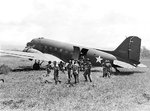
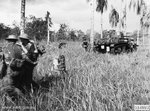
The Allies' major bases, at Port Moresby and Milne Bay, were distant, the Owen Stanley Ranges were impassable to motor vehicles, and the Bismarck Sea to the north of New Guinea was controlled by the Imperial Japanese Navy and air forces. The attacking troops depended on airdrops by the Liberator cargo planes of the U.S. Fifth Air Force and makeshift transport units assembled by the Royal Australian Air Force (RAAF), as well as coastal shipping, which was vulnerable to air attack. However, USAAF and RAAF ground attack and bomber aircraft, typified by the A-20 Havoc/Boston, represented a significant and ever-increasing advantage for the Allies.
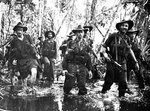
The U.S. 32nd Infantry Division, an inexperienced National Guard formation, commanded by Major General Edwin F. Harding launched the initial attack on Buna. The Australian 7th Division (minus one brigade) under Major General George Vasey, and the U.S. 126th Infantry Regiment (detached from the 32nd Division) was to attack Gona. The Gona push was reinforced by the remnants of Maroubra Force, in the shape of the battered 30th Brigade, a Militia unit which included the "ragged bloody heroes" of the Kokoda Track, the 39th (Militia) Battalion. {patch upper right}. The Australian 16th Brigade, detached from the 6th Division, would push towards Sanananda.
First phase
Fighting was bitter from the outset: 7th Division took 204 casualties in the first three days of its thrust. The 32nd Division lost 392 personnel within two weeks.
On November 29, the Japanese were reinforced by the remaining 500 troops from the South Seas Detachment (mostly 41st Infantry Regiment; under Colonel Kiyomi Yazawa), which had led the Kokoda Track campaign and retreated to the sea at a point north of Gona. They were shuttled by boat to the Sananada stronghold.
By November 29, the Supreme Allied Commander in the South West Pacific, General Douglas MacArthur, had become frustrated at what he saw as poor performance by the 32nd Division, especially its commissioned officers. He told the US I Corps commander, Major General Robert L. Eichelberger:
"Bob, I'm putting you in command at Buna. Relieve Harding ... I want you to remove all officers who won't fight. Relieve regimental and battalion commanders; if necessary, put sergeants in charge of battalions and corporals in charge of companies ... Bob, I want you to take Buna, or not come back alive ... And that goes for your chief of staff, too"
Second phase
A second phase of the battle is marked by the coincidental arrival of more senior commanders and reinforcements for both sides, on December 2.
Eichelberger immediately replaced several senior commanders within the 32nd, ordered improved food and medical supplies, and halted operations on the Buna front for two days, to allow units to reorganize.
Also on December 2, 500 Japanese reinforcements, in the form of the inexperienced 21st Independent Mixed Brigade (based on the 170th Infantry Regiment), arrived at Gona under Maj. Gen. Kurihanao Yamagata.
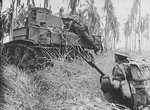
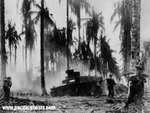
On December 6, following savage close-quarter fighting, the Australians captured Gona village. That same day, Eichelberger organized a new attack on Buna Village and the 32nd Division captured the position on December 14. The Japanese landed 1,300 reinforcements, but by December 18 the Allies were reinforced by the 7th Division's 18th Brigade, as well as the 2/6th Armoured Regiment — the first tanks available to the Allied forces. In spite of this boost, the Australians suffered some of their worst losses of the entire battle, although they eventually broke through the Japanese defensive positions along the coast. In ten days of fighting, the Allies advanced along the coast from Duropa plantation to Buna Mission, taking the remaining Japanese positions by December 28.
The U.S. 163rd Infantry Regiment — from the U.S. 41st Infantry Division — joined the assault on the last Japanese holdout, at Sanananda, which was taken on January 22.
The Japanese forces had been cut off from resupply during the second week of January, and their food had run out. The severity of their plight was such that Allied troops found evidence of cannibalism in captured Japanese positions.
Two NCOs from the 32nd Division, both of them killed in action near Buna — 1st Sgt Elmer J. Burr and Sgt Kenneth E. Gruennert — were later awarded the Medal of Honor. Staff/Sgt. Herman Bottcher, who played an instrumental role in the battle was awarded the battlefield commission of Captain and earned two Distinguished Service Cross Medals.

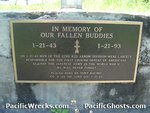
 to the men of the Australian and American Armies who fought in that tough campaign.