ADVENT 1/72nd A6M5 Reisen (Zero) (1 Viewer)

Ad: This forum contains affiliate links to products on Amazon and eBay. More information in Terms and rules

Matt308

Glock Perfection
18,961
90
Apr 12, 2005
Washington State
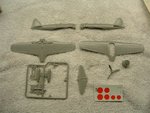
I was in dire need of a change from my last builds and wanted something simple. Well this couldn't be more simple. Nor crude. This a 1979 ADVENT kit, produced under the Revell name. However the mouldings have stamped right on them Revell 1962. And the decals are marked Revell 1969. That's pretty telling.

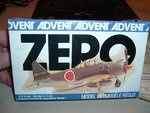
Here is the wonderful box art. A true masterpiece in modeling marketing if you ask me. :rolleyes: I remember when I bought this kit, it was only because I had built every other 1/72nd kit on my local store shelves.
 

Attachments

  • DSCF2042.JPG
    DSCF2042.JPG
    59.2 KB · Views: 188
The instructions are shite. But then again, with literally only 9 (nine) pieces for my wheels up build what do you expect. WELL FOR EFFING STARTERS HOW ABOUT SOME DECAL PLACEMENT YOU OUTTA BUSINESS DUMBS$HITS!!!

Anyhow, here is some pics of the instructions just for grins...
 

Attachments

  • DSCF1971.JPG
    DSCF1971.JPG
    101.3 KB · Views: 150
  • DSCF1972.JPG
    DSCF1972.JPG
    99.5 KB · Views: 122
Here is the massive amounts of sprue parts in their glory.
 

Attachments

  • DSCF1970.JPG
    DSCF1970.JPG
    95.4 KB · Views: 208
I won't even begin to identify the mistakes on this crapheap. But I will make a best attempt to do 'er up! And I refuse to use my airbrush, just out of spite. Virtually OOB.
 
Boy oh boy! Does that bring back memories?!!
I remember building that when i was about 12, back in 19*. I seem to recall crashing it into a French railway station! Don't ask me why a Zero crashed into a French station on a British model railway, as I have no idea!
Looking forward to seeing pics of the build - what, done already! OK, pics of the finished masterpiece then.
 
It looks okay. Wings from an A6M8. Wrong scaling throughout. No cockpit. Pilot must be 4'10. No HF aerial. No direction finder. Too many cylinders on the engine. Cowl improperly dimensioned. I could go on and on. But she dresses up relatively well. I put a coat of Future on her yesterday. Today I'll put the decals on. Just gotta figure out where, as other than the rising suns, the box art/instruction sheet contains no clues. The damn tail number decal was blank for both sides, so a little free hand will have to do for that too. What did I expect for $0.99USD. :lol: It's all good!
 
Too many cylinders on the engine. Cowl improperly dimensioned. I could go on and on. But she dresses up relatively well

You got an experimental plane WOW :lol: :rolleyes: Hey it could be target practice for your sons BB gun.
 
I need the forum members help on this one. I'm at wits end. Certainly this kit has numerous errors and flaws, but I'm not looking for authenticity for the individual aircraft, just some basic direction on where these types of individual markings might be applied.

Here are the decals that I'm still working with. The two rising suns are the port and starboard fuselage national insignias.

Decal Number (1) goes on the port side forward of the horizontal stabs.

I messed up the numbering, but (2) and (3) are exactly the same, with no difference in arrow direction (i.e., arrow points forward on both sides or aft on both sides).

I have no idea where (4) goes. Likely under the cockpit.

(5) is hard to see, but looks like a scope aiming reticle. Perhaps a refueling point? It has Japanese writing below it.

(6) are propeller markings I think. With a white stripe perpendicular to the blades rotation with Japanese letters running below the white strip towards the prop hub.

Any help would be appreciated. This kit is so basic that the decals are a make or break for her. The decals are terrible. They are as thick as writing paper and my first attempts have required about 6-8 applications of Micro Sol to get them to adhere and flow across the mold lines.
 

Attachments

  • DSCF2047.JPG
    DSCF2047.JPG
    53.3 KB · Views: 125
Matt, let me try and find the 1/72 Hasegawa Instructions that I built years ago, and I'll scan them in and see if that helps. It'll be a little bit as I plan on spraying my plane and finishing my homework, but I'll get it done tonight.
 
Take a look first before you go thru any effort, Catch. From the pics that I have, the propeller decals (6) are not the norm. And the Red arrow with writing is also unique. Decal (1) is very typical. Decal (4) and (5), I have no clue.
 

Users who are viewing this thread

Back