copcheck
Airman 1st Class
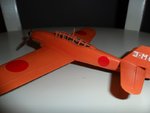
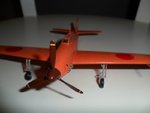
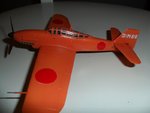
First addition in awhile and my first Tamiya kit.
Overall I enjoyed the kit and the quality seemed very good, however I was not impressed with the fit of the canopy and could not figure out how to get it to fit properly.
Also, I was disappointed that the tail decal clouded up on me and the left wing had a bit of silvering even though I used Klear prior to setting the decals.
This was also my first attempt at painting decals and placing them on the canopy rather than paint. Overall I like the outcome although my lines are thicker than they should be and I need to figure out how to get the finish coat to match the plane finish coat which is satin.
Cheers,
Jon
")
