Hey All,
Been a looooong time since I last posted. Many years ago was working on a Zero, then life got in the way, moved house, etc, and it got shelved. It's still sitting on my shelf unfinished unfortunately, I'm scared to remove the masking tape as it has been sitting for years!
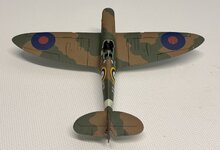
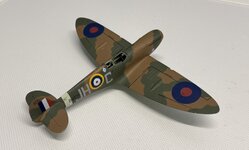
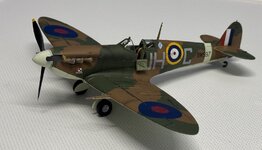
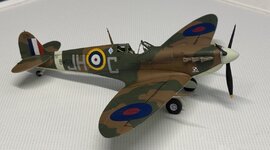
Recently got back into it and decided to build a 1/48 Airfix Spitfire that's been sitting on my shelf for a long time.
As something different, I decided to fully paint it with hairy brushes rather than airbrushes, largely due to the difficulty in setting up my airbrush these days and wanting to work on it after I get home from work not really being conducive to airbrushing. So it's more of an experiment than anything.
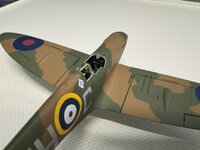
The roundels, the sky coloured band on the fuselage, and the "no step" lines on the wings were painted with masks and hairy brushes, largely to prove to myself that it's actually possible to do that, I'm pretty happy with how they came out (better than some of the decal came out IMO!).
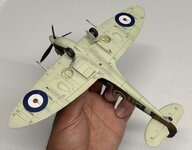
Being hairy brushed, the model does have a bit of texture to it, but it's so subtle that I struggled to capture it in a photo, though on a sunny day looking up close I can see it. I tried to avoid brush streaks by using large soft brushes (think make up brushes rather than your typical round pointy brush) and applied paint with either a buffing or stabbing/stippling motion, and I used relatively thick paint rather than the traditional advice of thinning it down.
Using that method (stabbing/stippling with a large soft brush) meant that masking was possible. Admittedly the yellow on the roundel was a bit of a pain (took several layers of Games Workshop Averland Sunset as a base, then a couple of coats of AK Interactive Volcano Yellow to get the tone right.
If anyone is interested in the method, happy to talk about it more, as I've not really seen modellers using this approach.
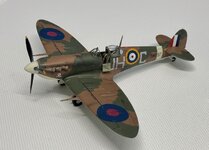
I haven't applied a varnish layer or done any weathering yet, the hairy brush technique means I'm left with a very "clean" looking aircraft (vs applying some gradients or mottling with the airbrush to break it up).
So I'm not really sure how to approach weathering it, any suggestions I'd love to hear them!
Paints used:
I spent a pretty long time and bought an absurd number of paints before settling on the Dark Earth / Dark Green combo, in the end the Dark Earth is just AK Interactive RAF Dark Earth from the Acrylic AIR range, the Dark Green is the RAF Dark Green from the same range, but mixed 1:1 (based on drops rather than volume) with Vallejo US Dark Green. The former was too dark and too green, the latter to pale and light, so just used a mix. The underside is also the AK RAF Sky, but compared to my imagination it was too dark, so I lightened it 1:1 (drops not volume) with Pro Acryl Bold Titanium White. Blue on Roundels is Vallejo Game Colour Imperial Blue (just had it lying around, but it's a really good match to the decals).
Been a looooong time since I last posted. Many years ago was working on a Zero, then life got in the way, moved house, etc, and it got shelved. It's still sitting on my shelf unfinished unfortunately, I'm scared to remove the masking tape as it has been sitting for years!
Recently got back into it and decided to build a 1/48 Airfix Spitfire that's been sitting on my shelf for a long time.
As something different, I decided to fully paint it with hairy brushes rather than airbrushes, largely due to the difficulty in setting up my airbrush these days and wanting to work on it after I get home from work not really being conducive to airbrushing. So it's more of an experiment than anything.
The roundels, the sky coloured band on the fuselage, and the "no step" lines on the wings were painted with masks and hairy brushes, largely to prove to myself that it's actually possible to do that, I'm pretty happy with how they came out (better than some of the decal came out IMO!).
Being hairy brushed, the model does have a bit of texture to it, but it's so subtle that I struggled to capture it in a photo, though on a sunny day looking up close I can see it. I tried to avoid brush streaks by using large soft brushes (think make up brushes rather than your typical round pointy brush) and applied paint with either a buffing or stabbing/stippling motion, and I used relatively thick paint rather than the traditional advice of thinning it down.
Using that method (stabbing/stippling with a large soft brush) meant that masking was possible. Admittedly the yellow on the roundel was a bit of a pain (took several layers of Games Workshop Averland Sunset as a base, then a couple of coats of AK Interactive Volcano Yellow to get the tone right.
If anyone is interested in the method, happy to talk about it more, as I've not really seen modellers using this approach.
I haven't applied a varnish layer or done any weathering yet, the hairy brush technique means I'm left with a very "clean" looking aircraft (vs applying some gradients or mottling with the airbrush to break it up).
So I'm not really sure how to approach weathering it, any suggestions I'd love to hear them!
Paints used:
I spent a pretty long time and bought an absurd number of paints before settling on the Dark Earth / Dark Green combo, in the end the Dark Earth is just AK Interactive RAF Dark Earth from the Acrylic AIR range, the Dark Green is the RAF Dark Green from the same range, but mixed 1:1 (based on drops rather than volume) with Vallejo US Dark Green. The former was too dark and too green, the latter to pale and light, so just used a mix. The underside is also the AK RAF Sky, but compared to my imagination it was too dark, so I lightened it 1:1 (drops not volume) with Pro Acryl Bold Titanium White. Blue on Roundels is Vallejo Game Colour Imperial Blue (just had it lying around, but it's a really good match to the decals).
")